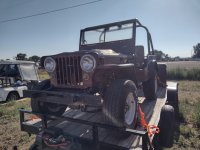
'wittle 'wesistor (Mini Jeep)

Functional Artist

Well-known member
Messages
4,410
Reaction score
1,692
Location
Toledo, Ohio
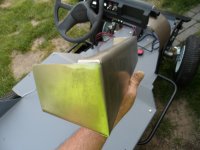
I used CAD to fab up a lower windshield/back of the dash panel ;)
SAM_8175.JPG
Another view
SAM_8176.JPG
Then, probably trim the ends off, to follow the contours of the dash
SAM_8177.JPG
Used the CAD template to transfer the pattern, to some 18g. steel
SAM_8182.JPG
Kinda like this
SAM_8184.JPG
Then, cut 'er out
SAM_8191.JPG
Then, did some bendin'
SAM_8194.JPG
Had to get creative with the clamping, for some of the bends :cheers2:
SAM_8197.JPG
...& the ends too
SAM_8204.JPG
It turned out lookin' like this :thumbsup:
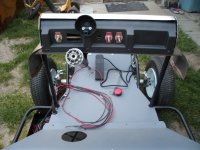
SAM_8206.JPG
 

Functional Artist

Well-known member
Messages
4,410
Reaction score
1,692
Location
Toledo, Ohio
I dry fit 'er on the Cowl
SAM_8208.JPG
...& marked the dash contours
SAM_8211.JPG
Trimmer 'er up
...& dry fit 'er again
SAM_8214.JPG
A view from the inside :thumbsup:
SAM_8216.JPG
Still a little work ta do
...but, Ima thinkin' that it's pretty close

Hey Denny,
For a Windshield
...maybe something like this?
SAM_8224.JPG
What you'all think?
SAM_8226.JPG
 

BaconBitRacing

Well-known member
Messages
2,180
Reaction score
1,296
Location
N.C.
I dry fit 'er on the Cowl
View attachment 138754
...& marked the dash contours
View attachment 138755
Trimmer 'er up
...& dry fit 'er again
View attachment 138756
A view from the inside :thumbsup:
View attachment 138757
Still a little work ta do
...but, Ima thinkin' that it's pretty close

Hey Denny,
For a Windshield
...maybe something like this?
View attachment 138758
What you'all think?
View attachment 138759
I’m likin’ it. Maybe a little tall, IMHO. Are you doing just posts, or some form of clear coverage. If you do use some kind of “glass” what would you use? Glass, plexiglass, clear plastic, etc.
 

Denny

Canned Monster
Messages
8,477
Reaction score
4,710
Location
Mayberry, Indiana
The hinges bolted to the sides of the cowl so you might need to make it wider. As for windshield height, size it to fit the jeep not you. You don’t want it to look stupid, just complete. I’m not trying to criticize, just to help it look correct and cool. Kevin I think you’re doing a great job so far. Just needs a gas engine instead of electric.
 

Functional Artist

Well-known member
Messages
4,410
Reaction score
1,692
Location
Toledo, Ohio
I’m likin’ it. Maybe a little tall, IMHO. Are you doing just posts, or some form of clear coverage. If you do use some kind of “glass” what would you use? Glass, plexiglass, clear plastic, etc.
Thanks!
If I install a windshield, it'll probably be something like Plexiglas or Lexan
The hinges bolted to the sides of the cowl so you might need to make it wider. As for windshield height, size it to fit the jeep not you. You don’t want it to look stupid, just complete. I’m not trying to criticize, just to help it look correct and cool. Kevin I think you’re doing a great job so far. Just needs a gas engine instead of electric.
Thanks! (Um...I think) :devil2::innocent:

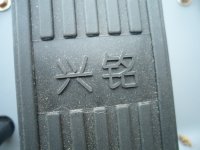
Hey what's up with that "gas" pedal? :huh:
...that's not part of that pedal set up, that I saw earlier in the thread

Well, Ima glad you asked :thumbsup:

I dunno, I just wasn't "feelin' it":mad2:

So, I was lookin' around & found this guy ;)
SAM_8147.JPG
It bolts down good-n-sturdy
...& seems pretty robust :cheers2:
SAM_8219.JPG
Ima thinkin' that Chinese symbols musta means "GO" :unsure:
SAM_8148.JPG
 

Functional Artist

Well-known member
Messages
4,410
Reaction score
1,692
Location
Toledo, Ohio
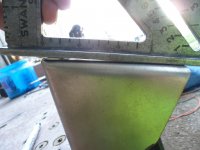
I did a bit more bodywork on the lower windshield/back of dash panel
...'cause it wasn't sit too flat :huh:
SAM_8229.JPG
So, I marked 'em where they were overlapping
SAM_8227.JPG
...& made a couple of small cuts
SAM_8230.JPG
Yup, that looks (& fits) much better :thumbsup:
SAM_8233.JPG
I cut a hole (& slot) to mount a rubber grommet & run the wiring harness up thru the Cowl
...then, cleaned 'em up (the Cowl & the back of dash panel) & got 'em "in primer" :cheers2:
 

Functional Artist

Well-known member
Messages
4,410
Reaction score
1,692
Location
Toledo, Ohio
Nice work. Do you think you’ll make Jeep fest? I’m not sure when that even is…
Thanks! :cheers2:

IIRC our Jeep Fest is in late August
...so, yup, we should be good :thumbsup:

Ima still hookin' stuff up
...but, Ima thinkin' maybe could do a test drive today :2guns:

Also, I got a call friday eve
...the steel for the body panels is ready
...so, I'll pick 'em up tomorrow (movin' right along):sifone:
 

BaconBitRacing

Well-known member
Messages
2,180
Reaction score
1,296
Location
N.C.
Thanks! :cheers2:

IIRC our Jeep Fest is in late August
...so, yup, we should be good :thumbsup:

Ima still hookin' stuff up
...but, Ima thinkin' maybe could do a test drive today :2guns:

Also, I got a call friday eve
...the steel for the body panels is ready
...so, I'll pick 'em up tomorrow (movin' right along):sifone:
I trust you’ll get test drive video. :devil2::innocent:
Soon ‘nuff you gonna be the coolest “kid” on the block with that Jeep. :auto:
 

Functional Artist

Well-known member
Messages
4,410
Reaction score
1,692
Location
Toledo, Ohio
I trust you’ll get test drive video. :devil2::innocent:
Soon ‘nuff you gonna be the coolest “kid” on the block with that Jeep. :auto:
Maybe...:unsure:I haven't done any videos since last fall :huh:
...when, I went on a Lithium battery dis-assembly, re-arranging cells & re-assembling & then, testing adventure :thumbsup:

Here is a video of a 60V15Ah Lithium battery pack that I built :sifone:
...& tested on my Mini-Aerial Atom kart :cheers2:
 

Functional Artist

Well-known member
Messages
4,410
Reaction score
1,692
Location
Toledo, Ohio
So where is the jeap test drive?
Well, Ima still hookin' stuff up :cheers2:

Throttle wiring issue(s)

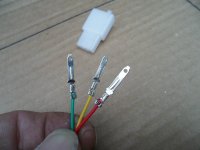
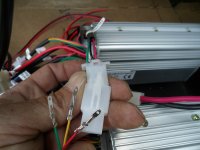
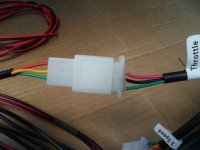
The electronic throttle pedal has (3) wires
...but, the plug is different
...& the wire colors are different too :huh:
SAM_8239.JPG
SAM_8242.JPG
The SC(s) came with the plug & mating terminals for connecting the throttle
SAM_8244.JPG
Terminals installed
...but, as you can see the wires are: Red, Green & Yellow
SAM_8247.JPG
...& the throttle wires on the SC(s) are: Red-Pos(5V+), Black Neg (-) & Green (signal)
SAM_8248.JPG
I would think Red to Red, Black to Yellow & Green to Green
...but, lets see if we can be (more) sure(er) ;)

So, I did some checkin' with the InterWebs
...& yup, it looks like Red is (+) Yellow is (-) & Green is ADC (signal)
SAM_8250.JPG
...so, I hooked 'em up, as such :2guns:
SAM_8255.JPG
 

Functional Artist

Well-known member
Messages
4,410
Reaction score
1,692
Location
Toledo, Ohio
On/Off switch wiring
Red/Black is the "power switch" for SC #1
...& Green/White is for SC #2
SAM_8256.JPG
...& connected to the switch :thumbsup:
SAM_8257.JPG
* Before connecting the switch(es), I ran the harness thru another rubber (also slidable) grommet, ta bring it up thru the Cowl ;)
SAM_8261.JPG
The On/Off, Forward Reverse & Head Light switches are all connected, labeled & ready for installation, into the dash board :cheers2:
SAM_8262.JPG
 

Functional Artist

Well-known member
Messages
4,410
Reaction score
1,692
Location
Toledo, Ohio
Still cleaning up (wife insisted)
...so, I took the power washer apart (had ta be done) ;)
SAM_8277.JPG
Dismantled
SAM_8279.JPG
See honey, it's gone (kinda) :innocent:

Then went thru/cleaned up some wood scraps
...& before I knew it, I was building a door shelf :huh:
Before
SAM_8265.JPG
After
SAM_8268.JPG
But, while I wasa doin' that, I broke the "bit" off in my impact driver :ack2::mad2:
SAM_8278.JPG
So then, I had ta do some "work" on it
Drill out
SAM_8282.JPG
Extraction
SAM_8285.JPG
Culprit
SAM_8287.JPG
Back in Business :2guns:
SAM_8290.JPG
Well, there went most of that day :surrender:
 

G.W

Well-known member
Messages
669
Reaction score
447
Location
Nyssa Oregon
If ya ever need a weird measurement just shoot me a message. I've got a 1948 willys. Also don't forget the tool box under the passenger seat that hinges forward to get into said tool box (it is also a quick way to remove the seat)
 

Functional Artist

Well-known member
Messages
4,410
Reaction score
1,692
Location
Toledo, Ohio
If ya ever need a weird measurement just shoot me a message. I've got a 1948 willys. Also don't forget the tool box under the passenger seat that hinges forward to get into said tool box (it is also a quick way to remove the seat)
Howdy & :welcome2:

Kool! & Thanks! :thumbsup:
...some pics would be kool

Like especially of where the front fenders & grille interact
...& also, where the "corners" curve around, in the rear :cheers2:

I'll be pickin' up the steel for the body later today :)
 
  • Like
Reactions: G.W

G.W

Well-known member
Messages
669
Reaction score
447
Location
Nyssa Oregon
Howdy & :welcome2:

Kool! & Thanks! :thumbsup:
...some pics would be kool

Like especially of where the front fenders & grille interact
...& also, where the "corners" curve around, in the rear :cheers2:

I'll be pickin' up the steel for the body later today :)
Sure thing. I'll get you some picks when I get off work. I've got the hard tip on it right now. Here's a few pics I have
 

Attachments

  • IMG_20220705_130658901.jpg
    IMG_20220705_130658901.jpg
    2.5 MB · Views: 3
  • IMG_20220814_181155734_HDR.jpg
    IMG_20220814_181155734_HDR.jpg
    1.4 MB · Views: 3
Top