Grand Daddyish build

TNThomas

Well-known member
Messages
386
Reaction score
369
Location
Washington
Have you looked into Muggy Weld? Your pressing idea was doomed to failure I hate to say because you were not working with enough force. Nor did you have a tight enough tooling. But if you worked it slowly enough with hammers it would have actually been faster. Sorry to be a Denny Downer.
What sorcery is this! Low temp Aluminum weld rods! Thats pretty cool, ive seen those, but always assumed they were some sort of TIG welding rod. Thanks for the info! I might have to pick some up and give it a shot I always try to learn a few new skills/tools on projects. I actually have a mini Aluminum preheating setup for my Aluminum bullet molds, so that could be helpful. Yea, usually my plans go well, but sometimes not! Good to fail sometimes :) Helps future me be less dumb, haha.
 

TNThomas

Well-known member
Messages
386
Reaction score
369
Location
Washington
Going to give the low temp aluminum weld rods a shot later tonight:
 

Attachments

  • 20221126_143514.jpg
    20221126_143514.jpg
    3.4 MB · Views: 5
  • 20221126_143523.jpg
    20221126_143523.jpg
    1.6 MB · Views: 5

TNThomas

Well-known member
Messages
386
Reaction score
369
Location
Washington
Good enough! Thanks for the heads up about these sticks Denny!
 

Attachments

  • 20221127_141020.jpg
    20221127_141020.jpg
    2.7 MB · Views: 6
  • 20221127_141030.jpg
    20221127_141030.jpg
    1.3 MB · Views: 6

TNThomas

Well-known member
Messages
386
Reaction score
369
Location
Washington
Glad they worked for you! They looked kind of slick always wanted to try them.
Definitely pretty cool, I am surprised they are not more common/popular. Stronger than JB weld, and better with high temps. I set my aluminum on a hot plate turned on high, and then primarily used a little butane micro torch to focus on a specific spot. The sticks literally won't come close to melting till the surface is at the correct temp. If you mess up, you can reheat the piece and re-liquify the error. Pretty cool overall. My biggest mistake was not letting my first piece cool before moving it. Unlike steel welding that almost instantly cools to a solid, this stuff is still a sort of liquid/soft material for a few minutes. It is tough to heat aluminum up enough since it dissipates heat so fast. I had to keep my garage door shut as the draft was enough to cool my piece down too much (wore a respirator). The hot plate was a big help.
 

TNThomas

Well-known member
Messages
386
Reaction score
369
Location
Washington
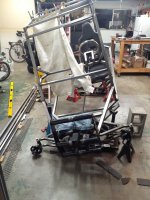
Finally knocked her off the stands. Woops. Suspension works!

Working in the dash. The passenger side will have diamond plate on the far side, that way the closest bar to the passenger will act as a grab bar.
 

Attachments

  • 20221128_235025.jpg
    20221128_235025.jpg
    2 MB · Views: 15
  • 20221128_234229.jpg
    20221128_234229.jpg
    3.1 MB · Views: 15
  • 20221128_220854.jpg
    20221128_220854.jpg
    1.8 MB · Views: 15

Denny

Canned Monster
Messages
8,477
Reaction score
4,710
Location
Mayberry, Indiana
I like the ones with the dancing girls! Can’t get that in the garage! Well you can but it’s expensive and causes a whole other set of problems. :mad2: Even more expensive ones.
 

TNThomas

Well-known member
Messages
386
Reaction score
369
Location
Washington
Ok thats it, not doing the 6 wheel setup. I called and canceled parts I had on order for it. Too much extra time, money, weight, too long, and too complex for now. I dont think ill be using the diffs I bought either, just going to finish her out nice and simple with a single solid rear axle. I figured out a way to essentially mount the outer axle bearings within an inch of tbe hubs, so that should solve my bent axle worries. Got the mounts and first bar on for the swingarm.
 

Attachments

  • 20221212_223541.jpg
    20221212_223541.jpg
    4.2 MB · Views: 5

TNThomas

Well-known member
Messages
386
Reaction score
369
Location
Washington
On another "learning" note, I found a potential great rear suspension upgrade after chatting with a dune buggy builder on a 670cc forum. From my pick above, instead of attaching 2 connection points, he runs one big heim joint. And on the rear he uses a "sway bar" called a "panhard bar" to keep it steady. Essentially this allows the rear swingarm to pivot up and downz but also to rotate on the heim azis (within shock tolerances). This would be an easy upgtade for me in the future if needed as my frame design would totally work with that system. Not planning on doing it now, but maybe down the road. Hopeing to have the swingarm built and tie rods made within the next two weeks.
 

Attachments

  • 20221216_020802.jpg
    20221216_020802.jpg
    31.5 KB · Views: 16

TNThomas

Well-known member
Messages
386
Reaction score
369
Location
Washington
It might look cool but a lot of bad things are going on in that last picture of the white kart.
I see a few as well, initially it's the stacked wheel spacers, and exhaust, and technically he is running the wrong Drive cvt, that one is rated for higher RPMs of snowmobile sleds. What else are you seeing?
 

MTScott

Active member
Messages
146
Reaction score
128
Location
Montana
I see a few as well, initially it's the stacked wheel spacers, and exhaust, and technically he is running the wrong Drive cvt, that one is rated for higher RPMs of snowmobile sleds. What else are you seeing?

Well you did say it came from the "670cc" forum.... is he actually running the Skidoo 670cc snowmobile engine (vs the predator 670)? Those things are screamers.

EDIT: Eh, nevermind, I see a valve cover.
 

Denny

Canned Monster
Messages
8,477
Reaction score
4,710
Location
Mayberry, Indiana
The angle and length of the pan hard bar. Both way too much. Not enough shock angle. I kinda stopped looking after I got that far.
 

TNThomas

Well-known member
Messages
386
Reaction score
369
Location
Washington
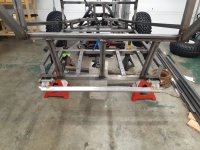
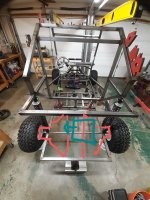
Got the base of the swingarm done. I went a little long so as to act like a rear bumper. Im sure my kids will drive into me at some point. Im going to mount the shocks somewhere close to the red position, and likely kick my axle a few inxhes further back. Also, im going to build a small box that essentially mounts an outer bearing inside the wheel, 1/4" to 1/2" ish away from the hub. Just for peace of mind to not bend this thing. Downside is ill have to slide the axle horizontally to get ot in/out, but hopefully ill never have to! Also, the driven Polaris cvt seems to fit nicely. The belt it came with looks like it will work. If its grabbing at idle ill have go 1/16" narrower. But I have blenty of building to do...
 

Attachments

  • 20221221_194533.jpg
    20221221_194533.jpg
    3 MB · Views: 12
  • 20221221_194805.jpg
    20221221_194805.jpg
    1.3 MB · Views: 12
  • 20221218_221758.jpg
    20221218_221758.jpg
    3.3 MB · Views: 13

TNThomas

Well-known member
Messages
386
Reaction score
369
Location
Washington
Rear shocks on. Drilled out 1/2" spindle brackets to 9/16" for the mounting brackets. Swingarm bolts are the same setup, but 5/8".
 

Attachments

  • 20221224_004334.jpg
    20221224_004334.jpg
    3.2 MB · Views: 19
  • 20221224_004625.jpg
    20221224_004625.jpg
    3.3 MB · Views: 19

Denny

Canned Monster
Messages
8,477
Reaction score
4,710
Location
Mayberry, Indiana
Those rear springs and shocks, you’re not going to leave them like that are you? They will be in a bind that way. Not good. Just something to think about.
 
Top