2017 - !Arriba!

Status
Not open for further replies.

Functional Artist

Well-known member
Messages
4,410
Reaction score
1,692
Location
Toledo, Ohio
Did I ever tell ya the story about the guy who took all of his clothes off & sat on a cactus?
...he said "It seemed like a good idea at the time"

Ya, my wife didn't like that explanation either :lolgoku:

I had to try again :thumbsup:
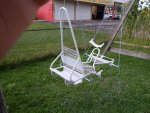
...so, I tried a few runs "in the grass"
(softer landing)

My wife wasn't happy about those...either :ack2:
...alright...alright...I'm done :roflol:

* Hold on to your Hat tests are "officially" over
...done...finito

But, it was fun :2guns:

https://www.youtube.com/watch?v=k9I5fhBZ1zo
 

Functional Artist

Well-known member
Messages
4,410
Reaction score
1,692
Location
Toledo, Ohio
Double checked everything, propped 'er up & made sure that the wheels were off the ground

Flipped
...the circuit breaker "on" (nothing popped or is smokin') :wai:

Turned the left switch "on" (still lookin' good)
...& gave the left thumb throttle a twist
Yup, :thumbsup:

Turned the right switch "on"
...& gave the right thumb throttle a try
Yup, :2guns:

Time for a test drive :cheers2:

https://www.youtube.com/watch?v=WC2EPqBMkJA

Me & the kids rode 'er around for at least 20 min or so before dinner
...then plugged the charger in when done :2guns:

TBH
When I test drove the !Arriba! kart (back in April) with the (2) ZY1020 motors
...I was quite disappointed :huh:

The kart seemed a lot more "peppy" (last fall) when I test drove it with just the (1) MY1020 motor

"Jumpin' to conclusions", I immediately blamed the ZY motor's (being clones, I guess)

But, now I have come to find out that (1) battery
...or possibly (2) of the batteries, that I was using, had/was "goin' bad" :ack2:

I think, that's why I was so surprised, when It "poped a wheelie" so violently, when I did the first "Hold on to your Hat" test :smiley_omg:

I wasn't expecting those ZY motors to be so powerful
...compared to my earlier test drive when they didn't seem very "peppy", at all

So, I'ma gonna re-install the (2) speed controllers & see how "peppy" she is with a fresh battery pack :thumbsup:
 

Functional Artist

Well-known member
Messages
4,410
Reaction score
1,692
Location
Toledo, Ohio
This kart was specifically designed to "pop wheelies" :thumbsup:
...super short wheel base (~28")
...powerful, dual ZY1020 48V 1,000W motors
...even, weight biased, by mounting the battery pack behind the rear axle :cheers2:

But, it didn't perform as designed :huh:
...come to find out, due to unforeseen circumstances (a bad cell or 2 in the battery pack) :ack2:

So, lets try this again
...(2) fresh motors/controllers, from Alfa Wheels (~$100.00 ea./$200.00 total)
…& (4) fresh 12V 12AH batteries, from Mighty Max (~$25.00 ea./$100.00 total)

First, we gotta get rid of these dinky sprockets & install some #35 "Power Curve" sprockets
…& can't forget the stickers

Then got 'em mounted & adjusted :2guns:

Next up, is connectin' the electronics :idea2:
 

Attachments

  • SAM_1155.jpg
    SAM_1155.jpg
    401.9 KB · Views: 2
  • SAM_1162.jpg
    SAM_1162.jpg
    251.1 KB · Views: 2
  • SAM_1167.jpg
    SAM_1167.jpg
    199.1 KB · Views: 2
  • SAM_1168.jpg
    SAM_1168.jpg
    443 KB · Views: 2
  • SAM_1172.jpg
    SAM_1172.jpg
    344.9 KB · Views: 3
  • SAM_1173.jpg
    SAM_1173.jpg
    328 KB · Views: 2

Functional Artist

Well-known member
Messages
4,410
Reaction score
1,692
Location
Toledo, Ohio
First, I had to crimp some terminals on to the on/off switch wires
...(2) for the left motor & (2) for the right

Made a new "hatch cover" for the back
...a piece of plastic from the back of an old TV :thumbsup:
&
Cut in a fuse holder & a covered charge port
...mounted both speed controllers
...then. mounted the whole unit on the kart :cheers2:
 

Attachments

  • SAM_1183.jpg
    SAM_1183.jpg
    166.6 KB · Views: 2
  • SAM_1181.jpg
    SAM_1181.jpg
    349.7 KB · Views: 2
  • SAM_1178.jpg
    SAM_1178.jpg
    284.3 KB · Views: 3
  • SAM_1190.jpg
    SAM_1190.jpg
    164 KB · Views: 2
  • SAM_1194.jpg
    SAM_1194.jpg
    179.8 KB · Views: 4
  • SAM_1206.jpg
    SAM_1206.jpg
    374.8 KB · Views: 2
  • SAM_1205.jpg
    SAM_1205.jpg
    326.3 KB · Views: 2
  • SAM_1199.jpg
    SAM_1199.jpg
    387.5 KB · Views: 4
  • SAM_1197.jpg
    SAM_1197.jpg
    220.4 KB · Views: 2
  • SAM_1195.jpg
    SAM_1195.jpg
    149.1 KB · Views: 3

Functional Artist

Well-known member
Messages
4,410
Reaction score
1,692
Location
Toledo, Ohio
Then, I dropped (4) 12V 12AH SLA's in the battery box & finished connecting the wiring :thumbsup:
...battery to controller
...controller to motor
...on/off switches to controller
...& the charge port

Bolted the rear hatch cover down
…& now, were ready for a "more powerful" test run :cheers2:
 

Attachments

  • SAM_1211.jpg
    SAM_1211.jpg
    409.9 KB · Views: 2
  • SAM_1212.jpg
    SAM_1212.jpg
    362 KB · Views: 2
  • SAM_1208.jpg
    SAM_1208.jpg
    372.1 KB · Views: 2

gegcorp2012

Active member
Messages
491
Reaction score
62
Location
Alabama
Nice work on your electric kart.

I watched the wheelie video (and love riding wheelies), looks really fun !

A couple of times you can see the driver has the natural urge to "steer" during the wheelie because of the uneven terrain.

Does the steering have any electronic feedback to the motors ?

Sent from my SM-J700T using Tapatalk
 

Functional Artist

Well-known member
Messages
4,410
Reaction score
1,692
Location
Toledo, Ohio
Nice work on your electric kart.

I watched the wheelie video (and love riding wheelies), looks really fun !

A couple of times you can see the driver has the natural urge to "steer" during the wheelie because of the uneven terrain.

Does the steering have any electronic feedback to the motors?

Sent from my SM-J700T using Tapatalk

"Does the steering have any electronic feedback to the motors?"

Kinda, there are individual thumb throttles.

The left one controls the left motor
…& the right one controls the right

I guess natural instincts "kick in"
...because I wasn't doing it intentionally :smiley_omg:
 

Functional Artist

Well-known member
Messages
4,410
Reaction score
1,692
Location
Toledo, Ohio
Here is the video of my first test ride with the fresh motor & batteries. :thumbsup:

The whole test ride was ~24 min :wai: & still didn't deplete the batteries. :2guns:

I mainly wanted to see how long of a run time I could get out of these little 12V 12AH SLA batteries
...but, I edited the video down to ~12 min (as to not be too boring) :cheers2:

https://www.youtube.com/watch?v=eLCojNpCPu0
 

landuse

Moderator
Staff member
Messages
18,626
Reaction score
220
Location
Pietermaritzburg, South Africa
Here is the video of my first test ride with the fresh motor & batteries. :thumbsup:

The whole test ride was ~24 min :wai: & still didn't deplete the batteries. :2guns:

I mainly wanted to see how long of a run time I could get out of these little 12V 12AH SLA batteries
...but, I edited the video down to ~12 min (as to not be too boring) :cheers2:

Success!!!!!
 

Functional Artist

Well-known member
Messages
4,410
Reaction score
1,692
Location
Toledo, Ohio
!Arriba! needs a fresh paint job :thumbsup:

The rattle can gold looks kool
...but, it scratches really easily
…the wheelie bar is "bare metal"
…& she has some "road rash" from the "flip" last summer :smiley_omg:
(wasn't really a flip but, more like a flop) :ack2:
 

Attachments

  • SAM_2842.jpg
    SAM_2842.jpg
    332.8 KB · Views: 2
  • SAM_2841.jpg
    SAM_2841.jpg
    337.8 KB · Views: 3
  • SAM_2840.jpg
    SAM_2840.jpg
    396.2 KB · Views: 2
  • SAM_2839.jpg
    SAM_2839.jpg
    330.2 KB · Views: 2

Functional Artist

Well-known member
Messages
4,410
Reaction score
1,692
Location
Toledo, Ohio
A lot of the gold paint came off
...but, he white primer, that I used previously, seemed to stick to 'er pretty good :thumbsup:

So, after a bunch of smoothin', & scuffin' & sandin' (my arm is about to fall off :ack2: )
I gave the whole thing a good coating of the white primer :cheers2:


* Hmmm
I took a break from cleanin' up the main frame on the Atom kart
…& somehow ended up cleanin' up this one :huh:
 

Attachments

  • SAM_2896.jpg
    SAM_2896.jpg
    447.1 KB · Views: 2
  • SAM_2894.jpg
    SAM_2894.jpg
    555.2 KB · Views: 2
  • SAM_2892.jpg
    SAM_2892.jpg
    552.7 KB · Views: 2
  • SAM_2891.jpg
    SAM_2891.jpg
    559.1 KB · Views: 2
  • SAM_2889.jpg
    SAM_2889.jpg
    594.8 KB · Views: 2
  • SAM_2893.jpg
    SAM_2893.jpg
    496.8 KB · Views: 2
  • SAM_2900.jpg
    SAM_2900.jpg
    376.5 KB · Views: 2
  • SAM_2899.jpg
    SAM_2899.jpg
    508 KB · Views: 2

Functional Artist

Well-known member
Messages
4,410
Reaction score
1,692
Location
Toledo, Ohio
I gave the primer a good scuffin'
...& wiped 'er down, with some degreaser :cheers2:

Started off by tipping 'er up on 'er back side
...& giving the underside a coat of gloss black paint. :thumbsup:

Let that dry, (~1 hour) sat 'er down gently
...& then, gave the top side a good-n-glossy coat :2guns:
 

Attachments

  • SAM_2981.jpg
    SAM_2981.jpg
    459 KB · Views: 2
  • SAM_2980.jpg
    SAM_2980.jpg
    456.2 KB · Views: 2
  • SAM_2977.jpg
    SAM_2977.jpg
    472.4 KB · Views: 2
  • SAM_2975.jpg
    SAM_2975.jpg
    392.9 KB · Views: 2
  • SAM_2974.jpg
    SAM_2974.jpg
    436.1 KB · Views: 2
  • SAM_2984.jpg
    SAM_2984.jpg
    370.6 KB · Views: 2
  • SAM_2986.jpg
    SAM_2986.jpg
    323.7 KB · Views: 2

Functional Artist

Well-known member
Messages
4,410
Reaction score
1,692
Location
Toledo, Ohio
Makin' it flip (safely)

Goin' Gold again, cause it looked really kool
...but, for some extra "bling" I gonna try some Gold-to-Green Color Shifting Pearl :thumbsup:
https://www.ebay.com/itm/CX40-Color...e=STRK:MEBIDX:IT&_trksid=p2060353.m2749.l2649

It's the same procedure as the Blue-to-Purple "paint" that I used on Damien & El Mini.

So, I mixed up 16oz. (1 pint) of an automotive type clear
...added ~10g. of the "magic" powders :cool:
…& then, stirred 'er up really, really good :stir:

* Looked kool, while stirring
...but, I didn't see any green :huh:
 

Attachments

  • SAM_2993.jpg
    SAM_2993.jpg
    247.3 KB · Views: 2
  • SAM_2990.jpg
    SAM_2990.jpg
    411.7 KB · Views: 2
  • SAM_2989.jpg
    SAM_2989.jpg
    332.5 KB · Views: 2
  • SAM_2987.jpg
    SAM_2987.jpg
    168.4 KB · Views: 2
  • SAM_2988.jpg
    SAM_2988.jpg
    176 KB · Views: 2
  • SAM_2994.jpg
    SAM_2994.jpg
    232.8 KB · Views: 3
  • SAM_2995.jpg
    SAM_2995.jpg
    303.8 KB · Views: 3

Functional Artist

Well-known member
Messages
4,410
Reaction score
1,692
Location
Toledo, Ohio
During disassembly, I noticed that the sprockets were lookin a bit rough :ack2:

So, I cleaned 'em up (didn't paint or prime 'em, just mainly just degreased 'em)
…& then, hung 'em up

For this one, I broke out my "old" conventional spray gun (added the mixture)
...& layed down a decent coat, of this clear with the "magic powders" in it :thumbsup:


* I painted a couple of plastic bottles gloss black
…& then, made 'em flip too

I'ma keep 'em on the shelf as examples, of this color over gloss black :2guns:
 

Attachments

  • SAM_2996.jpg
    SAM_2996.jpg
    256.3 KB · Views: 2
  • SAM_3002.jpg
    SAM_3002.jpg
    147.3 KB · Views: 2
  • SAM_3000.jpg
    SAM_3000.jpg
    189.3 KB · Views: 2
  • SAM_2999.jpg
    SAM_2999.jpg
    249.3 KB · Views: 2
  • SAM_2998.jpg
    SAM_2998.jpg
    231.9 KB · Views: 2
  • SAM_3004.jpg
    SAM_3004.jpg
    579.8 KB · Views: 2
  • SAM_3005.jpg
    SAM_3005.jpg
    545.3 KB · Views: 2
  • SAM_3009.jpg
    SAM_3009.jpg
    492.2 KB · Views: 2
  • SAM_3012.jpg
    SAM_3012.jpg
    333.5 KB · Views: 2
  • SAM_3015.jpg
    SAM_3015.jpg
    378.8 KB · Views: 2
Status
Not open for further replies.
Top