Dingo Manco Fox 2x5 LXT Torque Converter replacement

Karttekk

Well-known member
Messages
1,836
Reaction score
428
Location
Elizabeth, PA
There should be no reason why your kart wouldn't run properly once it's together. The last step should be installing the belt. Attach your driven pulley on the jackshaft, slip the belt over it, slip the back half or engine side half of the drive pulley on the engine, slip the belt over the crankshaft then attach the outer half of the drive pulley. If you can put the belt on with the drive pulley fully assembled the belt is too big. If you watched the video I sent about measuring for the correct belt you'll see what I mean. Good luck, waiting for the results.
 

madprofessor

"Loose Cannon Creations"
Messages
2,899
Reaction score
888
Location
Jacksonville, Florida
what else can I squeeze out
Ahhhh, what a nicely open question! Here's where some others might say I'm dead wrong, but just speaking generally based on what many folks I've chatted with agree about............... The greatest gains in performance can always be had at the beginning of mods to an engine, and the return-on-investment shrinks smaller and only improves in smaller increments as more is added.
For me personally, gokart, mower, minibike, lawn tractor, whatever, always begins like yoga..........with deep breathing. Cheapest mods for the best improvement; just a hi-flow air filter and the correct adapter for it, and a freer exhaust w/ or w/out a race muffler.
Like yoga, once breathing freely there's room for more effort. Huge gain for a few bucks is a bigger carb jet.
Mods get more expensive and gain less performance from there as you keep going. Generally speaking. Many folks say. I agree with them.
For a tractor used 3 times a year...........deep breathing only, just improve that airflow, downward dog stretching unnecessary.
 

USAMAC

Member
Messages
88
Reaction score
9
Location
NE Georgia
Ahhhh, what a nicely open question! Here's where some others might say I'm dead wrong, but just speaking generally based on what many folks I've chatted with agree about............... The greatest gains in performance can always be had at the beginning of mods to an engine, and the return-on-investment shrinks smaller and only improves in smaller increments as more is added.
For me personally, gokart, mower, minibike, lawn tractor, whatever, always begins like yoga..........with deep breathing. Cheapest mods for the best improvement; just a hi-flow air filter and the correct adapter for it, and a freer exhaust w/ or w/out a race muffler.
Like yoga, once breathing freely there's room for more effort. Huge gain for a few bucks is a bigger carb jet.
Mods get more expensive and gain less performance from there as you keep going. Generally speaking. Many folks say. I agree with them.
For a tractor used 3 times a year...........deep breathing only, just improve that airflow, downward dog stretching unnecessary.
I've done some yoga, but not enough to get all the analogies precisely but I think I get your point. Would you be willing to advice on the proper adapter necessary for my kart to add a high air filter to the stock carb on my predator 212cc? As well as a recommended free-er exhaust? The bigger carb jet I've seen on a lot of YT videos being added and supposedly making big gains, but most people are recommending doing a full stage one and removing the governor inside the case. What's your opinion on removing the governor? Is it worth the trouble?

I want to get the kart back to running without burning belts and trying to go in idle and then I was planning on ordering a kit I can't seem to find right now, I saw a week ago on GPS.. but your route sounds better because it's far more economical.

I'd love to get this stuff going asap and at least get best bang for my buck.. Then maybe later on experiment with upgrading pistons and springs and all that..

Side note, do you mod your mowers etc? Do they really benefit from low budget mods like you're suggesting for the kart?
 
Last edited:

USAMAC

Member
Messages
88
Reaction score
9
Location
NE Georgia
Use an impact wrench to tighten the nuts on both pulleys once everything is setup properly and always lift the rear of the kart off the ground before you start it. Be ready to shut the engine off in the event things get ugly.
Can't believe I forgot to comment on this part! First time I cranked it up with the first belt I had ordered, I walked over and just tapped the throttle while standing next to it, and ended up chasing it down the hill before I slammed the break peddle just before we ended up in the lake.. My 8yr old yelling Daddy the whole time behind me! The lake is down a 10ft drop right now with the water being out right now lol

Long story to say, this lesson was well learned and your tip is so very much appreciated! I will definitely do this from now on!
 

madprofessor

"Loose Cannon Creations"
Messages
2,899
Reaction score
888
Location
Jacksonville, Florida
We were just discussing on some thread here about cheap remote kill switches. The interesting one claimed a keyfob range of 110 yards for $24.
I'm getting one, will let y'all know how it works out. Meanwhile, back at the ranch............
to shut the engine off in the event things get ugly
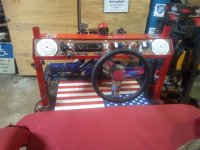
Check out this dashboard picture................#1: You can't see, but my OEM on/off switch on the Predator 212 is still there and still works.............
#2: See on the left that pair of black ignition keys in the ignition switch?.....................#3: On the right between the 2 chrome dispenser spouts for Cuervo Gold and O.J., see that big red 40mm slapswitch?...................1PC 22mm Twist Release Emergency Stop Mark Mushroom 40mm Push Button Switch 608307765884 | eBay................that's for any panicked passenger who wants off of Mr. Toad's Wild Ride.................#4: The aforementioned remote killer will be added ASAP...................Soooooo, feeling inspired to do as Karttekk suggested? I hope so, for your benefit. Could only help.
 

Attachments

  • IMG_20210815_152558_1CS.jpg
    IMG_20210815_152558_1CS.jpg
    1.4 MB · Views: 2

Karttekk

Well-known member
Messages
1,836
Reaction score
428
Location
Elizabeth, PA
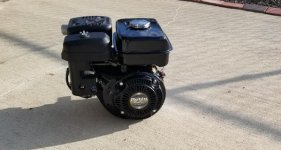
I just finished up a Robin Subaru engine that was on an old Manco kart I picked up. Half of a carburetor, no fuel tank, no governor lever or springs, a chunk of wood for the recoil handle, no muffler, took on a little water from sitting. I pulled the plug, shot some good CRC penetrating oil and a little motor oil in the cylinder, got a breaker bar & socket on the flywheel nut and rocked it back and forth with light pressure to see if it it would turn over. A little crunchy but it started to rotate normally after some nudging. Figured I had nothing to lose by rounding up the missing parts, changing the oil, putting a new plug in it. There was no cut off wire coming out of the block, only the switch on the housing. Installed that and made sure the kill switch worked. Good thing. Thing fired up after the 3rd pull and went wide open. If it weren't for that kill switch working I'd be looking for the connecting rod. I didn't have the governor lever tight enough on the governor shaft coming out of the block. Thinking it will be fine, ran fine since then.
 

Attachments

  • Refurb_Robin.jpg
    Refurb_Robin.jpg
    79.3 KB · Views: 3

USAMAC

Member
Messages
88
Reaction score
9
Location
NE Georgia
I just finished up a Robin Subaru engine that was on an old Manco kart I picked up.

Cool, this makes me want to pick up an old one to play with and see if I can get it running! So the Subaru is the original motor that came on that kart?
 

USAMAC

Member
Messages
88
Reaction score
9
Location
NE Georgia
We were just discussing on some thread here about cheap remote kill switches. The interesting one claimed a keyfob range of 110 yards for $24.
I'm getting one, will let y'all know how it works out. Meanwhile, back at the ranch............

Check out this dashboard picture................#1: You can't see, but my OEM on/off switch on the Predator 212 is still there and still works.............
#2: See on the left that pair of black ignition keys in the ignition switch?.....................#3: On the right between the 2 chrome dispenser spouts for Cuervo Gold and O.J., see that big red 40mm slapswitch?...................1PC 22mm Twist Release Emergency Stop Mark Mushroom 40mm Push Button Switch 608307765884 | eBay................that's for any panicked passenger who wants off of Mr. Toad's Wild Ride.................#4: The aforementioned remote killer will be added ASAP...................Soooooo, feeling inspired to do as Karttekk suggested? I hope so, for your benefit. Could only help.
I think that's getting into another level of modifying karts that will be a little while before I start exploring with. Would be fancy enough for me to have key' start on it and a battery for accessorizing with things like Lights lol But from what I've read, that's where it becomes beneficial to get the 420cc

Did you have any recommendations for the budget friendly upgrades that would have a lot of gain for the price or do pretty much any of the places we've discussed here meet the criteria?
 

Karttekk

Well-known member
Messages
1,836
Reaction score
428
Location
Elizabeth, PA
Yes, the kart shipped with that engine. Typical things younger riders do to these engines. They remove the mufflers and put straight pipes on, they remove the governor springs and levers without removing the governor gears from them, install huge cone style air filters. Nothing wrong with trying to "soup up" the engine but if not done correctly things don't always turn out so well. These old Mancos either shipped with Robin Subaru engines, Briggs or Tecumseh engines. Tecumseh is now LCT and Robin parts were too expensive, that's why you see so many Predators out there. The Predator is a decent engine, their Hemi version is popular. They have cast iron sleeves in the cylinders and ball bearings supporting the crankshafts, pretty robust for what they cost. I try & go with something different like Carroll Stream or Lifan just to change things up.
 

Denny

Canned Monster
Messages
8,528
Reaction score
4,762
Location
Mayberry, Indiana
My theory is make it work stock first to make sure everything is right. Then modify one thing at a time and make sure that is right before you do the next thing. This way when you have a problem you only have one thing to trouble shoot instead of five different thing to figure out.
 

madprofessor

"Loose Cannon Creations"
Messages
2,899
Reaction score
888
Location
Jacksonville, Florida
If it weren't for that kill switch working I'd be looking for the connecting rod.

...............and but for that killswitch you might have found the connecting rod. Might have found it imbedded up your asspen tumble cushion.
I don't think any majority of people have any idea how many mph. those little parts are moving, or that they become oversized ragged bullets when it all goes bad. Quick math on a 6" stock cast iron flywheel somebody decides to run ungoverned at 7,000 rpm's has the big ragged chunks of the outer sides exploding at 187 mph when it goes through the flimsy housing and disappears up your tumble cushion.
 

USAMAC

Member
Messages
88
Reaction score
9
Location
NE Georgia
There should be a drive clutch on the engine, a driven clutch on the jackshaft (which I don't see) and a belt between the two. There should also be a 9 tooth sprocket on the jackshaft that aligns with the drive sprocket on the axle with a chain on both sprockets. If you don't have a jackshaft, you'll need one of these: https://www.bmikarts.com/Clutch-Mount-with-Jackshaft_p_1129.html. In order to use a #5959 belt, the jackshaft should sit about an inch high on the engine mount plate.

Refer to these pictures to further understand what you'll need.
First update:

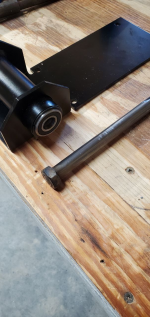
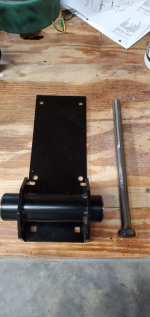
So I got the Clutch Mount with Jackshaft today from BMI. Before I mess something up, I thought I'd get some incite here on the proper way of inserting the shaft. Should I remove the bearings and put them on the shaft and then install shaft and 1 bearing and then slide the 2nd bearing onto the clutch side or should the shaft slide right in with the bearings on the mount?

I am sure it would be ideal to grease everything up first, any specific recommendations or just some motor oil? I do have some Dry Moly Lube and Chain Wax coming in sometime today.

Edite: Pics

1632258228445.png

1632258244119.png
 

Karttekk

Well-known member
Messages
1,836
Reaction score
428
Location
Elizabeth, PA
I would ask the vendor first, that way if something goes sideways while putting it together you can blame them. Probably a little wheel bearing grease will allow it to slip in pretty easily.
 

USAMAC

Member
Messages
88
Reaction score
9
Location
NE Georgia
I would ask the vendor first, that way if something goes sideways while putting it together you can blame them. Probably a little wheel bearing grease will allow it to slip in pretty easily.
The thought crossed my mind as well to ask them. Thanks, I'll shoot them an email
 

madprofessor

"Loose Cannon Creations"
Messages
2,899
Reaction score
888
Location
Jacksonville, Florida
Chain Wax chain lube or any other chain lube is for chains. Use either grease or oil to slide shafts and bearings together, I like grease myself because it doesn't run off like oil. Do not use any dry lube on those bearings, and don't use any wet lubes on the pulleys. Mount the bearing plate, slide the shaft into it. After everything's assembled and locked down, standard good practices dictate wiping away excessive greases, oils, or lubes to prevent attracting and holding dirt. Dry lube your pulleys.
 

Denny

Canned Monster
Messages
8,528
Reaction score
4,762
Location
Mayberry, Indiana
On a shaft like that what I would do is gently knock the bearings out. Remove the seal from the side that faces inboard on both bearings and before reinstalling them I would drill and tap the center of the tube for a grease zerk. Clean out all shavings from the tube and install zerk. Then get a tube of marine grease and load it up in the old grease gun. Reinstall the bearings open side inboard. Then pump that sucker full of grease until it starts to come out the center of the bearings where the shaft goes. Install the shaft and give it about 4 more pumps after the shaft is installed.
Now what that will do is make sure the bearings are well greased all the time and seal it all up to help keep water and fine dust out of the bearings. It will also help keep the bearings cooler always having a fresh supply of grease. Keeping them cleaner and dryer longer increasing their life. Then every 10 hours or after riding in mud or water just give it a pump or two of fresh grease. Water proof grease is usually green in color and available where ever grease is sold. Just one of my little tricks. Rarely lost a bearing in 40 years.
 

Karttekk

Well-known member
Messages
1,836
Reaction score
428
Location
Elizabeth, PA
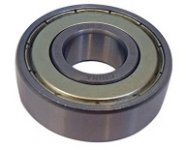
I'm not so sure I'd knock the bearings out. First, there's the chance of ruining the pressed in bearings. Second, those are sealed bearings. Adding grease and fittings won't help because they're encased so no water or grime gets in them plus adding grease will attract dirt. The inner race rides on the jackshaft "bolt." A slight bit of lube to help slide the shaft in is all you need if that. If you look at the bearing, it's sealed. Adding grease won't accomplish anything in my view.

sealed bearing.jpg
 

Denny

Canned Monster
Messages
8,528
Reaction score
4,762
Location
Mayberry, Indiana
You may need glasses then. If you reread my post you will see I said to remove the seal on the inner facing side of the bearing. It does a lot of good. Remember that is the shaft with the highest speed next to the crankshaft. With a good supply of grease the bearings are much happier. The extra supply of grease will also help seal to keep out contamination. Everytime you add grease it is like repacking the bearings.
One other advantage also is you get to clean out the boiled yack grease the bearings come with from the Chinese factory.
 

Karttekk

Well-known member
Messages
1,836
Reaction score
428
Location
Elizabeth, PA
You may need glasses then. If you reread my post you will see I said to remove the seal on the inner facing side of the bearing. It does a lot of good. Remember that is the shaft with the highest speed next to the crankshaft. With a good supply of grease the bearings are much happier. The extra supply of grease will also help seal to keep out contamination. Everytime you add grease it is like repacking the bearings.
One other advantage also is you get to clean out the boiled yack grease the bearings come with from the Chinese factory.
Those are actually high speed bearings, designed to work in situations like this. Personally I wouldn't chance destroying brand new bearings under warranty.

  • The clutch mount has (2) 5/8" high speed bearings pressed in.
 
Top