My first build

Status
Not open for further replies.

jamyers

Well-known member
Messages
1,444
Reaction score
47
Location
Buffalo Gap, TX
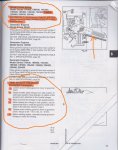
In the below pic, I'm wondering if tab "1" contacts "2" when you close the throttle all the way, which should kill the engine. If so, you could bend or cut off "1", then hook your remote kill switch to "2" easily (after reconnecting those wires above)

If you haven't already, you'll want to loosen wingnut "3" just enough for the throttle to move freely up & down.

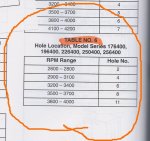
"4" and "5" are your dual governor springs, mine only has "5". I believe "4" is for a governed idle speed. I'll post and scan how to adjust the governor in a little while, along with the table on which "5" hole gives you which "Top No Load Speed".

"6" is the governor shaft, you'll need to loosen that nut/bolt to do the static governor adjustment (rarely out of whack but worth checking.
 

jamyers

Well-known member
Messages
1,444
Reaction score
47
Location
Buffalo Gap, TX
You adjust the governor in the following order:
(1) Set/Confirm the Static Adjustment
(2) Pick your high rpm range and set the spring in the corresponding hole
(3) Set the Governed Idle, if any. Note that this is also when/where you adjust the carb idle mixture and carb idle speed screws.
(4) Set the No Load Top Speed

The first page shows the initial, Static Governor Adjustment at the bottom, and directs us to "Table 6" for info on which hole to put the main governor spring ("5" above) in for the various high-rpm speeds. I'm currently using hole #2, which is on the low end of the scale.

Also note the arrow showing a throttle cable hookup.

Second is Table 6

Third is how to set your governed idle speed (if you want to - I'm just using the idle screw on the carb on mine) and the governed "No Load Top Speed"
 

Attachments

  • Governor1.jpg
    Governor1.jpg
    100.9 KB · Views: 7
  • Governor2.jpg
    Governor2.jpg
    61.9 KB · Views: 7
  • Governor3.jpg
    Governor3.jpg
    97.5 KB · Views: 8
Last edited:

jamyers

Well-known member
Messages
1,444
Reaction score
47
Location
Buffalo Gap, TX
Of course, all of the above assumes you want to keep your governor. If you wanted to bypass it, then you could remove the governor spring(s), hook the throttle cable up direct to the governor arm using one of the numbered holes, and away you go - note that the faster the engine spins, the more the governor arm is going to "push back" on the throttle cable with this hookup.

If you didn't want that "push back", you could either remove the governor's guts completely (requires opening up the crankcase), or remove all the governor springs and links, then strap the governor arm down solid in the idle position and hook the throttle cable direct to the carburetor's throttle.

Me, I'm content (so far) with keeping the governor - I'm limiting the top speed on purpose ... but/and with the available torque, acceleration to that top speed is pretty much instantaneous. :drool5::D:wai:
 

souperman000

New member
Messages
2,466
Reaction score
10
Location
Westlake Village, CA
(1) How do you turn your engine off? Is there a kill switch I'm not seeing, and/or can you kill it by moving the throttle lever all the way closed / down?

The engine dies when you put the throttle level all the way down.

(2) Assuming that wire "A" comes from the magneto up behind the blower housing, that it loops up and is the same as wire "B" or "C", Where does the other wire "C" or "B" lead to? I'm guessing either back up to where wire "A" comes from, or to a kill switch somewhere else on the engine, or it's hanging free and doesn't connect to anything. If it's going to ground then I'm all screwed up...

I will look into this when I see my engine again.

For questions 3 and 4 I need to see my engine.

Again, Thank you
 

souperman000

New member
Messages
2,466
Reaction score
10
Location
Westlake Village, CA
****, UPS just recieved my packages today....coming on Monday (hopefully)

guess I wont have my parts for spring break after all, oh well. Guess I can work on the engine lol!
 

souperman000

New member
Messages
2,466
Reaction score
10
Location
Westlake Village, CA
Alright, got home last night, and dug into my engine this morning.

(2) Assuming that wire "A" comes from the magneto up behind the blower housing, that it loops up and is the same as wire "B" or "C", Where does the other wire "C" or "B" lead to? I'm guessing either back up to where wire "A" comes from, or to a kill switch somewhere else on the engine, or it's hanging free and doesn't connect to anything. If it's going to ground then I'm all screwed up...

Wire "C" is only a few inches long and leads to that little nylon piece that you pointed out in a pic you took in your own personal thread. (the post about the throttle hook up I think?) Wire "A" and Wire "B" are the same wire. Wire "A" does come from the magneto.

(3) I'm thinking there should be another wire behind the throttle assembly that's grounded to the engine block somewhere, and leads either to that nylon pass-through (the thing "B" and "C" connect to). Is there? If not, how does it connect those wires to ground?

I am not really sure where a wire would ground to the engine block. Those are the only two wires there.


Now, i tried to start the engine this morning before I took it apart and found the gas leaking from where the on/off switch is below the tank. I took it apart and it is now lying on the table in my garage. I knew there was a crack in the nipple thing on the bottom of the tank before but it didnt affect anything so I let it be. i think that is what is causing the leak.

Is there anywhere I can get a replacement tank that might work? I looked on the Briggs website and they want 80 bucks for a tank...no way. Any other suggestions? I will check ebay today see if I have any luck.

Edit - No luck on ebay
 

TheWingnut

New member
Messages
114
Reaction score
0
Location
Del Rio, TX
Hi I'm new to the site because I recently got a go kart frame and wanted some advice.

I purchased a frame off of craigslist that incluses steering and a seat. It didn't come with a rear axle or anything else.

I was wondering if you guys could give me some advice about the drivetrain and maybe a list of all the parts I might need (I know the basics but there might be some I need that I am not aware of):wai:

I have an 8hp briggs and straton enginethat I am working on fixing up and plan to put it on the back of my frame.

If you guys could give me some advice and/or a list of parts that I might need that would be awesome.

Just FYI the way the mount on the frame is set up, It will most likely need a live axle set up. I try to post some pics for reference. Thanks so much!:thumbsup:

Where did you get the 8hp briggs? Ive been looking for one. And if you could post a picture of it i could tell you a setup. Are you looking for speed or more of on off-rooad or what?
 

souperman000

New member
Messages
2,466
Reaction score
10
Location
Westlake Village, CA
Where did you get the 8hp briggs? Ive been looking for one. And if you could post a picture of it i could tell you a setup. Are you looking for speed or more of on off-rooad or what?

I got the engine from a guy that I know. It was just sittin under an overhan at the back of his property. It used to be a rototiller engine I think. There are a bunch of pics in the thread. Just a generic kart for the street and grass and some dirt, no suspension. I already have the gearing figured out 6:1. (about)
 

jamyers

Well-known member
Messages
1,444
Reaction score
47
Location
Buffalo Gap, TX
The engine dies when you put the throttle level all the way down.
...Wire "C" is only a few inches long and leads to that little nylon piece that you pointed out in a pic you took in your own personal thread. (the post about the throttle hook up I think?) Wire "A" and Wire "B" are the same wire. Wire "A" does come from the magneto.
OK, when you close the throttle all the way, I'm betting it somehow contacts with a little piece of metal (brass?) at that little nylon piece I pointed out in my thread, which completes the ground (back through wire "C" to the nylon passthrough in your picture where wire "C" and "A/B" both connect). This grounds the magneto and the engine dies.

I would connect a long wire (crimp-on spade terminal?) to the end of wire "A/B" and remove wire "C" completely. Confirm the operation by starting the engine, closing the throttle all the way (engine should NOT die) then touch the other end of the long wire to the engine block and the engine should die. Then run the long wire to your remote switch and you're good to go (or stop, depending on how you look at it...):D

...I knew there was a crack in the nipple thing on the bottom of the tank before but it didnt affect anything so I let it be. i think that is what is causing the leak.

Is there anywhere I can get a replacement tank that might work? ...

Can you unscrew / replace the nipple from the tank? Lowe's or Home Depot oughta have a replacement. Or is it the threaded fitting welded to the tank itself that's cracked? If so, might look into having it welded, brazed, or soldered - oughta be way cheaper than $80.

If you do need to replace the tank, lots of options there, since it's held on with big straps anything of similar size / shape could be modded to fit. Or, I like the idea I saw elsewhere in the forum of using a .50-caliber ammo can - HUGE opening for refilling, just have to figure out a mount for it (could mount it beside the engine if you've got room). :cheers2:
 

souperman000

New member
Messages
2,466
Reaction score
10
Location
Westlake Village, CA
Can you unscrew / replace the nipple from the tank? Lowe's or Home Depot oughta have a replacement. Or is it the threaded fitting welded to the tank itself that's cracked? If so, might look into having it welded, brazed, or soldered - oughta be way cheaper than $80.

If you do need to replace the tank, lots of options there, since it's held on with big straps anything of similar size / shape could be modded to fit. Or, I like the idea I saw elsewhere in the forum of using a .50-caliber ammo can - HUGE opening for refilling, just have to figure out a mount for it (could mount it beside the engine if you've got room).

The crack is in the actual plastic of the tank where the on/off switch screws in. I think the best bet would just get an old cheap gas tank from lawn mower shop or something. the mounting shouldnt be an issue, it will probably be right where the tank is in my mock-up
 

jamyers

Well-known member
Messages
1,444
Reaction score
47
Location
Buffalo Gap, TX
The crack is in the actual plastic of the tank where the on/off switch screws in. I think the best bet would just get an old cheap gas tank from lawn mower shop or something. the mounting shouldnt be an issue, it will probably be right where the tank is in my mock-up
Ah, I see now that you've got a plastic fuel tank...The problem is that plumbing (pipe) threads are tapered, so anything you screw into there is going to try to expand / crack the plastic (as you well know!)...

I'd try to repair the crack by:

* Making sure the tank is clean and DRY.

* Melting the plastic back together with a soldering-iron, with or without a plastic welding tip (basically a flat round tip).

* Use the soldering iron to melt and roughen up the surrounding surface,

* Get a straight hose barb, and using some fuel-resistant epoxy or JB Weld on the threads, install it snugly but not tight - don't want to expand / re-crack the plastic tank again.

* Either move the stock cut off valve downstream in the fuel line, or get rid of it and put a $4 inline valve ($4 or so) in the fuel line.

If that won't work, I'd look for an industrial series metal tank (like mine) with the mounting straps and bracket as well. Or I'd think about a remote-mounted tank - the possibilities there are endless, like the ammo-can...fire extinguishers are fun too...
 

jamyers

Well-known member
Messages
1,444
Reaction score
47
Location
Buffalo Gap, TX
That'll work as well! :cheers2:

Because of the plastic's tendency to crack when pipe-threads are used, I'd still recommend:
...
* Get a straight hose barb, and using some fuel-resistant epoxy or JB Weld on the threads, install it snugly but not tight - don't want to expand / re-crack the plastic tank again.

* Either move the stock cut off valve downstream in the fuel line, or get rid of it and put a $4 inline valve ($4 or so) in the fuel line.
 

souperman000

New member
Messages
2,466
Reaction score
10
Location
Westlake Village, CA
Got all my parts today :thumbsup:

i found a problem though. The unihub I got for my sprocket does not fit on the axle, This is as far as it goes... Any Ideas on how to fix this? I was thinking of using a dremel but that might be overkill and ruin the hub. Also, the keyway doesn't work. the page online said it was a 1/4 in keyway but the key will not fit. Any ideas on this? Maybe I have the lathe it out some more? Pics below:
 

Attachments

  • SAM_0901.jpg
    SAM_0901.jpg
    102.4 KB · Views: 13
  • SAM_0902.jpg
    SAM_0902.jpg
    77.7 KB · Views: 15
  • SAM_0903.jpg
    SAM_0903.jpg
    52.5 KB · Views: 13

souperman000

New member
Messages
2,466
Reaction score
10
Location
Westlake Village, CA
would emory cloth work if the hub doesnt even fit on the axle? I think that I would have to rub down a lot of the metal. The pic is as far as it goes on the axle, use any force and it gets stuck. The hub is supposed to have a 1" bore.
 
Status
Not open for further replies.
Top