Turning a negative into a positive
The 3-wheel, hydraulic brake system that I bought, for Sequoia, came with (1) 8" (rear) rotor & (2) 5" (front) rotors
But, my plan was to switch things around
...& use (2) of the bigger 8" rotors in the front
...& then, just (1) of the smaller 5" rotors in the rear
* Reminder why:
This brake system was designed for a (Hammerhead) kart
...& they have (2) small ~10" tall front wheels
...& (2) way bigger ~20" tall rear wheels
They use (2) 5" rotors (1 on each side) to control/stop the (2) smaller 10" wheels
...& then, the (1) 8" rotor on the axle to control/stop the (2) big 'ol 20" rear wheels
Sequoia is a (3) wheeled kart, that will be running on (3) ~16" tall wheels
So, to compensate I figured 8" rotors would be a "good match" to control/stop the (2) 16" front wheels
...& then, a 5' rotor should be adequate to control/stop the (1) rear wheel
Finding an 8" rear rotor turned out to be more difficult than anticipated

I found out that these 8" rotors sell (individually) for ~$35.00
 https://www.bmikarts.com/220mm-865-Brake-Rotor-for-Chinese-Go-Karts_p_35975.html
So, my frugal self, figured that it would be a better idea to just buy another whole brake kit (~$65.00)
Then, I would get the 8" rotor I needed
...& also, would have a bunch of spare parts
or
Just have to design & build another racer

Tsunami


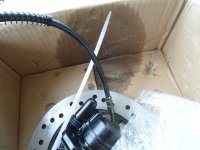
But, when the brake kit showed up there was a big wet spot in the box

.JPG")
I think the plastic reservoir may have gotten stressed or even cracked
,,,but, didn't seem to leak too much when spread out on the workbench

.JPG")
So, I sent the seller a message (& some pics)
...& they advised me to tighten the cap

Nope, that was first thing I checked
...& the cap was good-n-tight

Then, they offered to send me an "oil can" (plastic reservoir)
...& I replied, "if" I have to fix it, I should get a discount
They offered a $10.00 discount
...& I replied that a replacement master cylinder was ~$20.00
...or (if that wasn't acceptable) I would like to return the kit for a full refund
* I was pretty sure that they didn't want their damaged brake kit, back
...so yup, I ended up getting the 8" rotor I needed
...plus a bunch of spare parts (the original plan) ALL for ~$45.00


.JPG")
.JPG")
.JPG")
.JPG")
.JPG")
.JPG")
.JPG")
.JPG")
.JPG")
.JPG")
.JPG")

.JPG")
.JPG")