Need setup advice

BrownStainRacing

Well-known member
Messages
1,367
Reaction score
1,482
Haha, I was just about to say that. The threads are too course. I have some but they're slightly shorter. They're not much shorter so they MIGHT be ok. What do you think? I'll definitely need a new bolt for the crankshaft. I think you posted sizes a little bit back.

I don't think I'll have any clearance issues. Especially when it's shifted over. I do see one huge issue. Those fins have gotta go or I'll never get a chain on it. Guess I'll be grinding tonight.
Nice progress. Good pics. I would hold off on grinding for now. Those ribs are support, reinforment for the plate. You might need more shims on either side of the sprocket. I would mock up the axle, and check again. when you get the adapter plate in, you will have a better view. You might need that riser, idk. But I would definitely take off as little as I could get away with. I never had 1 crack or break, but I never had to grind those ribs off.
 

joshw0000

Well-known member
Messages
304
Reaction score
346
@joshw0000
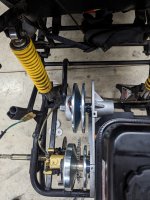
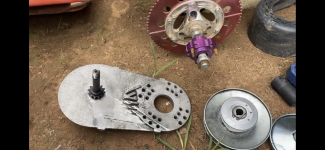
When you get your driven in. Mark the cam and pulley. That spring is preloaded, and when the snapring comes off, it will unload the spring, the mark on the cam will move to the right. Marking those 2 pieces will let you know where it needs to be (preloaded) when you get it back together.
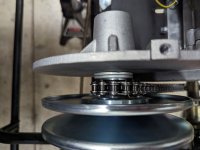
Heres a couple pics.
Put the spring in the hole where the pen is. This hole is used for heavy under powered vehicles. Make sure your marks line back up.
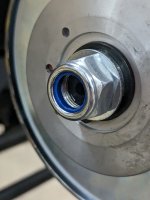
After you get the snap ring back on, take a big enough socket, put it over the snap ring and wack it good with a BFH. This will make sure the ring is locked down and seated in the groove. If it's not locked down good, it will pop off as soon as the tav starts to shift. Don't ask me how I know, 😆 🤣.

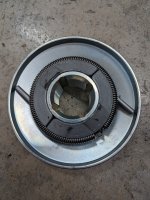
The tav's are no perfect outta the box. I've learned a couple of mods that make them alot more reliable and take less maintenance. Don't cost nothing and really ez to do. I gotta change a rear sprocket today, I'll grap some more pics. If you interested, let know and I will post them.
View attachment 137080View attachment 137081
The 6" doesn't look like your 7".
 

Attachments

  • PXL_20230407_021614178.jpg
    PXL_20230407_021614178.jpg
    3.4 MB · Views: 1

BrownStainRacing

Well-known member
Messages
1,367
Reaction score
1,482
That's the DRIVER. 😆 🤣 😂 😹 😆
You might need a break, and another cold adult beverage. 😆 🤣

The small pulley is the driver, the larger pulley is the driven.
 

joshw0000

Well-known member
Messages
304
Reaction score
346
That's the DRIVER. 😆 🤣 😂 😹 😆
You might need a break, and another cold adult beverage. 😆 🤣

The small pulley is the driver, the larger pulley is the driven.
Lol, well I am doing more thinking/drinking then working. I saw the spring on your snap ring pliers and associated it to the springs I bought for driver.

Ok, now I see what you're saying. Draw a line across both pieces (for alignment reference) open this guy up carefully on the new one (so the spring doesn't fly out), and move the red spring to the left hole instead of the center one.

I've mounted and removed this thing a half dozen times. I can move the sprocket over by adding washers. I probably need notched washers if I actually use them but by the time I get it to clear the ribs I don't have enough rod left for the spacer and the lock washer. An alternative might be to replace the rod with a longer one. And then I'd have to replace something on the other side so the belt properly aligns.

The guy on YouTube running his backward cut his ribs off. He says he's done it this way on 2 carts and he's popping wheelies with no issues. I'm going to play around some more but so far all indicators are leading to removing the ribs.
 

Attachments

  • Screenshot_20230406-232005.png
    Screenshot_20230406-232005.png
    2.3 MB · Views: 2

BrownStainRacing

Well-known member
Messages
1,367
Reaction score
1,482
Haha, I was just about to say that. The threads are too course. I have some but they're slightly shorter. They're not much shorter so they MIGHT be ok. What do you think? I'll definitely need a new bolt for the crankshaft. I think you posted sizes a little bit back.

I don't think I'll have any clearance issues. Especially when it's shifted over. I do see one huge issue. Those fins have gotta go or I'll never get a chain on it. Guess I'll be grinding tonight.
Yea those 3/4" bolts will be fine. Those threads in side cover are not very deep. Too long and they will break thur the side cover. Let's not do that!!!!

Here, get me another 🍺, and we'll get back to work, or at least think about work anyway.

You're gonna need to start at the axle sprocket. Get the little sprocket to line up with the axle sprocket, I would put a shim/washer between the sprocket and bearing, trying to keep the chain off that backing plate. Use a shim/washer, that's smaller then the outer bearing race. You want it to touch the inner race, but not the outer race.
Next, put a shim in between the sprocket and driven, trying to keep chain off the back side, outer edge of the driven. Sparks will fly and you will hear a bunch of grinding noises, if the chain is too close.

This is what keeps you from eating belts, very important.
Next, slide the back side of the DRIVER onto the crank shaft and see how far it's off from being lined up with the driven. You're gonna have to use that thick crankshaft spacer and some shims here, to get it PERFECT.
I use a flat file, it's hasn't lied to me yet and stays straight. Get those pulley's straight, and inline with each other.
Put the lil bronze ring on, belt and the rest of driver, look and see what it looks like.
If you need pics, lmk and i get some tomorrow.

I'll have another 🍺, thank you very much!!!
 
Last edited:

BrownStainRacing

Well-known member
Messages
1,367
Reaction score
1,482
Lol, well I am doing more thinking/drinking then working. I saw the spring on your snap ring pliers and associated it to the springs I bought for driver.

Ok, now I see what you're saying. Draw a line across both pieces (for alignment reference) open this guy up carefully on the new one (so the spring doesn't fly out), and move the red spring to the left hole instead of the center one.

I've mounted and removed this thing a half dozen times. I can move the sprocket over by adding washers. I probably need notched washers if I actually use them but by the time I get it to clear the ribs I don't have enough rod left for the spacer and the lock washer. An alternative might be to replace the rod with a longer one. And then I'd have to replace something on the other side so the belt properly aligns.

The guy on YouTube running his backward cut his ribs off. He says he's done it this way on 2 carts and he's popping wheelies with no issues. I'm going to play around some more but so far all indicators are leading to removing the ribs.
Yea OK, I gotcha. I jus can't see how much they was in the way.
Don't use too many washers, try to use the least amount you can. A 3/4" I.D. washer will fit over the key stock. I use em all the time. It jus needs to take up space, not look pretty. Lol
 

joshw0000

Well-known member
Messages
304
Reaction score
346
Ok, I finally quit overthinking and just assembled it with what I have. I can't bolt to the shaft since I don't have a long enough bolt that's the right thread. Maybe tomorrow. The axle is fairly close to where it would normally sit (just lower) since I have the brake and rotor loosely lined up.

I think I will need that riser plate when I move the motor over. If not it'll hit the brake assembly. There's another bar sticking up that might be in the way (just in the front/right of the shock) but I'm not concerned with it. I can cut it off if I have to.
 

Attachments

  • PXL_20230407_035344729.jpg
    PXL_20230407_035344729.jpg
    2.6 MB · Views: 5
  • PXL_20230407_035401250.jpg
    PXL_20230407_035401250.jpg
    2.5 MB · Views: 5

BrownStainRacing

Well-known member
Messages
1,367
Reaction score
1,482
Ok, I finally quit overthinking and just assembled it with what I have. I can't bolt to the shaft since I don't have a long enough bolt that's the right thread. Maybe tomorrow. The axle is fairly close to where it would normally sit (just lower) since I have the brake and rotor loosely lined up.

I think I will need that riser plate when I move the motor over. If not it'll hit the brake assembly. There's another bar sticking up that might be in the way (just in the front/right of the shock) but I'm not concerned with it. I can cut it off if I have to.
Yea, I see. Are you talking about that adapter plate with left/ right and front/back adjustments, or the riser, or both?????
The Pulleys are not inline.
 

joshw0000

Well-known member
Messages
304
Reaction score
346
Yea OK, I gotcha. I jus can't see how much they was in the way.
Don't use too many washers, try to use the least amount you can. A 3/4" I.D. washer will fit over the key stock. I use em all the time. It jus needs to take up space, not look pretty. Lol
This is with 2 washers and hand tightened. It appears to clear the ribs but I worry the bolt won't actually thread. I'll wait until the 7" comes in before I start cutting anything or tightening any bolts.
 

Attachments

  • PXL_20230407_041617476.MP.jpg
    PXL_20230407_041617476.MP.jpg
    5.5 MB · Views: 1
  • PXL_20230407_041706996.jpg
    PXL_20230407_041706996.jpg
    1.9 MB · Views: 1

BrownStainRacing

Well-known member
Messages
1,367
Reaction score
1,482
I was gonna say go ahead and bolt that axle in, but you still waiting on the sprocket. DAM, the bad luck!!!!

I'll have another 🍺 beer please.
😆 🤣 😂
 

joshw0000

Well-known member
Messages
304
Reaction score
346
Yea, I see. Are you talking about that adapter plate with left/ right and front/back adjustments, or the riser, or both?????
The Pulleys are not inline.
Yes. This one so it'll move it up and over to align with the axle sprocket and clear the brakes.

Generic Torque Converter Motor Riser Plate for 196cc/212cc Engines on Coleman Mini Bikes https://a.co/d/7n0HXaW
 

BrownStainRacing

Well-known member
Messages
1,367
Reaction score
1,482
This is with 2 washers and hand tightened. It appears to clear the ribs but I worry the bolt won't actually thread. I'll wait until the 7" comes in before I start cutting anything or tightening any bolts.
Something is not right. Take those washers out. I use shims, they are not as thick as washers. That nut has to be threaded to at least the nylon.
 

joshw0000

Well-known member
Messages
304
Reaction score
346
I was gonna say go ahead and bolt that axle in, but you still waiting on the sprocket. DAM, the bad luck!!!!

I'll have another 🍺 beer please.
😆 🤣 😂
Yea I still need a little of everything..both sprockets, 7" driven, springs for driver, and I still need to order a new belt. I can't finalize anything yet lol.
 

joshw0000

Well-known member
Messages
304
Reaction score
346
Something is not right. Take those washers out. I use shims, they are not as thick as washers. That nut has to be threaded to at least the nylon.
Look at the last photo on post 160. With no washers, the ribs are definitely in the way. One washer would help, but it's not far enough to clear.
 

joshw0000

Well-known member
Messages
304
Reaction score
346
Does this move it over or jus up???? Looks like you need up and over.
Up and over. It's intended for a mini bike when switching from a clutch to a torque converter since they don't have the option of moving the axle sprocket over (like me).
 

BrownStainRacing

Well-known member
Messages
1,367
Reaction score
1,482
Up and over. It's intended for a mini bike when switching from a clutch to a torque converter since they don't have the option of moving the axle sprocket over (like me).
No that's jus a riser. It raises the engine so the driven clears the frame. I've installed tav's on those colemans, using rectangle tubing as risers. The sprockets line up, it jus won't clear the driven pulley. That coleman comes from factory with a clutch and jackshaft, with 2 chains. Like that 1 I done yesterday.
 

joshw0000

Well-known member
Messages
304
Reaction score
346
No that's jus a riser. It raises the engine so the driven clears the frame. I've installed tav's on those colemans, using rectangle tubing as risers. The sprockets line up, it jus won't clear the driven pulley. That coleman comes from factory with a clutch and jackshaft, with 2 chains. Like that 1 I done yesterday.
Well hell. Then that's a no good. The adjustable one is the winner. And I think the tube idea is the best. As of right now I only have to come over about 2 inches. And I'll need to go up at least and inch or 2. How much heat does this thing create when running at WOT? Should I worry about it damaging the brake?
 

BrownStainRacing

Well-known member
Messages
1,367
Reaction score
1,482
Well hell. Then that's a no good. The adjustable one is the winner. And I think the tube idea is the best. As of right now I only have to come over about 2 inches. And I'll need to go up at least and inch or 2. How much heat does this thing create when running at WOT? Should I worry about it damaging the brake?
No. The brake disk will get hotter.
I think about 1" square tubing and that adapter plate will get you there.
Get that adapter plate, when you can, then that'll give you an idea on how much you need to go up.

Take that shaft back out and measure it end to end. I think i got a bent 1 in shop somewhere I can measure. That 1 you got, something jus ain't right.
 

joshw0000

Well-known member
Messages
304
Reaction score
346
No. The brake disk will get hotter.
I think about 1" square tubing and that adapter plate will get you there.
Get that adapter plate, when you can, then that'll give you an idea on how much you need to go up.

Take that shaft back out and measure it end to end. I think i got a bent 1 in shop somewhere I can measure. That 1 you got, something jus ain't right.
Mine is 6 - 7/16".
 

Attachments

  • PXL_20230407_053035035.jpg
    PXL_20230407_053035035.jpg
    2.5 MB · Views: 1
Top