BrownStainRacing
Well-known member
- Messages
- 1,367
- Reaction score
- 1,483
You can help the lil engine out a bit, with some really ez simple mods, might cost maybe $10-$15. Get alot more response, acceleration, and improvements over any stupid stage 1 kits suppliers got people believing in.With everything I'm doing, will this thing still be capable of a slow roll or will it only snatch the tires at full throttle?
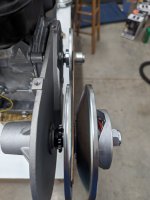
The pred 212 non hemi is the weakest of the 212's. Outta the box it only has 7.7 - 7.8:1 compression ratio, the smallest main jet, and the least amount of ignition timing, out of all the 212's.
A simple head gasket swap, .009"- .010" thick x 70mm dia., will bump CR up to 9.0:1, that's a huge improvement from idle to where ever you have max rpm set at.
Take that .028" main jet out, open it to .031" with a 1/32" drill bit. With the nice CR bump, it'll really like the extra fuel. They are way too lean outta the box, anyway.
Pop the flywheel off, and replace the stock key, with a +4 degree advance ignition timing key. They are usually around 20-22 degrees from factory. So that +4 will be dam near perfect for that small carb, better air/ fuel ratio, and bump in CR.
Set coil air gap to .035", with a stock cast iron flywheel. They usually too close and cook the coil eventually.
With jus those small mods you will hear, see, and feel the improvements.
Remember these engines were built to run as utility engines running at a constant steady rpm. They need jus a lil help to be good on, off throttle, pulling different load engines.