Kawasaki Mule 3010 project

Rat

Well-known member
Messages
1,520
Reaction score
991
Location
SW Virginia
Your better off if you pickle and seal the steel first before applying the undercoating.
I looked into that because I was curious... never heard it before.

That's going to be the biggest nastiest OH HELL NO!

Better off is a relative term and seemingly an opinion. Im not doing a showroom resto here... always Function before form. I dont care that it's rusy and crusty, I just care that as is crap can be shot at my head off the tires and anything dropped probably will never bee seen again.
My goal is to do it cheaply as possible, but with enough skill quality that it won't be an issue that matters by the time it starts rusting through again.

I'll weld it, grind it, clean it, body fill it, sand it prime it, spray it with whatever, hell I'll even do an electrolysis bath if I need for salvaging irreplaceable stuff, but under absolutely no circumstances am I messing corrosive compounds... I don't even like when I end up having to put the acid in a brand new battery!
 
Last edited:

Denny

Canned Monster
Messages
8,491
Reaction score
4,725
Location
Mayberry, Indiana
I don’t know what process you’re looking at but with metal ready all you do is put it in a spray bottle and spray it on. Keeping it wet for about an hour scrub with a scotch brite pad if necessary then hose off real well. Dry then paint over with POR15 then topcoat with your choice of products.
 

Rat

Well-known member
Messages
1,520
Reaction score
991
Location
SW Virginia
Driver's side is officially patch ready, dunno when Ill be able to get materials together but I know bending and installing all the brake linewill be a lot easier withouth the floor since with it I gotta slide underneath.1000001807.jpg
 

Rat

Well-known member
Messages
1,520
Reaction score
991
Location
SW Virginia
Just find a cheap small car muffler and make a 2 into one header to fit into the muffler.
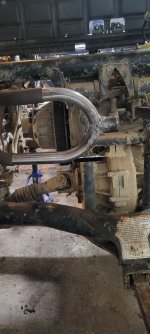
I decided you were half right since I realized I had an unused "U" pipe from a kart exhaust kit I grabbed a while back... one cheap dirtbike muffler is cheaper than 2, cheaper still if I have or can source it is making my own from scrap tubes.
1000001808.jpg
It's only pushed in for now because I don't want to deal with the header extensions should I need to weld a flange or anything to the stub

This thing would not run with the muffler off lmao.
I got it to start but it's so lean without the muffler it requires full choke to sorta run.
 

Rat

Well-known member
Messages
1,520
Reaction score
991
Location
SW Virginia
Well I'm pretty sure the starter just took a $hit.

Battery is at 13v and the starter won't crank it now... just pops into engagement with the flywheel That's it and that's all.

The engine is fine I hand rolled it a full turn to check if it somehow locked up.
 

Rat

Well-known member
Messages
1,520
Reaction score
991
Location
SW Virginia
I did some light research and it turns out this is common problem. I need only chase wires and clean off connections, it seems there's a just voltage drop occurring somewhere.
 

Rat

Well-known member
Messages
1,520
Reaction score
991
Location
SW Virginia
Got the starter working normally again but I'm thinking there's gotta be an intake manifold leak... only runs fully choked, filter is clean still so it's nothing from my fabricated tank blocking, manually bumping the throttle butterfly is an instant stall out.

I can't imagine my exhaust (temporary) muffler delete is flowing freely enough to make it that damn lean... a little sure probably but seriously?

There is more orange Permatex to remediate as well so I guess I start there before I overthink anything like everyone else here seems to enjoy doing1000001812.jpg
 

Rat

Well-known member
Messages
1,520
Reaction score
991
Location
SW Virginia
I've decided to cobble and patch the original muffler back together.l, thankfully all tue damage is under and behind so my atrocious patchwork will be invisible at least. Gonna need a can of hi temp when I'm done with that.

Im gonna crack the carb back open to make sure I didn't end up with some crud knocking loose and plug up the carb... seems the likely case more than a lack of backpressure making it lean out to the point of being unable to run.

It's very clear how lean it is because the choke has a catch that opens the throttle a little... it it will rev hard but shakily then really doesn't want to idle back down hardly at all.

The spark plugs look like hell too, so those will be getting replaced once I cross reference the Champion number with NGK.
 
Last edited:

Rat

Well-known member
Messages
1,520
Reaction score
991
Location
SW Virginia
It only took 3 tries, but finally got the crap out of the carb, so it now runs good again and shouldn't act up anymore...least nothing fuel related
 

Rat

Well-known member
Messages
1,520
Reaction score
991
Location
SW Virginia
Well I got a tire from the guy I got the mule from so it's now movable and doesn't need to sit on a jackstand anymore. Yay!
 

Rat

Well-known member
Messages
1,520
Reaction score
991
Location
SW Virginia
I pushed it out of the garage for some sweeping and general cleanup and couldn't get it to roll back in.
It was moved and stopped under it's own power, though I'm not entirely sure how it stopped when I mashed the dead brake pedal as far as it would go.
Now I'm done with it for a while, toy budget is non exsistant and will be for a while.
 

Rat

Well-known member
Messages
1,520
Reaction score
991
Location
SW Virginia
Welp, all new brake lines from master cylinder to the rear hubs are officially in and bled.

It's coming along nicely at a snails pace, but at least it's getting the TLC it needs.
 

Rat

Well-known member
Messages
1,520
Reaction score
991
Location
SW Virginia
Just an update on progress... I did take her out for a run around, triggered the oveheat warning light even without the bed on.

•Replace the gas cap
•Replace the fuel gauge
•Replace fuel pump
•Replace radiator fan switch
•Replace thermostat
•Rebuild or replace carburetor rebuilt
•Replace all hydraulic brake lines
•Replace drivers floor panel support between main and side rail

•Resheet the cab floor (24x24 panels x2)
•Replace a few bed braces
•Resheet the bed floor (53×47 panel)
•Replace all 4 tires
•Replace the rear shocks
•Replace the front struts
•Replace both rear light assemblies
•Replace the intake air filter hoses between the filter and carb, and the filter/roll bar connection
•Modify exhaust or spend $300 on OE muffler
(most likely modify)
repaired

•Replace or find a way to seal 2 wheels (rims leak air from factory assembly weld)
 
Last edited:

Rat

Well-known member
Messages
1,520
Reaction score
991
Location
SW Virginia
You could reweld those bad spots in the rims. Or even tube the tires.
The tires are pretty bad and I noticed one rim has silicone sealant all over the inside of the drum as well as a gnarly looking reweld job. I don't want the expense of replacing them or the tires, but in the grand scheme it seems worth it even if only for piece if mind.

I want to do a spare tire rack anyway so I’ll likely seal the nicer rim that doesn't have an ugly weld gobbed on it for that
 

Rat

Well-known member
Messages
1,520
Reaction score
991
Location
SW Virginia
So far today the tires seem to be holding air, but it takes 2 days for them to be noticeably low... I threw 16oz of slime in before last night's ride.

Because I do not use the "throw sh!t at the wall till something sticks" method of repair like the countless idiots I've witnessed so many times on here wondering why their junk doesn't run... I pulled the front clip apart to get at the radiator and checked a few things.

Fan switch get power, and when heated it shuts so that's all good and my thinking is it may have been either a false alert somehow or perhaps the thermostat or waterpump is failing. I haven't had the fan kick on other than manually applying power to verify its function.

Ive never witness a thermostat sticking shut, they typically open too early or get stuck open in my experiences. So I might ignore the idiot light for now since it did go back out pretty quickly

•Replace the gas cap
•Replace the fuel gauge
•Replace fuel pump
•Replace radiator fan switch
•Replace thermostat
•Rebuild or replace carburetor rebuilt
•Replace all hydraulic brake lines
•Replace drivers floor panel support between main and side rail

•Resheet the cab floor (24x24 panels x2)
•Replace a few bed braces
•Resheet the bed floor (53×47 panel)
•Replace all 4 tires
•Replace the rear shocks
•Replace the front struts
•Replace both rear light assemblies
•Replace the intake air filter hoses between the filter and carb, and the filter/roll bar connection
•Modify exhaust or spend $300 on OE muffler
(most likely modify)
repaired

•Replace or find a way to seal 2 wheels (rims leak air from factory assembly weld)
 

Rat

Well-known member
Messages
1,520
Reaction score
991
Location
SW Virginia
May have had just a slight air lock in the system that passed.
Maybe.

I checked all fluids when it first got shoved into my bay, someone tried the "throw sh!t till something sticks" method before litteraly putting it out to pasture... clean oil in both gear cases, clean bright green coolant in the system, clean oil in the engine, oil filter looks pretty new and not caked in crud as they tend to get. I guess the guy just wasn't smart enough to see if the fuel pump actually pumped? Sure it kicked on and "ran" but it didn't pump a single drop when bench tested.

On closer inspection it does appear that the fan switch is new, and that the thermostat housing has been off (gasket showing around it is still distinctly tan colored, definitely not a 2006 original). It ran fine without issue today other than being moody about going into gear... something seems off about that because the primary (spider type) is engaging enough to pull the secondary at idle and nearly stall if standing on the brake when putting it in gear.

Idk could be the idle is set too high still, but it needs a pair of plugs still.
 
Top