Kawasaki Mule 3010 project

Rat

Well-known member
Messages
1,520
Reaction score
991
Location
SW Virginia
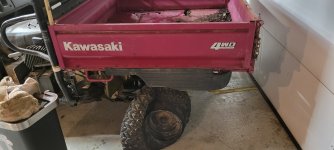
It has potential, but as it sits right now, it's a 1500lb pile of absolute $hit.

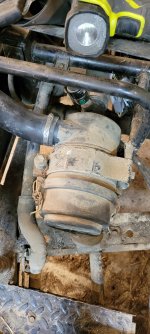
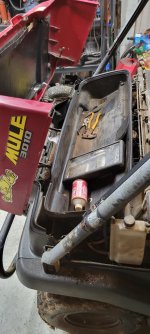
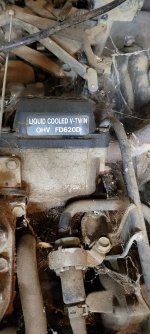
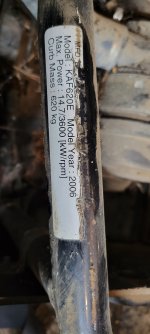
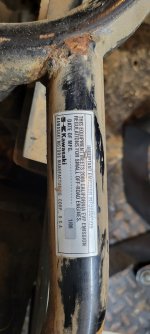
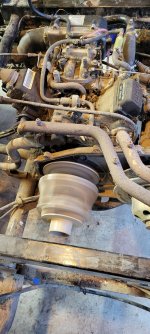
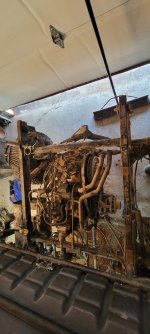
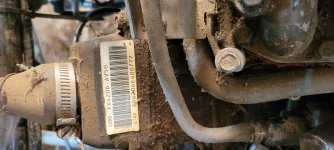
I won't know much until I get eyes on the engine as well as locate and decode the VIN but it is definitely an 06-08 model based on the easier to visually confirm features. Engine is liquid cooled which suggests 07, but that's all I know at this time.

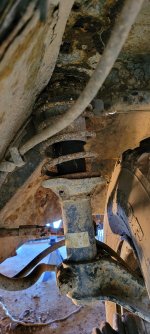
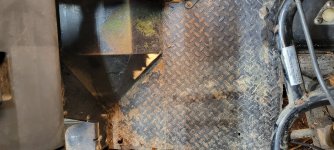
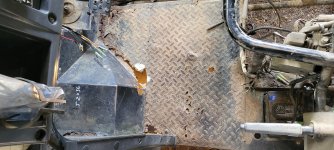
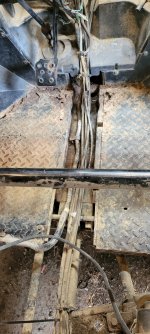
Despite some rust in the cab and bed floor sheets, it's solid considering it was pushed and drug with a locked up rear wheel more than 200 yards on blacktop by a big old Massey Ferguson tractor and didn't come apart.

It has a spot for a wench in the factory front bumper/bullbar, a snorkel air intake through the rear roll bar, and even a factory headache rack... doesn't matter at this point but I found them cool features.

I'm curious if anyone is familiar with the machine in general before I get started on it.
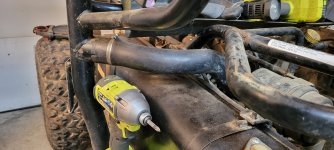
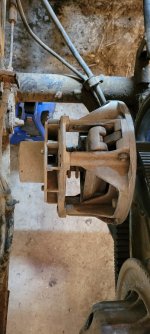
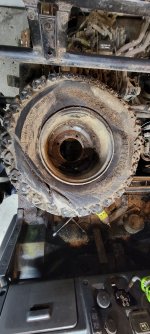
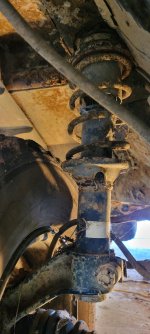
Ideally my first move is going to be to get the bed off and the rear end off the floor to determine how to unjam the one brake (only the rear right wheel is locked up) and get it at least rolling before diving into the engine and electrical.

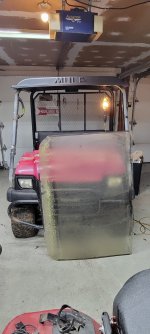
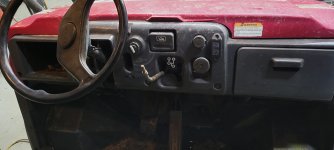
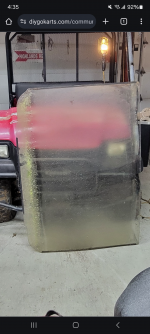
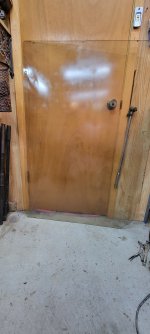
The acrylic windshield is fogged to hell like a pair of cheap old sun baked headlights...not sure if I can salvage that or how I would go about it since most of those tricks for headlights are gimmicks or offer temporary improvement at best.

I'm definitely not trying to replace it if I can avoid it. If it comes down to being a lost cause I would probably end up going without and eventually getting the cheapest sheet of plexiglass I can in an appropriate size from Lowe's... so not at all cheap and prefer to avoid that. Seeing as it blocks the "trunk" from being opened idk

This is going to end up a long running project thread that will end only one of two ways
optimisticaly it will be with a running machine
realistically a headache, a mess, and a pile of parts being sold off or junked
 

Attachments

  • 17077037329658353885367403217880.jpg
    17077037329658353885367403217880.jpg
    1.2 MB · Views: 7
  • 17077037939299034970490231734972.jpg
    17077037939299034970490231734972.jpg
    2 MB · Views: 7
  • 17077038280371723102810967129205.jpg
    17077038280371723102810967129205.jpg
    1.8 MB · Views: 6
  • 17077040114031204561384537457886.jpg
    17077040114031204561384537457886.jpg
    1,014 KB · Views: 7
Last edited:

Rat

Well-known member
Messages
1,520
Reaction score
991
Location
SW Virginia
Mystery solved, no decoding necessary.
Now I have a starting point for parts which so far looks to be
23×11-10 Tires (2)
Brake lines
Fuel lines
Rear shocks
misc electrical
battery
Possibly fuel tank

Dot3, coolant, 5w30, fresh gas for basic refresh

apears to have a top end pil leak of some kind so more to come for sure
 

Attachments

  • 17077117250324826042355881024472.jpg
    17077117250324826042355881024472.jpg
    1.3 MB · Views: 5
  • 17077117423446880242080703976472.jpg
    17077117423446880242080703976472.jpg
    941.1 KB · Views: 5
  • 17077117548423584919192597080737.jpg
    17077117548423584919192597080737.jpg
    961.4 KB · Views: 5

Rat

Well-known member
Messages
1,520
Reaction score
991
Location
SW Virginia
200yrds minimum and not a single knick in the rim 🤣

Such a shame for the tire though, it was new by all the whiskers on it
 

Attachments

  • 1707716196573766636716361700349.jpg
    1707716196573766636716361700349.jpg
    1.3 MB · Views: 4

Rat

Well-known member
Messages
1,520
Reaction score
991
Location
SW Virginia
Kamazuki let’s the good times roll!
Well as of right now it's not even rolling with one rear tire pulled off the rim and the other shredded.
The locked up wheel was fixed in 2 seconds... bolt cutters meet parking brake cable problem solved.

The fuel system was serviced by some dimwitted farmer John type so there was orange Permatex over a lot of the carb body surfaces where gaskets or oring should have been... if he wasn't already dead I'd strangle him for that. I'm hoping to get the carburetor cleaned up enough to not end up replacing since it's an OE genuine Mikuni and I don't like the price of them but don't trust clones much.

So far I've found...
the fuel tank is solid although I had to cut the strap bolts and weld on new ones. The engine turns freely by hand with the plugs out.

Battery is shot but that's no surprise, had to get new J-bolts for the hold down.

The headlights and relays function.

Had to use bolt cutters and an easy out to pull the trashed hydraulic brake line fitting for severely decayed brake lines to be replaced but ultimately I want to get the engine back up and running before I do anything major.

To do list as of now in no specific order:

•Replace the gas cap
•Replace the fuel gauge
•Rebuild or replace carburetor
•Replace all hydraulic brake lines,
•Resheet the cab floor
•Replace a few bed braces
•Resheet the bed floor
•Replace rear tires
•Replace the rear shocks
•Replace the front struts
•Replace both rear light assemblies
•Replace the intake air filter hoses between the filter and carb, and the filter/roll bar connection
 
Last edited:

Rat

Well-known member
Messages
1,520
Reaction score
991
Location
SW Virginia
I love tying a band around a tire, dousing it with gas, giving it a roll, and flipping it over on a small puddle of spillage before lighting it up with a small torch 🤣1000001783.jpg
 

Rat

Well-known member
Messages
1,520
Reaction score
991
Location
SW Virginia
When you find out the fuel pump don't pump... you do what you gotta do to keep moving forward and making the list
1000001787.jpg
It runs good though so I came out on top
 

Attachments

  • 17081243293448554777395352939962.jpg
    17081243293448554777395352939962.jpg
    1.4 MB · Views: 2
Last edited:

Rat

Well-known member
Messages
1,520
Reaction score
991
Location
SW Virginia
If you leave the tank there you’ll get brain damage from hitting your head.
Lmao nah I did that to bypass the dead fuel pump and move forward.... it runs and nothing leaks so I'm 10 steps ahead of what I expected to be.

I plan to get a pump and put the polished tank back on the bike I borrowed it from.

It's on the passengers side BTW
 

Rat

Well-known member
Messages
1,520
Reaction score
991
Location
SW Virginia
Good, we can’t have too many people with brain damage running around here. Bob, Hack, Functional and me are quite enough.
It's surprisingly quiet for as rusted and blown out the muffler is although it sounded oddly like a diesel engine.
It's a 2 into 1 unit with flanges that match the common 48mm stud spacing.

I'm contemplating the cheapest reasonable option and that seems to be just going with full true duals from the flanges.
Not really looking to go open pipes but idk I might fire it up an see how loud it is with the muffler off and figure it out from there
 

Rat

Well-known member
Messages
1,520
Reaction score
991
Location
SW Virginia
Borrowed the gas tank full if gas I built for a bike, and borrowed the battery from my lawn mower and verified it starts and runs. Let it idle high for 10 minutes to get up to temp and adjusted the idle speed to the slowest rpm it would idle smoothly at. Let it cool for 20 minutes and it fired right up no choke, no fuss.

•Replace the gas cap
•Replace the fuel gauge
•Rebuild or replace carburetor rebuilt
•Replace all hydraulic brake lines
•Replace drivers floor panel support between main and side rail
•Resheet the cab floor (24x24 panels x2)
•Replace a few bed braces
•Resheet the bed floor (53×47 panel)
•Replace all 4 tires
•Replace the rear shocks
•Replace the front struts
•Replace both rear light assemblies
•Replace the intake air filter hoses between the filter and carb, and the filter/roll bar connection

•Modify exhaust or spend $300 on OE muffler
(most likely modify)
 

Rat

Well-known member
Messages
1,520
Reaction score
991
Location
SW Virginia
Looking good so far :cheers2:
...but, we need more pics

More pics, more pics, more pics
...we need more pics :thumbsup:
As requested.
Got the windshield mostly clear and shiny.

Got the screws drilled out of the central tunnel so I could further knock all the crap out and access the rest of the rotted out brake lines to the rear. I swear I've probably weight reduced this thing by 150lbs of rust and muck.

Front floor pans are Swiss mostly around the wheel well joint and especially the drivers side. This thing sat out in a field getting sun baked for at least the last 4 years, probably 5 but the battery is dated 2/19 so it's not been more than 5 since someone tried to make it run again
 

Attachments

  • Screenshot_20240217_163521_Chrome.png
    Screenshot_20240217_163521_Chrome.png
    2.9 MB · Views: 3
  • 20240217_163406.jpg
    20240217_163406.jpg
    1 MB · Views: 3
  • 20240217_163203.jpg
    20240217_163203.jpg
    1.3 MB · Views: 3
  • 20240217_163110.jpg
    20240217_163110.jpg
    1.3 MB · Views: 4
  • 20240217_163043.jpg
    20240217_163043.jpg
    1.3 MB · Views: 4
  • 20240217_163025.jpg
    20240217_163025.jpg
    1.1 MB · Views: 4
  • 20240217_162954.jpg
    20240217_162954.jpg
    2.1 MB · Views: 3
  • 20240217_162926.jpg
    20240217_162926.jpg
    2.7 MB · Views: 3
  • 20240217_162823.jpg
    20240217_162823.jpg
    2.6 MB · Views: 3
  • 20240217_162714.jpg
    20240217_162714.jpg
    1.4 MB · Views: 2

Rat

Well-known member
Messages
1,520
Reaction score
991
Location
SW Virginia
Oh and here's the muffler and stuff (limit of 10 images 🙄)

It's missing a drain plug but the threads are shot so whatever... this thing was seriously designed to be amphibious.

The CVT cover is missing, but it was ducted into the rear bar with its own airfilter as well with the front of the clutch acting as a centrifugal fan
 

Attachments

  • 20240217_164636.jpg
    20240217_164636.jpg
    1.3 MB · Views: 3
  • 20240217_164905.jpg
    20240217_164905.jpg
    1.2 MB · Views: 2
  • 20240217_164856.jpg
    20240217_164856.jpg
    1.3 MB · Views: 3
  • 20240217_165044.jpg
    20240217_165044.jpg
    1.1 MB · Views: 3

Rat

Well-known member
Messages
1,520
Reaction score
991
Location
SW Virginia
Just find a cheap small car muffler and make a 2 into one header to fit into the muffler.
That's going to be a total PITA and more expensive than just doing duals with a pair of cheap motorcycle silencers. There's enough expense with needing 4 new tires on account of dry rot and bad checking.

As bad as the driver pan looked its quite solid still so I don't think I'm going to bother with doing the whole cab floor. Besides getting the two 24×24×0.07 sheets needed has an outrageous price and won't even be diamond plate.

I only decided to go ahead and cut out the drivers side all out (battery quit on me I've still got some cutting to do) because it's the worst and it's also the only way to properly patch up the one bad floor brace between the main frame box and outboard frame tube.

Yeah I cut with a Ryobi 18v cordless and grind with a DeWalt 9A
1000001805.jpg
 

Rat

Well-known member
Messages
1,520
Reaction score
991
Location
SW Virginia
Zink weld through primer and POR15 metal ready and paint will be your best friends on this project!
When I get far enough into it I'm thinking Ill spray the floors (cab and bed) with some sort of undercoat or rubberized bed liner.

The bed floor is the worst of it and I'm really undecided how I'm going to do that just yet because I can't seem to get big enough sheets (53x47) to do it in one piece the way I want, and even minimizing the amount of pieces I'm looking at $300 in sheet steel just for the bed floor.

[EDIT] I found a distributer that can do a custom cut 14ga sheet for $81, but idk what the shipping damage would be. Still a damn good price though. I can also get 14ga diamond tread plate 24x24 for $56 and do the whole cab like I originally wanted.
 
Last edited:
Top