2017 - El Moto

Functional Artist

Well-known member
Messages
5,275
Reaction score
2,713
Location
Toledo, Ohio
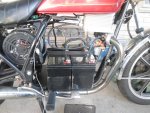
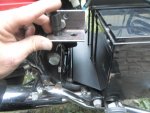
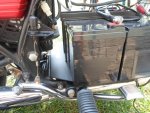
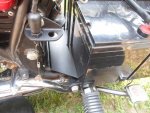
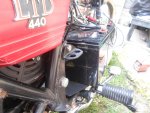
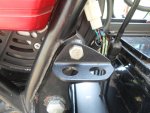
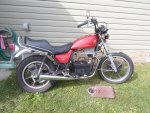
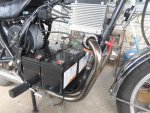
Bat trees are mounted & secured :thumbsup:

So,

...(3) of the bat trees are wired in series to provide the 36V for the propulsion system

...the other (1) bat tree is wired to power the motorcycle's 12V system (lights & signals)


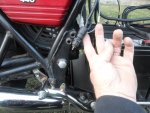
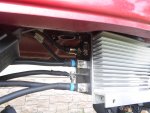
I was able to use most of the ~10', of bat tree cables, I made up when this motor/controller was mounted on El Dingo last year

I even went back to the old "El Dingo" thread (several times) to double check details about cable routing & other wiring stuff :cheers2:

https://www.youtube.com/watch?v=y8VBKvGCHqo
 

Attachments

  • SAM_5240.jpg
    SAM_5240.jpg
    414.1 KB · Views: 3
  • SAM_5346.jpg
    SAM_5346.jpg
    411 KB · Views: 4
Last edited:

Functional Artist

Well-known member
Messages
5,275
Reaction score
2,713
Location
Toledo, Ohio
Makin' good progress :thumbsup:

yesterdays to do list

make (1) bat tree cable

double check solenoid wiring

& then attach solenoid wires

double check bat tree cable routing

& make sure ALL connections are tight

solder & add heat shrink to the 12V wire connection on the bike

clean, polish & install the chain guard
 

Attachments

  • SAM_5273.jpg
    SAM_5273.jpg
    377 KB · Views: 3

Functional Artist

Well-known member
Messages
5,275
Reaction score
2,713
Location
Toledo, Ohio
Now, for the 12V wiring on the bike

We don't need

...the gas engine coil (supplied spark)

...the starting solenoid (engaged the engine starter)

So, I donated them to a local motorcycle repair shop


The other stuff, I'm not sure about

...so, I'll leave them alone for now (rectifier etc.)


So, the main power wire started at the positive (+) bat tree cable going to the solenoid

So, I cut the wire at the solenoid & soldered on a red 10g. wire with a fuse block running up to the 12V bat tree


I bolted the ground wire goin' to the solenoid, to the frame

...& also ran a black 10g. wire from the frame to the 12V bat tree


Turned the key on

Yup! :thumbsup: we have

...lights (head & tail & instrument)

...turn signals

...& even the horn works :2guns:
 

Functional Artist

Well-known member
Messages
5,275
Reaction score
2,713
Location
Toledo, Ohio
Took another ride today :wai:

It was great! :thumbsup:

It's still not registered or plated so, I took it up to a local Wal-mart & cruised around the parking lot.

Started off with 9.4 miles on the trip meter

Put 'er out in the wind & opened 'er up. :2guns:

Within 20 minutes, I had put another 6 miles on her & she was still running strong

It has great acceleration but, tops out & seems like it needs another gear (I found myself wanting to shift to the next gear several times but, there is no next gear)

https://www.youtube.com/watch?v=NdwRuXyiqms
 

Functional Artist

Well-known member
Messages
5,275
Reaction score
2,713
Location
Toledo, Ohio
The bat trees must have recovered or leveled off a bit because, when I got back home, the bike would "go" again

So, I rode it into the back yard to recharge.

* Before charging the bat trees tested @ 36.4V with my mm


While charging the bat trees back up I figured that I could finish up the brake switch issue.

The bike has (2) brake light switches.

...one in the front brake lever housing (for when you apply the front brakes)

...& one on the right rear engine mount bracket that attaches to the foot pedal for the rear brakes, by a spring


The front one is fine, it's the rear one that's the issue

...first of all, it was mounted to the inside the frame

...but, that's where the motor is now & it doesn't clear/won't fit


If I just mount it outside the frame

...but, it would stick out & look kinda goofy

...& I also need to add another (totally separate) brake actuated switch
(sends a signal to the controller to cut the power to the motor when the brakes are applied)

...& on some models turns on the regen feature


So, Ima gonna make my own

...that wont stick out so far

...& will hold (2) brake switches

I'll use a piece of angle steel

...But, I'll do some body work so, it don't look like a bracket made outa angle steel
 

Attachments

  • SAM_5544.jpg
    SAM_5544.jpg
    312.9 KB · Views: 1
  • SAM_5538.jpg
    SAM_5538.jpg
    283.9 KB · Views: 1
  • SAM_5541.jpg
    SAM_5541.jpg
    268.2 KB · Views: 1
  • SAM_5545.jpg
    SAM_5545.jpg
    304 KB · Views: 1

Functional Artist

Well-known member
Messages
5,275
Reaction score
2,713
Location
Toledo, Ohio
Need to drill

...a couple of 5/8" holes into one side for the brake light switches

...& one 5/16" hole into the other side to bolt it on the bike


So, measure, mark, center punch, drill 1/8" pilot hole, then drill the correct size holes


Test fit on the bike

...mark what material needs removed
 

Attachments

  • SAM_5608.jpg
    SAM_5608.jpg
    265.4 KB · Views: 1
  • SAM_5606.jpg
    SAM_5606.jpg
    269.4 KB · Views: 1
  • SAM_5600.jpg
    SAM_5600.jpg
    235.5 KB · Views: 1
  • SAM_5594.jpg
    SAM_5594.jpg
    249 KB · Views: 1
  • SAM_5593.jpg
    SAM_5593.jpg
    339.9 KB · Views: 1

Functional Artist

Well-known member
Messages
5,275
Reaction score
2,713
Location
Toledo, Ohio
Now for the creative part or "body work" :thumbsup:


Removed the bulk of the unwanted material with the cut-off tool

...did some roundin' with the bench grinder

...then some smoothin' with a flap disk on the hand held grinder


Gettin' close

...but, still too much material on the front edge :ack2:
 

Attachments

  • SAM_5611.jpg
    SAM_5611.jpg
    228.2 KB · Views: 1
  • SAM_5616.jpg
    SAM_5616.jpg
    229.3 KB · Views: 1
  • SAM_5618.jpg
    SAM_5618.jpg
    206.8 KB · Views: 1

Functional Artist

Well-known member
Messages
5,275
Reaction score
2,713
Location
Toledo, Ohio
A little more trimming off the front & a little black paint

Yup, that should do it :thumbsup:

kinda looks like a factory "dual" brake switch mount :2guns:

Just gotta see if I can round up another switch & spring tomorrow
 

Attachments

  • SAM_5637.jpg
    SAM_5637.jpg
    376.5 KB · Views: 3
  • SAM_5636.jpg
    SAM_5636.jpg
    377.5 KB · Views: 1
  • SAM_5632.jpg
    SAM_5632.jpg
    304.3 KB · Views: 1
  • SAM_5631.jpg
    SAM_5631.jpg
    261.2 KB · Views: 1

Functional Artist

Well-known member
Messages
5,275
Reaction score
2,713
Location
Toledo, Ohio
Pretty slick man, pretty slick.
And you own a rollback too?

You really need to put some cards in the spokes or something.:roflol:


Well, Thank you sir :thumbsup:

Yes, I think this one turned out nice. :wai:


Yup, I gotta (part time) toy hauler

I told ya I was a tow truck driver :2guns:
 

Functional Artist

Well-known member
Messages
5,275
Reaction score
2,713
Location
Toledo, Ohio
After several test rides

I think it's time to "step it up a notch"

According to the specs this/these motors do ~72 rpm's per volt of input

So, at 12V it does 864 rpm's (12V x 72rpm's = 867 rpm's)
...24V = 1,728 rpm's


The bike is currently operating at 36V (2,592 rpm's)
...with the 10 tooth front gear
...& a 54 tooth on the rear (5.4:1) ratio
...top speed is ~26 mph

So, by moving up to 48V

...the motor should produce ~3,456 rpm's
...& draw less amps

It should be a faster bike with a lower/slower power consumption :2guns:
 

Functional Artist

Well-known member
Messages
5,275
Reaction score
2,713
Location
Toledo, Ohio
But are ya gonna put some playing cards or something in the spokes? :D


While a silent bike would be kuhl, I agree it's kinda dangerous especially now with these stupid smart phones

Been thinkin' about it

What kinda sound effects would be effective but, still kuhl?

swarmin' bee's?

back up beeper?

How about, that electric crackling sound
...you hear while welding? :2guns:
 

Functional Artist

Well-known member
Messages
5,275
Reaction score
2,713
Location
Toledo, Ohio
Still thinkin' & doin research before I move up to 48V

This speed controller is programmable

So, let's go in & see where it is set at from the factory

The manual says to remove motor cables & smaller wiring from the controller

Then, supply power & negative from battery pack


The main power switch is off but, I still wrapped each cable end with tape & also marked to ensure correct reconnection
 

Attachments

  • SAM_5688.jpg
    SAM_5688.jpg
    496.7 KB · Views: 2
  • SAM_5689.jpg
    SAM_5689.jpg
    254.5 KB · Views: 1
  • SAM_5690.jpg
    SAM_5690.jpg
    248.7 KB · Views: 1
  • SAM_5695.jpg
    SAM_5695.jpg
    260.4 KB · Views: 1
  • SAM_5696.jpg
    SAM_5696.jpg
    190.4 KB · Views: 1
Top