2017 - El Moto

Functional Artist

Well-known member
Messages
4,410
Reaction score
1,692
Location
Toledo, Ohio
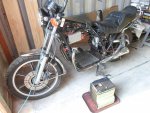
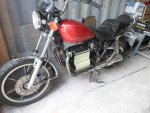
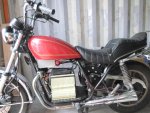
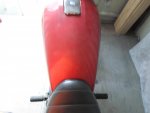
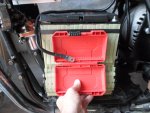
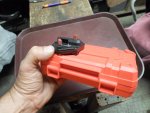
I got El Moto out today :thumbsup:

But, she was TOTALLY DEAD :ack2:

NOT just dead, "really" TOTALLY DEAD :ack2::ack2:

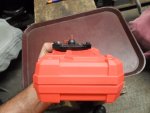
Nothing lit up, buzzed, clicked or anything
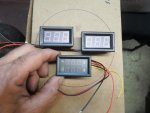
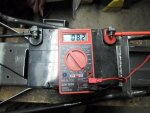
...so, I grabbed the MM

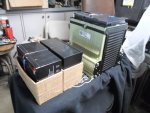
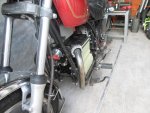
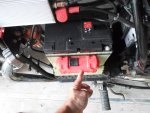
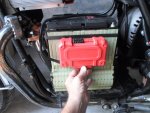
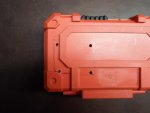
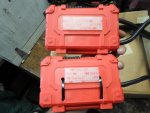
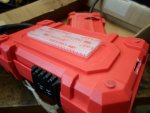
The 48V battery pack showed 6.2V :smiley_omg:

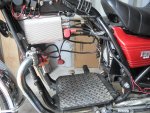
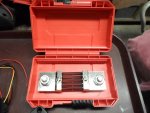
Then, I checked them individually
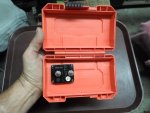
...battery #1 (@ the positive output connection) showed 1.5V
...#2 showed 3.3V
...#3 showed 5.4V
...#4 (@ the negative out put connection) showed -3.9V
(seriously, it showed a minus)
(negative voltage, a new one on me)

So, yup
...I think I killed 'em :oops: & :censored:

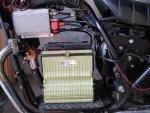
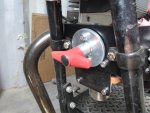
I had the main cut-off, turned off while it was in storage for the winter
...but, yup another :censored: up

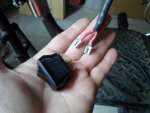
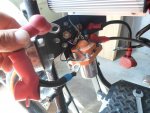
It seems that I didn't wire the DC to DC inverter to the cut-off switch
...I wired it straight to the battery pack
...it must have been drawin' a small amount of power all winter long

So, I'm guessin' (Naw, I'm pretty sure)
...that was a fatal (for the battery pack anyways) mistake

Well, can't get shook about it
...grandma always said "things happen for a reason" :cheers2:

* Note to self:
Don't do that again :lolgoku:

Learning as I go :2guns:
 

Attachments

  • SAM_9806.jpg
    SAM_9806.jpg
    283.7 KB · Views: 3
  • SAM_9808.jpg
    SAM_9808.jpg
    272.8 KB · Views: 3

Functional Artist

Well-known member
Messages
4,410
Reaction score
1,692
Location
Toledo, Ohio
Ugh!!! So how much will 3 new batteries set you back?

She started off runnin' @ 36V but, now she is runnin' @ 48V

(4) 12V 35AH HF solar batteries (that's what they were) are
...~$70.00 ea. x (4) = ~$280.00 plus tax
...weigh ~20 lbs. ea. x (4) = ~80 lbs.
...for only 35AH

https://www.harborfreight.com/12-volt-35-amp-hour-universal-battery-68680.html

Maybe this is a good opportunity to move on to Lithium

I have been doin' lots of research on 'em

http://www.diygokarts.com/vb/showthread.php?t=38167

So far, I'm likin' the Chevy Volt lithium battery packs

(1) 2Kwh section is
...45V (nominal) so, I would only need (1)
...~47AH (2Kwh)
...only weighs ~45 lbs.
& seem to be plentiful in the ~$300.00 range

But, I have been reluctant to "pull the trigger"
...because there's a lot of "Very Important Details" to them
...like monitoring the balance, discharge & recharge rates & even worrying about the levels (per cell) of discharge & recharge

That's why I did all of the research & work on that STUPID Batt-Bridge

http://www.diygokarts.com/vb/showthread.php?t=38400

Still thinkin" :idea2:
 

Functional Artist

Well-known member
Messages
4,410
Reaction score
1,692
Location
Toledo, Ohio
Well, I did it :thumbsup:

I am the proud owner of a 2kWh section of a Chevrolet Volt lithium Ion battery
...45V 47AH ($400.00 delivered)
...as opposed to (~$300.00) for (4) 12V 35 AH SLA batteries

It's only ~9 1/2" wide x 9 1/2" deep x 10 1/2" tall
...as opposed to the ~15" wide x 10" deep x 7" tall of the SLA batteries
...so, it should fit nicely on the bike

It only weighs ~45 lbs.
as opposed to the ~80 lbs. that the SLA batteries weighed
...so, the bike should handle better & get better "mileage"

According to my research, going from a 48V 35AH "Lead" battery pack to a 45V 47AH "lithium Ion" battery pack

I should have "roughly" double the "available" power (actual usable battery capacity)
...at about half of the weight
...& it should recharge in "roughly" 1/2 of the time that the lead battery pack took :auto:

https://www.youtube.com/watch?v=ePoG8xfocEY
 

Attachments

  • SAM_0302.jpg
    SAM_0302.jpg
    225.4 KB · Views: 3
  • SAM_0303.jpg
    SAM_0303.jpg
    238 KB · Views: 3
  • SAM_0304.jpg
    SAM_0304.jpg
    222.2 KB · Views: 3
  • SAM_0329.jpg
    SAM_0329.jpg
    271.7 KB · Views: 3
  • SAM_0328.jpg
    SAM_0328.jpg
    233.3 KB · Views: 3
  • SAM_0326.jpg
    SAM_0326.jpg
    221.3 KB · Views: 3

Functional Artist

Well-known member
Messages
4,410
Reaction score
1,692
Location
Toledo, Ohio
I have been takin' my time, this is a "whole lot of battery :cheers2:

I don't want to rush-n-mess something up

The battery pack fits in & looks great on the bike :thumbsup:

I can't even see it when sitting on the bike :2guns:
(I can just barely see it with the "gas" tank off)
 

Attachments

  • SAM_0981.jpg
    SAM_0981.jpg
    339 KB · Views: 2
  • SAM_0979.jpg
    SAM_0979.jpg
    375.5 KB · Views: 3
  • SAM_0975.jpg
    SAM_0975.jpg
    377.7 KB · Views: 3
  • SAM_0956.jpg
    SAM_0956.jpg
    394.1 KB · Views: 2
  • SAM_0955.jpg
    SAM_0955.jpg
    339.2 KB · Views: 3
  • SAM_0985.jpg
    SAM_0985.jpg
    220.8 KB · Views: 2
  • SAM_0995.jpg
    SAM_0995.jpg
    311.2 KB · Views: 2
  • SAM_0998.jpg
    SAM_0998.jpg
    331 KB · Views: 4
  • SAM_1000.jpg
    SAM_1000.jpg
    291 KB · Views: 2
  • SAM_1001.jpg
    SAM_1001.jpg
    153.1 KB · Views: 2

Functional Artist

Well-known member
Messages
4,410
Reaction score
1,692
Location
Toledo, Ohio
Quick update

I have done lots & lots more research

First, I discovered a few things that I set up kinda wrong :ack2:
...the main power disconnect cannot be turned off (in an emergency) while riding the motorcycle (it's too far away)
...the speed controller on/off switch cannot be turned off (in an emergency) while riding, either (it's under the seat)


So, this spring, when I upgrade 'er to a 45V 2Kwh section of a Chevy Volt battery

I am going to mount a circuit breaker right on the battery lid, next to the positive (+) terminal

Reasoning:
This way it will be within reach of the rider (& eliminate a battery cable)

I am also going to (try) a 48V 150A circuit breaker, instead of the 500A fuse, that I am currently using

Reasoning:
Circuit breakers are resettable (if you blow a fuse, you better have a spare-with you)
...& I may be able to use it as a governor to help limit the amp draw

For the speed controller on/off switch
...I am going to connect the speed controller on/off wires to a relay, that's connected where the engine spark coil wires used to connect

Reasoning:
This way I can use the "stock" motorcycle off/run/off switch (on the handle bar) to turn the speed controller on/off just like "from the factory" :2guns:
...& (I have not tried it yet) but, I think, the "stock" key switch should also turn the speed controller off
...kinda like a "double safety", in case I forget :auto:

More to come


As for the stuff I did wrong :ack2:

First, I removed the on/off switch, (for the speed controller) that I previously mounted under the seat
…& ran the wires up to a relay switch (under the "tank") that's controlled by the motorcycles ignition switch

Then, I removed
...the "extra" battery cables, connecting the "main" power cut-off switch
...the cut-off switch (itself)
…& the 500A "main" power fuse

I'm gonna try a 150A circuit breaker, as a test
...as the "main" power cut-off switch
…& as the "main" power fuse too :thumbsup:


It should be the "weakest link" so, if it's "incompatible"

I "think" :idea2: it should continuously "trip" the breaker
...but, (hopefully) not harm the system
 

Attachments

  • SAM_0965.jpg
    SAM_0965.jpg
    275.6 KB · Views: 1
  • SAM_0964.jpg
    SAM_0964.jpg
    341.9 KB · Views: 1
  • SAM_0961.jpg
    SAM_0961.jpg
    214.4 KB · Views: 1
  • SAM_0959.jpg
    SAM_0959.jpg
    296 KB · Views: 1
  • SAM_0968.jpg
    SAM_0968.jpg
    272.3 KB · Views: 1
  • SAM_0969.jpg
    SAM_0969.jpg
    260.9 KB · Views: 1

Functional Artist

Well-known member
Messages
4,410
Reaction score
1,692
Location
Toledo, Ohio
Now, we gotta figure

A way to mount the battery
...securely to the motorcycle

A place to mount the circuit breaker
...so, it's easily accessible while riding

& we need to mount a shunt ...somewhere
...for the Amp/Volt meter (to help keep an "eye" on what's happening inside of this thing)

Nothing can really be mounted "to" or "on" the battery cover
...not much room (~1/2") & open terminals (cell/pouch welds)

:idea2: Hey, what about...them "new" plastic drill boxes @ Harbor Freight?

Ya, the red ones
...they'll even match the bike :thumbsup:

Hmmmmm, just might work :wai:
...probably, have to go on the sides , not much room on top
 

Attachments

  • SAM_0994.jpg
    SAM_0994.jpg
    279.4 KB · Views: 2
  • SAM_0990.jpg
    SAM_0990.jpg
    229.9 KB · Views: 2
  • SAM_0989.jpg
    SAM_0989.jpg
    270.5 KB · Views: 2
  • SAM_0988.jpg
    SAM_0988.jpg
    257.5 KB · Views: 2
  • SAM_0992.jpg
    SAM_0992.jpg
    309.7 KB · Views: 2
  • SAM_0993.jpg
    SAM_0993.jpg
    309.5 KB · Views: 1

Functional Artist

Well-known member
Messages
4,410
Reaction score
1,692
Location
Toledo, Ohio
So, to monitor, protect & use this battery "safely" were gonna use
...a circuit breaker (as a fuse & main power disconnect)
…& a "Tri-Quad" (3) meters (to monitor the internals)

I think these drill boxes (~2" thick x ~4" tall x ~6" wide) will work
...I'ma gonna give 'em a try anyways :thumbsup:

I can mount the circuit breaker, in (1) box
…& the shunt (a part of the meter circuit) in the other

:idea2: If I mount (1) box on each side
...they'll look, kinda like, (mini) saddle bags :cheers2:

So, I started with the circuit breaker
...did some markin'-n-drillin'-n-cutting

Gettin' close :2guns:
 

Attachments

  • SAM_1002.jpg
    SAM_1002.jpg
    279.9 KB · Views: 0
  • SAM_1015.jpg
    SAM_1015.jpg
    203.1 KB · Views: 0
  • SAM_1006.jpg
    SAM_1006.jpg
    257 KB · Views: 0
  • SAM_1026.jpg
    SAM_1026.jpg
    197.1 KB · Views: 0
  • SAM_1023.jpg
    SAM_1023.jpg
    197.7 KB · Views: 0
  • SAM_1022.jpg
    SAM_1022.jpg
    219.7 KB · Views: 0
  • SAM_1020.jpg
    SAM_1020.jpg
    200.9 KB · Views: 0
  • SAM_1019.jpg
    SAM_1019.jpg
    142.5 KB · Views: 0
  • SAM_1028.jpg
    SAM_1028.jpg
    195.3 KB · Views: 0
  • SAM_1029.jpg
    SAM_1029.jpg
    224.9 KB · Views: 0

Functional Artist

Well-known member
Messages
4,410
Reaction score
1,692
Location
Toledo, Ohio
Cleaned the opening up, a bit more, with a razor knife

Yup, that should do! :thumbsup:

Looks Sweet!

Easy access
…& all connections will be connected/protected inside :cheers2:
 

Attachments

  • SAM_1035.jpg
    SAM_1035.jpg
    222.9 KB · Views: 1
  • SAM_1034.jpg
    SAM_1034.jpg
    216.4 KB · Views: 1
  • SAM_1036.jpg
    SAM_1036.jpg
    236.9 KB · Views: 1
  • SAM_1037.jpg
    SAM_1037.jpg
    223.9 KB · Views: 1
  • SAM_1038.jpg
    SAM_1038.jpg
    203.5 KB · Views: 1
  • SAM_1031.jpg
    SAM_1031.jpg
    236 KB · Views: 1

Functional Artist

Well-known member
Messages
4,410
Reaction score
1,692
Location
Toledo, Ohio
I had to get another box for the other side
…"BONUS" it comes with "FREE" drill bits :thumbsup:

The bit holders & the cardboard inserts "pop" right out
...the stickers are kinda thick & peel off easily :cheers2:

Now, we have a good, matching & easily accessible place for the shunt :2guns:
 

Attachments

  • SAM_1066.jpg
    SAM_1066.jpg
    273.9 KB · Views: 0
  • SAM_1061.jpg
    SAM_1061.jpg
    290.5 KB · Views: 0
  • SAM_1059.jpg
    SAM_1059.jpg
    298.2 KB · Views: 0
  • SAM_1056.jpg
    SAM_1056.jpg
    322.6 KB · Views: 0
  • SAM_1053.jpg
    SAM_1053.jpg
    350.2 KB · Views: 0
  • SAM_1071.jpg
    SAM_1071.jpg
    303.4 KB · Views: 0
  • SAM_1070.jpg
    SAM_1070.jpg
    270.2 KB · Views: 0

Functional Artist

Well-known member
Messages
4,410
Reaction score
1,692
Location
Toledo, Ohio
We have some kool "mini saddle bags" to mount & protect our components

Now, we gotta get everything mounted
...the saddle bags on to the battery
…& then, the battery on to the bike

Can't (well, I guess you can, but I'm not gonna) drill any holes into
...or screw anything into the battery itself

So, we gotta use adhesive (glue) or outside pressure (clamp or strap)

First, I tried a big (36") Zip Tie, that went all of the way around the battery, thru each box & back to itself
...it kept them on but, they still "moved around" a bit :ack2:

I don't want to just "glue them on" :idea2:
...how about some "Industrial Velcro" (the extra heavy duty kind)

This way, I can "glue them in place" & they'll still removable (if ever necessary)

So, I used both :thumbsup:
...the Velcro locks them in place (no movin' around)
…& the Zip Tie is a "safety strap" (just in case) :2guns:
 

Attachments

  • SAM_1098.jpg
    SAM_1098.jpg
    255.5 KB · Views: 0
  • SAM_1094.jpg
    SAM_1094.jpg
    183.7 KB · Views: 0
  • SAM_1090.jpg
    SAM_1090.jpg
    178 KB · Views: 0
  • SAM_1087.jpg
    SAM_1087.jpg
    233.2 KB · Views: 0
  • SAM_1043.jpg
    SAM_1043.jpg
    215.2 KB · Views: 0
  • SAM_1122.jpg
    SAM_1122.jpg
    237.2 KB · Views: 0
  • SAM_1121.jpg
    SAM_1121.jpg
    307.1 KB · Views: 1
  • SAM_1124.jpg
    SAM_1124.jpg
    220.5 KB · Views: 0

Functional Artist

Well-known member
Messages
4,410
Reaction score
1,692
Location
Toledo, Ohio
Now, we gotta attach the battery pack to the bike

There are (4) ~9" x 1/4" threaded rod "bolts" that go thru the entire battery that (basically) hold it together
...(2) on each side (1) above & (1) below the coolant passage way

This battery pack has a coolant running thru it when used @ ~370V in a car
...it shouldn't be necessary when only running @ ~45V

It looks like I can simply attach a piece of small "angle steel" to each end
...using the (2) lower coolant passage bolts

Gonna have to get/use some longer "thru bolts"

12" x 1/4" threaded rod (~$1.00 ea.) were a bit long
...so, (after fitting & alignment) I wacked off ~1 1/2"

I cut (2) pieces of "angle steel"
...each ~ 8 1/2"
...drilled (2) holes in each piece, that aligned with the bolts on the battery
…& bolted 'em to the battery :thumbsup:

Set it on the bike
…& got it centered & aligned

Then, marked the (4) mounting spots
...drilled the (4) 1/4" holes (2) in each piece
...smoothed the edges & cleaned 'em up a bit

A light coat of primer
…& a couple of coats of gloss black paint

Yup, that should do it! :2guns:
 

Attachments

  • SAM_1126.jpg
    SAM_1126.jpg
    247.1 KB · Views: 0
  • SAM_1127.jpg
    SAM_1127.jpg
    248.4 KB · Views: 0
  • SAM_1125.jpg
    SAM_1125.jpg
    219.6 KB · Views: 0
  • SAM_1145.jpg
    SAM_1145.jpg
    309.8 KB · Views: 0
  • SAM_1136.jpg
    SAM_1136.jpg
    306 KB · Views: 0
  • SAM_1134.jpg
    SAM_1134.jpg
    200.5 KB · Views: 0
  • SAM_1132.jpg
    SAM_1132.jpg
    244.1 KB · Views: 0
  • SAM_1130.jpg
    SAM_1130.jpg
    276.5 KB · Views: 0
  • SAM_1149.jpg
    SAM_1149.jpg
    299.5 KB · Views: 0

Functional Artist

Well-known member
Messages
4,410
Reaction score
1,692
Location
Toledo, Ohio
Now, to hook 'er up

The power starts @ the battery packs positive (+) terminal

So, I attached a piece of 4g. cable to the battery's positive terminal via 1/4" x 4g. lug & 10mm nut
…& connected the other end to the in "BATT" side of the circuit breaker via another 1/4" x 4g. lug & a 7/16" nut

Then, the power comes out of the "AUX" side of the circuit breaker
...thru another piece of 4g. cable via 1/4" lug x 4g. lug & a 7/16" nut & then connects to the contactor with a 3/8" x 4g. lug & a 17mm nut
&
Finally, the power comes out of the contactor via a 3/8" x 4g. lug & a 17mm nut & then connects to the B+ "bar" on the speed controller, using another 1/4" x 4g. lug & a 10mm nut-n-bolt :thumbsup:

Now, to complete the circuit
...the negative (-) connects to the speed controllers B- "bar" (1/4" x 4g. lug) thru a piece of 4g. cable
…& then connects to the P- side of the "shunt" (3/8" x 4g. lug)(mounted in the other "saddle bag")
&
Finally, another piece of cable connects the B- side of the shunt (3/8" x 4g.) to the negative terminal on the battery pack using a 10mm nut

* tip on cuttin' battery cables
...a cut-off tool can/will slice thru it like butter without smashing/deforming the end of the cable :cheers2:
 

Attachments

  • SAM_1186.jpg
    SAM_1186.jpg
    177.9 KB · Views: 0
  • SAM_1191.jpg
    SAM_1191.jpg
    241.9 KB · Views: 0
  • SAM_1194.jpg
    SAM_1194.jpg
    244.5 KB · Views: 0
  • SAM_1201.jpg
    SAM_1201.jpg
    252.7 KB · Views: 0
  • SAM_1198.jpg
    SAM_1198.jpg
    208.3 KB · Views: 0
  • SAM_1204.jpg
    SAM_1204.jpg
    318.4 KB · Views: 0
  • SAM_1205.jpg
    SAM_1205.jpg
    312.6 KB · Views: 0

Functional Artist

Well-known member
Messages
4,410
Reaction score
1,692
Location
Toledo, Ohio

Attachments

  • SAM_1168.jpg
    SAM_1168.jpg
    171.5 KB · Views: 1
  • SAM_1166.jpg
    SAM_1166.jpg
    172.4 KB · Views: 2
  • SAM_1164.jpg
    SAM_1164.jpg
    190.8 KB · Views: 2
  • SAM_1161.jpg
    SAM_1161.jpg
    343.9 KB · Views: 1
  • SAM_1160.jpg
    SAM_1160.jpg
    261.6 KB · Views: 1
  • SAM_1229.jpg
    SAM_1229.jpg
    281.2 KB · Views: 1
  • SAM_1223.jpg
    SAM_1223.jpg
    254.4 KB · Views: 1
  • SAM_1207.jpg
    SAM_1207.jpg
    190.6 KB · Views: 2
  • SAM_1172.jpg
    SAM_1172.jpg
    239.6 KB · Views: 1
  • SAM_1170.jpg
    SAM_1170.jpg
    206.5 KB · Views: 1

TT540

Newb
Messages
346
Reaction score
1
Location
Huntsville, AL
I love all of the repurposing and reuse. Bummer about wasting those batteries. I pull all of mine out and set them near the house garage door. Reminds me to charge them throughout the winter.
 

Functional Artist

Well-known member
Messages
4,410
Reaction score
1,692
Location
Toledo, Ohio
I love all of the repurposing and reuse. Bummer about wasting those batteries. I pull all of mine out and set them near the house garage door. Reminds me to charge them throughout the winter.

Thanks! :thumbsup:

Learning as I go (won't do that again) :cheers2:

"Everything happens for a reason"
...probably would of procrastinated another year before going Lithium

Actually, now that I think about it, I used those Harbor Freight 12V 35AH Solar batteries to power

Double Trouble https://www.youtube.com/watch?v=TRIKLdvGlTA
El Dingo (before a speed controller) https://www.youtube.com/watch?v=_5EK9EOulsY
Zero https://www.youtube.com/watch?v=Rss3YOJPBFY
El Turbo https://www.youtube.com/watch?v=H-704ZyJkaU
…& then El Moto https://www.youtube.com/watch?v=brqfLud-Ygc

Good Batteries?
Yup! :2guns:
 

Functional Artist

Well-known member
Messages
4,410
Reaction score
1,692
Location
Toledo, Ohio
Been thinkin' & workin' on the "Tri-Quad" meter(s) :thumbsup:

There are (3) separate gauges (~1" tall x 2" wide)
...but, its hard to fit 'em into where a 3" gauge used to go (old RPM gauge)

My buddy "Jim" @ Homers Cycle Shop gave me a couple of "make-it-yourself" gauge options, to try :cheers2:

First one looks like the back or cup for some kind of gauge
Second one looks like a chrome cover of some kind
Third is a non-functioning motorcycle speedometer (to gut, if necessary)
...or I could even "gut" the charge meter that's on the bike now

Nuthin's big enough :ack2:
(2 gauges side by side are ~4" wide)

Still thinkin' :idea2:
 

Attachments

  • SAM_1238.jpg
    SAM_1238.jpg
    209.4 KB · Views: 0
  • SAM_1237.jpg
    SAM_1237.jpg
    182.4 KB · Views: 0
  • SAM_1236.jpg
    SAM_1236.jpg
    224.2 KB · Views: 0
  • SAM_1235.jpg
    SAM_1235.jpg
    268 KB · Views: 0
  • SAM_1234.jpg
    SAM_1234.jpg
    244.2 KB · Views: 0
  • SAM_1239.jpg
    SAM_1239.jpg
    229.3 KB · Views: 0
  • SAM_1242.jpg
    SAM_1242.jpg
    215.3 KB · Views: 0
  • SAM_1244.jpg
    SAM_1244.jpg
    317.4 KB · Views: 0
  • SAM_1247.jpg
    SAM_1247.jpg
    282.3 KB · Views: 0
  • SAM_1248.jpg
    SAM_1248.jpg
    229.9 KB · Views: 0
Top