I love the colour Tony. What colour are the hangers going to be? I see they are still unpainted (or were they left till last)
You are using an out of date browser. It may not display this or other websites correctly.
You should upgrade or use an alternative browser.
You should upgrade or use an alternative browser.
2013 - AusEx (AmEx Replica)
- Thread starter OzFab
- Start date
- Status
- Not open for further replies.
OzFab
Well-known member
Yes they are, they're silver
OzFab
Well-known member
Lets Back up a bit, I thought I'd posted this but I can't find it so, for those who want an easy, Honda/clone, post governor removal throttle setup, pay attention:
You will need a short length (approx 3-4") of 2mm solid wire (a wire coathanger is perfect), a 10mm socket (to remove the throttle plate), a sharpie or other felt tipped marker pen, pliers (to bend the wire) & some degree of manual dexterity.
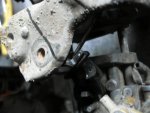
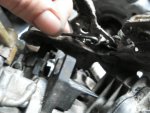
The first thing to do is remove the throttle assembly from the top of the carb. On the top of the carb you will see 2 black pieces, the one on the outside controls the ckoke butterfly, the other one, closest to the head, controls the throttle butterfly; that's the one we'll be working with.
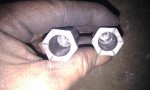
Looking closely at the black butterfly linkage you will see a small hole through it & a slot near the top (see pic 1). Take the piece of wire & place it into the hole until it protrudes through the bottom of the hole. Now lift it so that the wire is just above the bottom of the hole & mark the wire at the slot with a sharpie. Remove the wire & make a 90* bend at the mark.
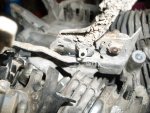
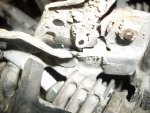
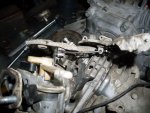
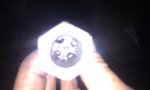
On the underside of the throttle plate, you will notice a small (1/4" x 3/8") tab with a small (approx 1/8") hole in it, pointing down from the top of the throttle base plate (pics 2 & 3). Refit the wire in the linkage, making sure it slides freely in the slot. Reposition the throttle assembly &, making sure the throttle & butterfly are both in the closed position, mark the wire level with the hole of the tab mentioned earlier. Don't worry if the wire is below the hole, that's a simple adjustment.
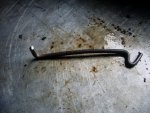
Now bend the wire at the mark 90* so that it points in towards the engine then, leaving a gap of around 10mm (3/8") make another bend of around 135* opposite to the one you just made. Once removed from the carb it should now look like the one in pic 4.
Now loop the end with the double bend through the hole in the underside of the throttle base (as seen in pic 5) & insert the other end in the throttle butterfly linkage (as seen in pic 6) & bolt down the throttle assembly.
Now you will notice the wire is probably binding on the slot in the butterfly linkage; using two pairs of pliers, carefully bend the wire until it stops binding & moves freely & you're done.
You can now attach a cable to the throttle assembly as you would if the governor is intact.
... & you can see it in action here... watch closely around the 20-30 second mark
You will need a short length (approx 3-4") of 2mm solid wire (a wire coathanger is perfect), a 10mm socket (to remove the throttle plate), a sharpie or other felt tipped marker pen, pliers (to bend the wire) & some degree of manual dexterity.
The first thing to do is remove the throttle assembly from the top of the carb. On the top of the carb you will see 2 black pieces, the one on the outside controls the ckoke butterfly, the other one, closest to the head, controls the throttle butterfly; that's the one we'll be working with.
Looking closely at the black butterfly linkage you will see a small hole through it & a slot near the top (see pic 1). Take the piece of wire & place it into the hole until it protrudes through the bottom of the hole. Now lift it so that the wire is just above the bottom of the hole & mark the wire at the slot with a sharpie. Remove the wire & make a 90* bend at the mark.
On the underside of the throttle plate, you will notice a small (1/4" x 3/8") tab with a small (approx 1/8") hole in it, pointing down from the top of the throttle base plate (pics 2 & 3). Refit the wire in the linkage, making sure it slides freely in the slot. Reposition the throttle assembly &, making sure the throttle & butterfly are both in the closed position, mark the wire level with the hole of the tab mentioned earlier. Don't worry if the wire is below the hole, that's a simple adjustment.
Now bend the wire at the mark 90* so that it points in towards the engine then, leaving a gap of around 10mm (3/8") make another bend of around 135* opposite to the one you just made. Once removed from the carb it should now look like the one in pic 4.
Now loop the end with the double bend through the hole in the underside of the throttle base (as seen in pic 5) & insert the other end in the throttle butterfly linkage (as seen in pic 6) & bolt down the throttle assembly.
Now you will notice the wire is probably binding on the slot in the butterfly linkage; using two pairs of pliers, carefully bend the wire until it stops binding & moves freely & you're done.
You can now attach a cable to the throttle assembly as you would if the governor is intact.
... & you can see it in action here... watch closely around the 20-30 second mark
Attachments
-
 1.jpg68.8 KB · Views: 71
 -
 2.jpg111.4 KB · Views: 71
 -
 3.jpg99.5 KB · Views: 61
 -
 4.jpg110.7 KB · Views: 60
 -
 5.jpg73.9 KB · Views: 68
 -
 6.jpg109.8 KB · Views: 66
 -
 7.jpg101.5 KB · Views: 78
Doc Sprocket
*********
Paint looks fantastic- Nice work!
OzFab
Well-known member
Paint looks fantastic- Nice work!
It's still not cleared yet...:toetap05:
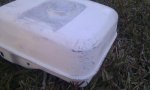
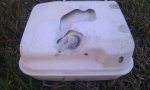
Speaking of paint: I assume, by now, you've all seen the results of yesterdays painting effort. Today I guide coated & rubbed the tank with 180 wet. It had some pretty deep gouges in the paint so, I had to reprime it. Most of the damage had to be on the side you see ,not the side facing the seat, didn't it...
In the process of fixing the wire hanger, the wire broke & it dropped again! Thankfully, this time it wasn't wet but, it did hit the concrete this time, creating a large (1/4") chip in the paint; a bit of extra primer needed there...
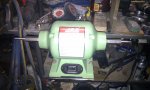
On a positive note, I FINALLY finished setting up my polisher today.
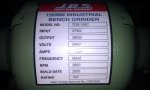
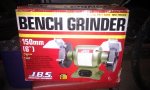
2 weeks ago I bought a new, in box 6" bench grinder for $40. It was purchased by the PO with the intention of building a bench but, he never got around to it. Well, my gain...
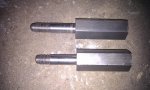
I set about making spindles from 3/4" hex bar. I finished the right one without incident; I drilled out the centre to 10mm then out to 1/2", leaving enough to cut an internal 12mm thread at the base of the hole. Then I flipped it around & turned down the outside beyond the hollow to 10mm (the size of the bore hole in the polishing pads) & cut a thread on the end.
The left one was where I ran into a problem...
I drilled the centre, the same as the right one, got the puprose bought 12mm left hand tap centred & started, removed the piece from the lathe & put it in my vice. Then I started winding the tap with a tap wrench. All was going well when, about halfway down SNAP!
 THE TAP BROKE! I WASN'T EVEN PUTTING THAT MUCH PRESSURE ON IT!
When I returned it to the store, the store owner & I both noticed that the metal was flawed, which created a weak point &, consequently, is what caused the break. The bad news was he didn't have a replacement...
As luck would have it, I was in contact with a fellow who recycles tools & he just happened to have 3 of them &, at $25 well used, they weren't cheap chinese ones
So, today I spun up another one without incident in a little over an hour.
It currently only has 4" wheels on it to fit the kart wheels. I also have pairs of 2", 3" & 6" wheels
Attachments
-
 IMAG0126.jpg25.1 KB · Views: 26
 -
 IMAG0106.jpg60.3 KB · Views: 28
 -
 IMAG0105.jpg82.4 KB · Views: 25
 -
 IMAG0119.jpg57.1 KB · Views: 28
 -
 IMAG0117.jpg61 KB · Views: 36
 -
 IMAG0121.jpg103.7 KB · Views: 26
 -
 IMAG0122.jpg71.6 KB · Views: 27
 -
 IMAG0123.jpg76.8 KB · Views: 28
 -
 IMAG0120.jpg81.9 KB · Views: 34
OzFab
Well-known member
We've had beautiful weather here for the past week & what have I done with it? NOTHING! Why? I rolled my ankle last tuesday & have been off my feet since. How frustrating, I have a hard time sitting around doing nothing, it's killing me...
Knowing my luck, just as I get back on my feet, the rain will set in...
Knowing my luck, just as I get back on my feet, the rain will set in...
Argg. Don't you hate that. I now have the flu and am in bed
OzFab
Well-known member
Aww man, bummer; get well soon
James.Ait.2013
The Village Idiot
the rain really has set in around home. 2 inches of rain over the weekend. no fox shooting for me. 
OzFab
Well-known member
I started well but, as time wore on, it's become more difficult to find time to proceed. The kart is all but complete, the frame is hanging in my garage awaiting a clear coat but, between bad weather & now injury that hasn't happened & I'm getting dangerously close to not finishing...
Thankfully, I have completed to the point of fulfilling the rules of completion but I wanted it finished before the deadline... if only for my own peace of mind.
Apart from a clear coat, I still need to finish polishing the wheels & a few other parts (that's not hard work, just time consuming) repaint the fuel tank then reassemble everything after the clear has had a chance to harden for a week... With only 2 weeks to go I'm not sure that's gonna happen...
I'll keep my fingers crossed for you!
Saturday will be your day.. I know it.
'sid
Saturday will be your day.. I know it.
'sid
OzFab
Well-known member
Ha, not this saturday, I'm not even at home; I, literally, can't do anything until Monday...
But you're back on your feet (or ankle in this case)?
That's what matters most, now everything else is just a matter of time management.
'sid
That's what matters most, now everything else is just a matter of time management.
'sid
OzFab
Well-known member
But you're back on your feet (or ankle in this case)?
Almost, it's about 90%, thanks to my wonderful ex (it's complicated) who ran around after me for 5 days so I had a chance to really rest it...
That's what matters most, now everything else is just a matter of time management.
True enough but, first I need to find some time to manage

With a bit of luck, it won't be too difficult though
OzFab
Well-known member
...On The Final Stretch
What a week! After resting my ankle for a week, 48 hours after returning home it was as painful as ever; by Friday I was ready to concede, now I'm glad I didn't...
The weather the last few days has been picture perfect so I thought it, I'm gonna do this!
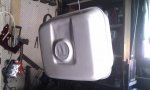
Saturday August 24th: On the THIRD attempt I finally managed to paint the fuel tank without incident! You may recall, on the first attempt, I'd just finished when it fell on the grass. On the second attempt I just couldn't get the consistency right (probably something to do with the weather) & the paint ran badly!
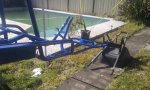
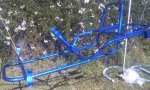
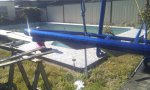
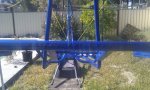
Knowing the weather would be even better the next day, I decided to get the frame out for it's clear coat but, not before I paid homage to the original (see pics 2 & 3)
Sunday August 25th: Beautiful weather; 20*C by midday, not a breath of wind nor a cloud in the sky, as close to perfect as I'll get for clearing. One heavy coat follower by two thin coats & I'm done!
Now all I have to do is polish the front wheels & a few other odds & ends, then put it all back together over the next 5 days
What a week! After resting my ankle for a week, 48 hours after returning home it was as painful as ever; by Friday I was ready to concede, now I'm glad I didn't...
The weather the last few days has been picture perfect so I thought
it, I'm gonna do this!Saturday August 24th: On the THIRD attempt I finally managed to paint the fuel tank without incident! You may recall, on the first attempt, I'd just finished when it fell on the grass. On the second attempt I just couldn't get the consistency right (probably something to do with the weather) & the paint ran badly!
Knowing the weather would be even better the next day, I decided to get the frame out for it's clear coat but, not before I paid homage to the original (see pics 2 & 3)
Sunday August 25th: Beautiful weather; 20*C by midday, not a breath of wind nor a cloud in the sky, as close to perfect as I'll get for clearing. One heavy coat follower by two thin coats & I'm done!
Now all I have to do is polish the front wheels & a few other odds & ends, then put it all back together over the next 5 days
Attachments
-
 IMAG0141.jpg135.9 KB · Views: 66
 -
 IMAG0137.jpg193.2 KB · Views: 91
 -
 IMAG0139.jpg119.6 KB · Views: 57
 -
 IMAG0136.jpg129.1 KB · Views: 64
 -
 IMAG0135.jpg65.3 KB · Views: 47
 -
 IMAG0140.jpg100.3 KB · Views: 47
Jim-L-L
New member
Well done man ! love that colour looks great
great, did you do the lettering by hand of is that a decal?
Good to see you back on your feet.
Oh I miss the warning sticker on your kart
"Do not lick the lacquer!"
'sid
Good to see you back on your feet.
Oh I miss the warning sticker on your kart
"Do not lick the lacquer!"
'sid
OzFab
Well-known member
great, did you do the lettering by hand of is that a decal?
It was a bit of a process but, long story short, it's painted on...
I printed the design onto a piece of cardboard, cut out the letters, traced onto a piece of 2" masking tape then set the tape in place as a stencil, covered the whole frame with plastic & painted it
It's actually a bit heavier than I wanted coz it was hard to judge when you can't see the contrast...
Good to see you back on your feet.
Well, sort of, it's still not great...
Oh I miss the warning sticker on your kart
"Do not lick the lacquer!"
'sid
yeah, it does look kinda tasty EDIT: Just got back from the doctor. Turns out that, when I rolled my ankle 4 weeks ago, I chipped the edge of the Talar Dome (the weight bearing knuckle); that explains a lot...
Well as far I can tell, it looks great!It's actually a bit heavier than I wanted coz it was hard to judge when you can't see the contrast...
It sure does.
I'm sorry to hear that, sounds like a he// of a pain.EDIT: Just got back from the doctor. Turns out that, when I rolled my ankle 4 weeks ago, I chipped the edge of the Talar Dome (the weight bearing knuckle); that explains a lot...
Hopefully it'll heal without any problems and FAST!
'sid
firemanjim
Just kartin' around....
Hope you get well soon. Thats a sweet @§$ kart for sure! Outstanding craftsmanship. ....
- Status
- Not open for further replies.