Torsk (Backbone Chassis) Kart

Status
Not open for further replies.

Functional Artist

Well-known member
Messages
4,434
Reaction score
1,724
Location
Toledo, Ohio
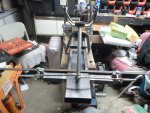
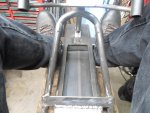
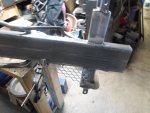
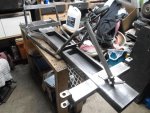
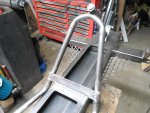
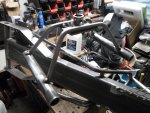
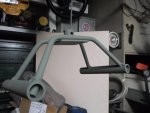
Now that part of the steering is pretty much complete, next is to work on the spindles

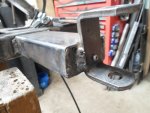
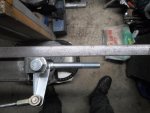
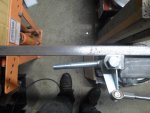
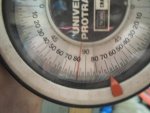
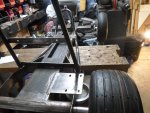
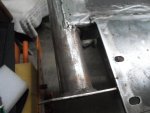
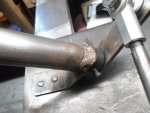
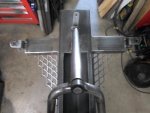
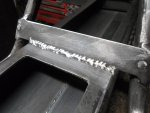
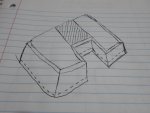
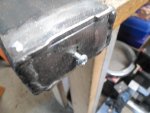
When I capped off the ends of the front axle, I angled the plates, where the spindle mounts to ~10*
(I read somewhere, that's how it's supposed to be)
...but, it didn't look right

So, I did some research
(back to the books, so to speak)

http://www.diygokarts.com/vb/showthread.php?t=11760&highlight=caster+camber

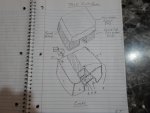
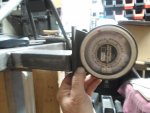
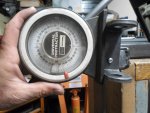
So, to set it up right, you have to keep in mind
...Caster (the angle of the spindle, when viewed from the side)
...Camber (the angle of the spindle, when viewed from the front)
...Toe Out (the angle of the spindle, when viewed from the top)
...& King Pin Inclination (an imaginary line thru the spindle main bolt (king pin) to the center of the tires contact patch)

But, it seems that there are no definitive answer
...there are a lot of variables
...& it depends on the specific situation (how the kart is designed & what you intend to do with it)

So, for this kart, I am going to
...set the Caster @~7-8* (10* just seemed like too much)
...redo the Camber, back to 0* (leaning front wheels just don't look right)
...& set it to Toe In just a bit (it's easily adjustable later)

Also, I am using factory made spindles so, there is isn't a lot I can do about the KPI (without extensive work)


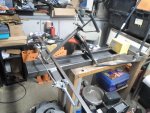
Moving on (now, with more info)

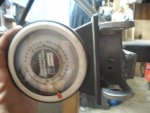
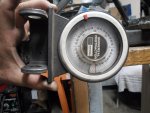
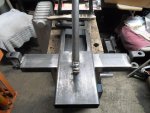
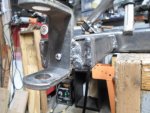
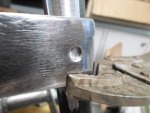
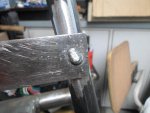
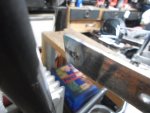
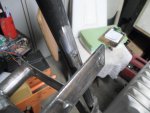
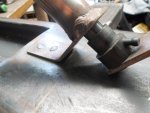
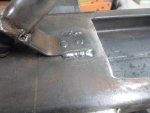
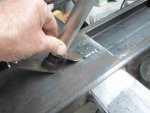
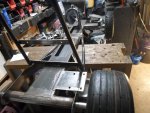
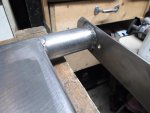
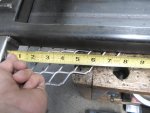
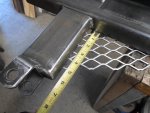
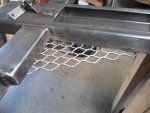
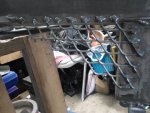
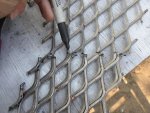
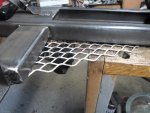
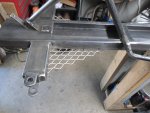
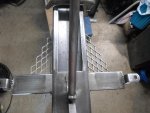
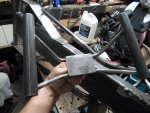
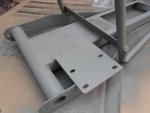
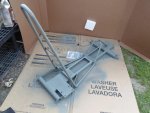
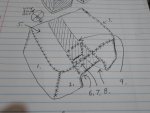
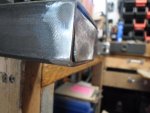
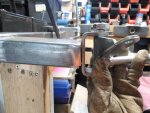
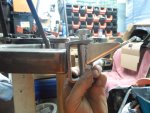
I drilled 1/8" "pin/screw" holes in the center if both front axle end plates

Lined the spindle brackets (up/even) with the bottom of the axle tube
...& drilled corresponding "pin/screw" holes

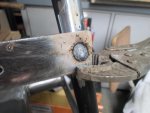
This way I could "screw" them on (evenly on both sides)
...to more accurately place & adjust them

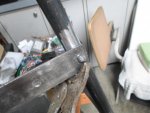
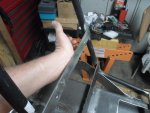
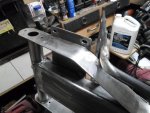
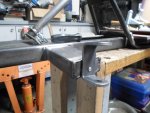
I can lean them "outward" to "fix" the Camber issue (that I caused)

It also allows me to "very accurately & evenly" adjust the Caster on both sides (to matching specs) :thumbsup:
 

Attachments

  • SAM_9544.jpg
    SAM_9544.jpg
    239.3 KB · Views: 1
  • SAM_9551.jpg
    SAM_9551.jpg
    266.4 KB · Views: 1
  • SAM_9546.jpg
    SAM_9546.jpg
    288.8 KB · Views: 1
  • SAM_9558.jpg
    SAM_9558.jpg
    253.4 KB · Views: 1
  • SAM_9722.jpg
    SAM_9722.jpg
    273.8 KB · Views: 1
  • SAM_9721.jpg
    SAM_9721.jpg
    282.7 KB · Views: 1
  • SAM_9720.jpg
    SAM_9720.jpg
    243.9 KB · Views: 2
  • SAM_9718.jpg
    SAM_9718.jpg
    209.3 KB · Views: 1
  • SAM_9724.jpg
    SAM_9724.jpg
    243.9 KB · Views: 1
  • SAM_9725.jpg
    SAM_9725.jpg
    266.1 KB · Views: 3

Functional Artist

Well-known member
Messages
4,434
Reaction score
1,724
Location
Toledo, Ohio
After double checking the Caster & Camber
...I welded 'em on good :thumbsup:

Next, is to make some tie-rods

Used a piece of 1/4" x 1" steel as a straight edge
...layed it across/behind the spindle brackets
...to help align the spindles

Measured, marked & cut a couple of pieces of 5/16" rod
(ya, I know it's kinda small but, it's hard to do light weigh & heavy duty at the same time)
(we'll see how they do, can always add beefier/heavier ones later) :cheers2:

Threaded both ends ~3/4"
...added the center links & ends
...then toed 'em in just a bit :2guns:
 

Attachments

  • SAM_9743.jpg
    SAM_9743.jpg
    220.6 KB · Views: 0
  • SAM_9740.jpg
    SAM_9740.jpg
    271 KB · Views: 0
  • SAM_9736.jpg
    SAM_9736.jpg
    293.5 KB · Views: 0
  • SAM_9735.jpg
    SAM_9735.jpg
    251.3 KB · Views: 1
  • SAM_9731.jpg
    SAM_9731.jpg
    251.2 KB · Views: 0
  • SAM_9749.jpg
    SAM_9749.jpg
    315.4 KB · Views: 4
  • SAM_9748.jpg
    SAM_9748.jpg
    263.9 KB · Views: 1
  • SAM_9747.jpg
    SAM_9747.jpg
    240.3 KB · Views: 0
  • SAM_9745.jpg
    SAM_9745.jpg
    315.6 KB · Views: 3
  • SAM_9744.jpg
    SAM_9744.jpg
    212.1 KB · Views: 0

Functional Artist

Well-known member
Messages
4,434
Reaction score
1,724
Location
Toledo, Ohio
I got a little more done on the kart :thumbsup:

Back to the seat, kinda

Gotta be able to mount it, before we put the cover on it

So, for the seat bottom, I just drilled (2) holes into the backbone & also, added corresponding T-nuts

For mounting the seat back, I added a couple pieces of 1/8" x 1" "cross bars", with 1/4" mounting holes & added corresponding T-nuts, in the back panel of the seat

I used my "new" spot weld mounting method
...drilled 1/4" holes in the ends of each cross bar
...clamped 'em on & filled in the holes

But, just for Ha ha's I banged the back of the top bar
...just with my hand & (1) side just "poped" off :ack2:

Well, :censored:

"Back to the drawin' board"
...clamped 'er "back in place" & welded 'er on the "old fashioned way" :thumbsup:
 

Attachments

  • SAM_9752.jpg
    SAM_9752.jpg
    281.1 KB · Views: 1
  • SAM_9754.jpg
    SAM_9754.jpg
    226 KB · Views: 0
  • SAM_9756.jpg
    SAM_9756.jpg
    214.7 KB · Views: 0
  • SAM_9758.jpg
    SAM_9758.jpg
    233.2 KB · Views: 1
  • SAM_9776.jpg
    SAM_9776.jpg
    268.5 KB · Views: 1
  • SAM_9761.jpg
    SAM_9761.jpg
    209.5 KB · Views: 0
  • SAM_9760.jpg
    SAM_9760.jpg
    205.8 KB · Views: 0
  • SAM_9759.jpg
    SAM_9759.jpg
    213.6 KB · Views: 0
  • SAM_9766.jpg
    SAM_9766.jpg
    242.6 KB · Views: 0

Functional Artist

Well-known member
Messages
4,434
Reaction score
1,724
Location
Toledo, Ohio
It takes a lot of heat input, real fast, to do a good plug weld.

Important detail :thumbsup:

Now, ya tell me :cheers2:

Thanks, now we "all" have more info on the what & why :cheers2:

I'll still use it for just "tackin'" stuff in place
...but, then apply a "good" perimeter weld :2guns:

Speakin' of :idea2:
...remember, I just "spot" welded the steering housing foot (as a test)

Abort Test...Abort test
...not waitin' for it to "fail"

So, I went back & added some extra welds to the steering housing "foot" :thumbsup:

Had to separate the steering & nylon bushing, again
...welded (1) side
...checked temp
...waited (for it to kool a bit)
...then, welded the other side

Not quite as clean & pretty

but,

Yup, that should do, better :2guns:
 

Attachments

  • SAM_9788.jpg
    SAM_9788.jpg
    247 KB · Views: 2
  • SAM_9798.jpg
    SAM_9798.jpg
    228.9 KB · Views: 2
  • SAM_9799.jpg
    SAM_9799.jpg
    215.7 KB · Views: 2

Functional Artist

Well-known member
Messages
4,434
Reaction score
1,724
Location
Toledo, Ohio
Been lookin' into options for front wheels

I would like to use those 13 x 5.00/6 ribbed tires that I have on the front
...but, they need narrower rims (like ~3" wide)

I checked with BMI karts & a few other kart part places
...but, all I found (in 6") was the wider rims (like ~5' wide)

Lookin' in the Surplus Center catalog
...I found some narrower 4.10/3.50-6 rims/tires (hub width 3 1/4") #1-3657 for $12.95 ea.
...But, not sure about them bearings (kinda remind me of HF wheels)

Anyone know of "higher quality" bearings for these type of wheels?

I also found some (kinda outta the ordinary) 6" wheels that caught my eye #1-116259
...they have a 3" wide plastic rim with ceramic bushings
(for use around corrosive materials like salt & fertilizer)
...a 4.00-6 ribbed (wheelbarrow) tire
...& are super light weight

I'll give 'em a try, if they don't work out I can just use 'em on the 2-wheel dolly
(as long as I don't bust 'em during testing)

First pic is of 6" plastic wheel (left), 6" steel wheel (mid) & the 13-5.00/6 tire (right)

Second pic is the 1-3657 steel wheel

Third pic is a close up of the bearing

Fourth pic is of the plastic wheel & bushing

Fifth pic is a side by side of the plastic wheel & the 13-5.00/6 tire

Six & seven are of the kart with the steel rim

Eight, nine & ten are of the kart with the plastic wheel :cheers2:
 

Attachments

  • SAM_9811.jpg
    SAM_9811.jpg
    252.3 KB · Views: 1
  • SAM_9828.jpg
    SAM_9828.jpg
    218.5 KB · Views: 1
  • SAM_9829.jpg
    SAM_9829.jpg
    206.1 KB · Views: 1
  • SAM_9823.jpg
    SAM_9823.jpg
    141.1 KB · Views: 1
  • SAM_9824.jpg
    SAM_9824.jpg
    246.7 KB · Views: 0
  • SAM_9812.jpg
    SAM_9812.jpg
    364.7 KB · Views: 1
  • SAM_9818.jpg
    SAM_9818.jpg
    275.8 KB · Views: 2
  • SAM_9816.jpg
    SAM_9816.jpg
    304.4 KB · Views: 1
  • SAM_9815.jpg
    SAM_9815.jpg
    315.3 KB · Views: 1
  • SAM_9813.jpg
    SAM_9813.jpg
    294.1 KB · Views: 2

anickode

Active member
Messages
2,296
Reaction score
15
Location
S.E. Michigan
Order floater wheel bearings from a go kart supplier. They're like 4 bucks apiece. Same 1⅝" OD as hand truck bearings. Just press them in and go. That's what I ended up doing on my budget kart with some good quality one piece 6" hand truck wheels. Just a bearing upgrade. When the tires give out, I'll buy some better ones.
 

Functional Artist

Well-known member
Messages
4,434
Reaction score
1,724
Location
Toledo, Ohio
We have had a lot of rain & humidity lately
...& we're beginnin' to get some corrosion (rust)

I think we have most of the major "frame" stuff done

So, I guess it's time to get 'er cleaned up
...& then, sealed up :thumbsup:
 

Attachments

  • SAM_9779.jpg
    SAM_9779.jpg
    248.9 KB · Views: 1
  • SAM_9780.jpg
    SAM_9780.jpg
    218.2 KB · Views: 1
  • SAM_9781.jpg
    SAM_9781.jpg
    277.4 KB · Views: 1

Functional Artist

Well-known member
Messages
4,434
Reaction score
1,724
Location
Toledo, Ohio
After several hours of deburring, smoothing, rounding, filing & sanding

When I thought I just about had 'er done, I noticed
...that we got no floorboards or stirrups (so to speak)

This frame is designed for the operator to "prop" their feet right on the front axle housing
...but, for "safety" purposes, I think it would be best to have something down under the feet too
...just in case :thumbsup:
 

Attachments

  • SAM_9866.jpg
    SAM_9866.jpg
    264.1 KB · Views: 3
  • SAM_9919.jpg
    SAM_9919.jpg
    215.5 KB · Views: 2
  • SAM_9911.jpg
    SAM_9911.jpg
    265.2 KB · Views: 2
  • SAM_9867.jpg
    SAM_9867.jpg
    233.3 KB · Views: 2
  • SAM_9868.jpg
    SAM_9868.jpg
    189.1 KB · Views: 1

Functional Artist

Well-known member
Messages
4,434
Reaction score
1,724
Location
Toledo, Ohio
I got some 8' running boards off of a Ford F250 p/u
...they should do the trick :thumbsup:

JK :lolgoku:

We don't need nothin that elaborate
...just small plates under each foot

I found a piece of scrap "expanded" steel, that should do
...it's left over from either the Zero kart or the !Arriba! kart (can't remember)

Did some measurin', markin' & cuttin'
 

Attachments

  • SAM_9873.jpg
    SAM_9873.jpg
    258.8 KB · Views: 0
  • SAM_9871.jpg
    SAM_9871.jpg
    280.7 KB · Views: 0
  • SAM_9869.jpg
    SAM_9869.jpg
    249.7 KB · Views: 0
  • SAM_9863.jpg
    SAM_9863.jpg
    279.3 KB · Views: 0
  • SAM_9862.jpg
    SAM_9862.jpg
    310.7 KB · Views: 0
  • SAM_9874.jpg
    SAM_9874.jpg
    294.5 KB · Views: 0
  • SAM_9880.jpg
    SAM_9880.jpg
    466.2 KB · Views: 0
  • SAM_9881.jpg
    SAM_9881.jpg
    392.8 KB · Views: 0

Functional Artist

Well-known member
Messages
4,434
Reaction score
1,724
Location
Toledo, Ohio
Once I had the (2) pieces, just had to "dry fit" 'em
...& trim off a bit more of the excess

(1) piece had a nice "finished" edge to it
...but, the other didn't so, I had to do some bodywork

Then, they got permanently attached with a bunch of "blob" welds :2guns:
 

Attachments

  • SAM_9889.jpg
    SAM_9889.jpg
    257.6 KB · Views: 0
  • SAM_9887.jpg
    SAM_9887.jpg
    264.9 KB · Views: 0
  • SAM_9884.jpg
    SAM_9884.jpg
    258.6 KB · Views: 0
  • SAM_9883.jpg
    SAM_9883.jpg
    350.1 KB · Views: 0
  • SAM_9882.jpg
    SAM_9882.jpg
    290.6 KB · Views: 0
  • SAM_9893.jpg
    SAM_9893.jpg
    228.9 KB · Views: 1
  • SAM_9892.jpg
    SAM_9892.jpg
    276.8 KB · Views: 0
  • SAM_9890.jpg
    SAM_9890.jpg
    259.1 KB · Views: 1

Functional Artist

Well-known member
Messages
4,434
Reaction score
1,724
Location
Toledo, Ohio
After, lots & lots & lots of clean up (mostly smoothing rough spots)

Using the "WPI" (work piece indicator) concept
...feel, smooth, feel again & smooth some more, 'til it's super smooth :thumbsup:

Then, I wiped 'er down with some paint thinner
...but, kept finding more & more rough spots :ack2:

After a couple more "go overs" I think she's finally ready :wai:

While I was at it, I also, cleaned up the steering wheel & spindles :2guns:
 

Attachments

  • SAM_9917.jpg
    SAM_9917.jpg
    315.7 KB · Views: 1
  • SAM_9920.jpg
    SAM_9920.jpg
    288.8 KB · Views: 1
  • SAM_9921.jpg
    SAM_9921.jpg
    262.4 KB · Views: 3
  • SAM_9914.jpg
    SAM_9914.jpg
    293.8 KB · Views: 3
  • SAM_9915.jpg
    SAM_9915.jpg
    289 KB · Views: 2

Functional Artist

Well-known member
Messages
4,434
Reaction score
1,724
Location
Toledo, Ohio
Set up a mini paint booth in the back yard :thumbsup:

Still, just using' "rattle cans"

Gave 'er a final wipe down & shot 'er

Since, it's mostly bare metal I am using "Self Etching" primer
...it's supposed to "bite" better on clean metal:2guns:
 

Attachments

  • SAM_9929.jpg
    SAM_9929.jpg
    202.1 KB · Views: 3
  • SAM_9927.jpg
    SAM_9927.jpg
    332.1 KB · Views: 2
  • SAM_9926.jpg
    SAM_9926.jpg
    348.9 KB · Views: 2
  • SAM_9924.jpg
    SAM_9924.jpg
    299.7 KB · Views: 0
  • SAM_9925.jpg
    SAM_9925.jpg
    237 KB · Views: 0

Functional Artist

Well-known member
Messages
4,434
Reaction score
1,724
Location
Toledo, Ohio
Gave 'er ~1/2 hour to dry then, set 'er down
...& finished sealing 'er up good :thumbsup:

Hung the spindles & steering wheel
...& sealed 'em up too :cheers2:

Kinda reminds me of Army colors
...like an olive drab (off-greenishgray) :2guns:
 

Attachments

  • SAM_9942.jpg
    SAM_9942.jpg
    631.7 KB · Views: 1
  • SAM_9941.jpg
    SAM_9941.jpg
    274.2 KB · Views: 3
  • SAM_9939.jpg
    SAM_9939.jpg
    180.7 KB · Views: 1
  • SAM_9938.jpg
    SAM_9938.jpg
    265.5 KB · Views: 2
  • SAM_9933.jpg
    SAM_9933.jpg
    278.2 KB · Views: 2
  • SAM_9949.jpg
    SAM_9949.jpg
    196.1 KB · Views: 1

Functional Artist

Well-known member
Messages
4,434
Reaction score
1,724
Location
Toledo, Ohio
Had some time so, I did some work on the seat :thumbsup:

Worked on the seat back first (the easier section)

Cut a piece of plywood to the desired dimensions
...used 1" thick "closed cell" foam rubber & ~1" of "fluff" to soften it up
& round the corners

A friend gave me some faux gator skin type of material
...it seems kinda thin
...but, looks kool so, I'll give 'er a shot :2guns:

Layed the plywood, foam rubber & the fluff out on the material
...trimmed around leaving ~3" on the sides & bottom for "wrap around"

I left ~ 16" of material @ the top "for wrap around"
...but, also to cover the back side of the plywood (for a cleaner look)

Marked the corners @ a 45* angle
…& sewed 'em up (straight first, then on a bit of an angle so the corners will curve nicely when flipped around the right way)

Stapled 'er all the way around
...then flipped the top "flap" down & stapled 'er down too :cheers2:
 

Attachments

  • SAM_0056.jpg
    SAM_0056.jpg
    238.8 KB · Views: 0
  • SAM_0050.jpg
    SAM_0050.jpg
    352.8 KB · Views: 0
  • SAM_0047.jpg
    SAM_0047.jpg
    204.2 KB · Views: 0
  • SAM_0044.jpg
    SAM_0044.jpg
    196.8 KB · Views: 0
  • SAM_0042.jpg
    SAM_0042.jpg
    249.2 KB · Views: 0
  • SAM_0061.jpg
    SAM_0061.jpg
    255.9 KB · Views: 1
  • SAM_0060.jpg
    SAM_0060.jpg
    324 KB · Views: 0
  • SAM_0059.jpg
    SAM_0059.jpg
    196 KB · Views: 0
  • SAM_0058.jpg
    SAM_0058.jpg
    215.9 KB · Views: 0
  • SAM_0057.jpg
    SAM_0057.jpg
    237.8 KB · Views: 0

Functional Artist

Well-known member
Messages
4,434
Reaction score
1,724
Location
Toledo, Ohio
The seat bottom...
...the battery cut out was a major PITA :ack2:

I drew it out
...& kinda planned it out
...step by step

But, WOW super complicated to make a cover fit "good"

So, I ended makin' (3) seat covers before it came out "decent"
...not great but, passable
...third times a charm :cheers2:
 

Attachments

  • SAM_0071.jpg
    SAM_0071.jpg
    179.6 KB · Views: 0
  • SAM_0066.jpg
    SAM_0066.jpg
    190.8 KB · Views: 0
  • SAM_0065.jpg
    SAM_0065.jpg
    209.8 KB · Views: 0
  • SAM_0064.jpg
    SAM_0064.jpg
    240.8 KB · Views: 0
  • SAM_0063.jpg
    SAM_0063.jpg
    260.6 KB · Views: 0
  • SAM_0072.jpg
    SAM_0072.jpg
    256.5 KB · Views: 0
  • SAM_0074.jpg
    SAM_0074.jpg
    201.5 KB · Views: 0
  • SAM_0088.jpg
    SAM_0088.jpg
    222.1 KB · Views: 0
  • SAM_0094.jpg
    SAM_0094.jpg
    253.1 KB · Views: 1
  • SAM_0095.jpg
    SAM_0095.jpg
    221 KB · Views: 0
Status
Not open for further replies.
Top