Slingshot

madprofessor

"Loose Cannon Creations"
Messages
2,899
Reaction score
888
Location
Jacksonville, Florida
Still seems like a good idea. There may be some great-grandchildren someday, and the more things they can learn about from the old-timers' successes and fails, the more we'll have that we can enjoy teaching them.
 

Functional Artist

Well-known member
Messages
4,410
Reaction score
1,692
Location
Toledo, Ohio
I made up a extra HD mounting bracket, for the steering rack
...but, it was really heavy
...so, I lightened it up a bit ;)

I used an assortment of hole saws
...then, kinda chamfered the holes with some step bits 😎

I also, drilled & tapped some mounting, bolt holes too :2guns:


* Hole saw tip:
Install & use a piece of 1/4" rod, to guide the saw, instead of a 1/4" drill bit
This way, it won't/can't "wallar out" (technical term) the "guide hole" (another technical term) like a drill bit can & will :huh:
...ya just gotta drill ya a 1/4" "pilot hole" first 😎SAM_2405.JPG
 

Attachments

  • SAM_2397.JPG
    SAM_2397.JPG
    3 MB · Views: 0
  • SAM_2398.JPG
    SAM_2398.JPG
    3.1 MB · Views: 0
  • SAM_2400.JPG
    SAM_2400.JPG
    3.1 MB · Views: 0
  • SAM_2402.JPG
    SAM_2402.JPG
    2.8 MB · Views: 0
  • SAM_2403.JPG
    SAM_2403.JPG
    3 MB · Views: 0
  • SAM_2404.JPG
    SAM_2404.JPG
    3 MB · Views: 0
  • SAM_2406.JPG
    SAM_2406.JPG
    3.1 MB · Views: 0

madprofessor

"Loose Cannon Creations"
Messages
2,899
Reaction score
888
Location
Jacksonville, Florida
Would be nice to have your kind of patience, drilling out all those holes. And a back that can hunker over anything that long. 2 more weeks and another spinal procedure will get me there again for a few more months. Anyhooooo, wanted to say thanks for the excellent holesaw tip.
Not because I wallow out pilot holes, I don't. No, I go for the gusto, and just snap the pilot bits off halfway through the job.
 

Functional Artist

Well-known member
Messages
4,410
Reaction score
1,692
Location
Toledo, Ohio
Would be nice to have your kind of patience, drilling out all those holes. And a back that can hunker over anything that long. 2 more weeks and another spinal procedure will get me there again for a few more months. Anyhooooo, wanted to say thanks for the excellent holesaw tip.
Not because I wallow out pilot holes, I don't. No, I go for the gusto, and just snap the pilot bits off halfway through the job.
When I do "my art", I kinda get "in a zone" :bannana:
...& don't think of it as, or it doesn't feel like a "task"

It's just gotta be done
...ta make 'er look kool ;)

Your very welcome :2guns:
...team work :cheers2:
 

Functional Artist

Well-known member
Messages
4,410
Reaction score
1,692
Location
Toledo, Ohio
Here are pics of the "cleaned up" steering rack mounting bracket, bolted to the bracket :thumbsup:
...with some kool, chamfered holes :cheers2:

I got the bracket welded on to the kart, too :2guns:
SAM_2412.JPG
 

Attachments

  • SAM_2407.JPG
    SAM_2407.JPG
    3.1 MB · Views: 1
  • SAM_2408.JPG
    SAM_2408.JPG
    3 MB · Views: 2
  • SAM_2410.JPG
    SAM_2410.JPG
    3 MB · Views: 4
  • SAM_2413.JPG
    SAM_2413.JPG
    3.1 MB · Views: 4

Functional Artist

Well-known member
Messages
4,410
Reaction score
1,692
Location
Toledo, Ohio
I went ahead & tack welded the spindles "in place" @ ~10* toward the rear (which should help keep 'er good-n-centered) :cheers2:

But, first I had ta make sure the kart was pretty level
...& then, that the A-frames were level

Next, was to set the Caster
...& then, "lock 'er down" with "the screw" ;)

The same procedure for the other side
...but, I then, also used a straight edge (board)

Just ta make sure that both the left & right spindle brackets were "pretty closely" aligned 😎
SAM_2370.JPG
 

Attachments

  • SAM_2365.JPG
    SAM_2365.JPG
    3 MB · Views: 3
  • SAM_2371.JPG
    SAM_2371.JPG
    3.1 MB · Views: 2
  • SAM_2375.JPG
    SAM_2375.JPG
    3.2 MB · Views: 2
  • SAM_2373.JPG
    SAM_2373.JPG
    3.1 MB · Views: 2
  • SAM_2376.JPG
    SAM_2376.JPG
    3.1 MB · Views: 2
  • SAM_2377.JPG
    SAM_2377.JPG
    3.1 MB · Views: 3

Functional Artist

Well-known member
Messages
4,410
Reaction score
1,692
Location
Toledo, Ohio
Might have to start calling you Mr. Clean, that's nice work. Good call on the nylock nuts, no lockwashers or double-nutting required. Is that mech riveted to the bracket?
Thank you! :cheers2:

I call it Functional Art :2guns:

Yup, them Nylock nuts are the "cats azz"
...I "put that shiz on everything" :smartass:

Nope, I tapped, the mounting holes in the bracket (kinda why I went with that thick of material)

* I may use longer bolts, to mount the rack
...this way, I can add a couple of "lock nuts" for "extra security" :thumbsup:

** TBH, This thing is "totally" experimental
...& I'm not sure even how well it's gonna work :huh:
...but, were gonna find out, soon :popcorn:
 

Functional Artist

Well-known member
Messages
4,410
Reaction score
1,692
Location
Toledo, Ohio
The weather here in Northwest Ohio has been unseasonably tropical recently (~90* with ~80% humidity)
...which is starting to put an unwanted patena, on all of this beautiful metal :ack2:

Now, the weather guy says is gonna be possibly rainy, for the next few days :worried2:
...which will make things worse :mad2:

So, I figured that I'd better give 'er a quick clean up
...& then, seal 'er up with some primer :thumbsup:

Can always "grind" 'er off if/when necessary :cheers2:SAM_2433.JPG
 

Attachments

  • SAM_2432.JPG
    SAM_2432.JPG
    3 MB · Views: 2
  • SAM_2434.JPG
    SAM_2434.JPG
    3.1 MB · Views: 2
  • SAM_2435.JPG
    SAM_2435.JPG
    3.1 MB · Views: 2

madprofessor

"Loose Cannon Creations"
Messages
2,899
Reaction score
888
Location
Jacksonville, Florida
I do like a nice colored (not gray like I use) primer for a good topcoat to build from, what's the finish going to be?
Not really understanding the frame, it's a mini-Slingshot reverse trike of a sort, but I'm just not understanding the structure. Are there going to be some body panels over some of that skeleton? Color?
 

Functional Artist

Well-known member
Messages
4,410
Reaction score
1,692
Location
Toledo, Ohio
I do like a nice colored (not gray like I use) primer for a good topcoat to build from, what's the finish going to be?
Not really understanding the frame, it's a mini-Slingshot reverse trike of a sort, but I'm just not understanding the structure. Are there going to be some body panels over some of that skeleton? Color?
Not "feelin it"? :huh:

She should be a "roller" soon
...then, maybe you'll see "my vision" or version ;)

As far as body panels, I'm thinkin' some kinda hood or "cowl" :idea2:
...maybe something that I can work some, Slingshot style headlights, into :thumbsup:

& also, maybe something on/around the "tail"
...again to maybe be able to work some tail & brake lights into :2guns:

Color is still "up in the air" :stir:
 

Attachments

  • 2018-polaris-slingshot front view.jpg
    1.6 MB · Views: 2
  • Red Slingshot.jpg
    Red Slingshot.jpg
    199.1 KB · Views: 1

Functional Artist

Well-known member
Messages
4,410
Reaction score
1,692
Location
Toledo, Ohio
I need to drill & tap the end of the steering shaft
...but, drilling a 5/16" hole, by hand (kinda straight) into a 5/8" shaft is kinda difficult :huh:

It can be done ;)

Just clamp 'er in the vise, pretty much vertical
...mark the center
...drill an 1/8" "pilot hole"
...then, move up to 17/64" (IIRC for a 5/16" tap)
...& then, add some threads/tap the hole :thumbsup:

* Yup, I covered the rack to help keep metal shavings outta them gears
...& off of that lube :cheers2:

Now,...Um...DIY splines...anyone? 🤔
SAM_2422.JPG
 

Attachments

  • SAM_2423.JPG
    SAM_2423.JPG
    3.1 MB · Views: 1
  • SAM_2424.JPG
    SAM_2424.JPG
    3 MB · Views: 0
  • SAM_2426.JPG
    SAM_2426.JPG
    3.2 MB · Views: 0
  • SAM_2429.JPG
    SAM_2429.JPG
    3 MB · Views: 0
  • SAM_2430.JPG
    SAM_2430.JPG
    3 MB · Views: 1

Functional Artist

Well-known member
Messages
4,410
Reaction score
1,692
Location
Toledo, Ohio
Next, we need up some "custom" shock mounts for the front :thumbsup:

* I made up a paper "model" before wastin' any steel
...then, made some brackets for the bottom, from a couple of pieces of 1/8" x 2" x 4 1/2" steel

I marked 'em
...then, split 'em, on each side
...& then, bent up the (4) "tabs" (2) different ways

The vise holds 'em good (the piece)
...& that 18" "persuader" pretty much tells 'em (the tabs) where to go & what to do

Yup, that should do the trick ;)
...& also, strengthen the spindle to A-frame connection too :sifone:
SAM_2461.JPG
 

Attachments

  • SAM_2443.JPG
    SAM_2443.JPG
    3 MB · Views: 0
  • SAM_2445.JPG
    SAM_2445.JPG
    2.8 MB · Views: 0
  • SAM_2447.JPG
    SAM_2447.JPG
    3 MB · Views: 0
  • SAM_2450.JPG
    SAM_2450.JPG
    3 MB · Views: 0
  • SAM_2452.JPG
    SAM_2452.JPG
    3.1 MB · Views: 0
  • SAM_2456.JPG
    SAM_2456.JPG
    3.1 MB · Views: 0
  • SAM_2464.JPG
    SAM_2464.JPG
    3.1 MB · Views: 0
Last edited:

Functional Artist

Well-known member
Messages
4,410
Reaction score
1,692
Location
Toledo, Ohio
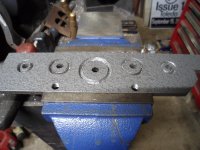
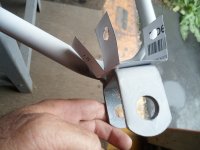
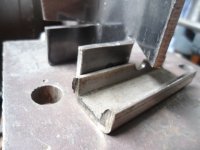
Next, we need to drill the (4) bolt holes for the shocks, (2) in each mount

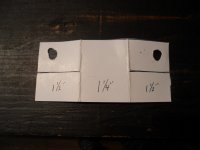
Since the tabs are ~1" x 1"
...that means that we need the holes ta be ~1/2" in from the edges

But, measurin' & markin' & then drillin' (4) identical holes (that's (4) seperate holes in (4) seperate faces) isn't easy :huh:

I got another trick for ya ;)
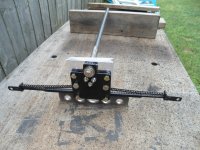
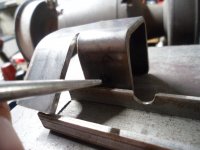
Instead of measurin' & markin" & then, hopin" your eye got 'em all "close"
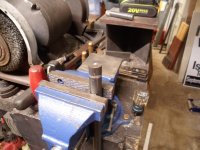
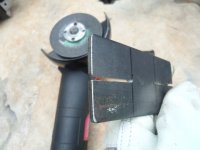
...just use a "guide" (a piece of "something" of appropriate thickness)
...& on a nice-n-flat surface :thumbsup:

Scribe a line
...& then, turn the piece & repeat :cheers2:

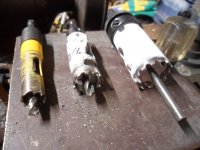
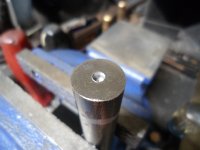
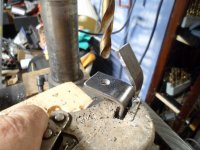
Next, "pop the spot" with a spring loaded center punch
...then, drill your "pilot hole"
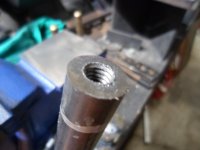
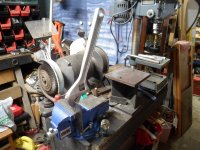
...then, easily drill 'em all out ta 5/16"
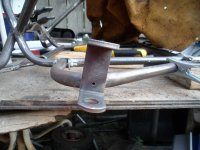
...& they should ALL be in matching spots :2guns:

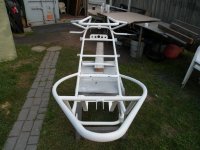
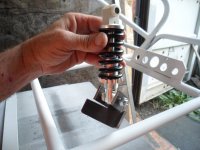
Lets see how that looks :sifone:
SAM_2481.JPG
 

Attachments

  • SAM_2466.JPG
    SAM_2466.JPG
    2.9 MB · Views: 1
  • SAM_2467.JPG
    SAM_2467.JPG
    3 MB · Views: 1
  • SAM_2470.JPG
    SAM_2470.JPG
    3.1 MB · Views: 1
  • SAM_2471.JPG
    SAM_2471.JPG
    2.9 MB · Views: 1
  • SAM_2473.JPG
    SAM_2473.JPG
    3.1 MB · Views: 1
  • SAM_2475.JPG
    SAM_2475.JPG
    3 MB · Views: 2
  • SAM_2478.JPG
    SAM_2478.JPG
    3.1 MB · Views: 2
  • SAM_2479.JPG
    SAM_2479.JPG
    3.1 MB · Views: 2

Functional Artist

Well-known member
Messages
4,410
Reaction score
1,692
Location
Toledo, Ohio
this is gonna be your coolest project yet! i love this thing its gonna be a blast im thinking your gonna want "MO POWA BABY!" :ROFLMAO:
Thanks!
She should "zip" right along
...& (hopefully) look kool too ;)

If/when I want more power, maybe, I'll build a full size/street legal one :bannana:

I'm thinkin' that I can just make 'er outta an old motorcycle/parts
...& then, register "it" as "that" motorcycle :sifone:
...with a "few" modifications :2guns:
 

Functional Artist

Well-known member
Messages
4,410
Reaction score
1,692
Location
Toledo, Ohio
I got our "third member" re-assembled ;)

It's not really a "third member" ('cause it's all in one)
...I guess you'd call it a "combo drive unit" :2guns:

*In Automotive lingo, the "third member" refers to the rear axle
...ya got the engine (first member of the "drive train")
...next, is the transmission & drive shaft (second member)
...& then, the rear axle :thumbsup:

* I must say, that's a "beefy" little "combo drive unit" :cheers2:

There's a 60T driven sprocket, the 15" x 6" rim/tire & a 4 1/2" drum brake, (2) bearings, plus (4) spacers, all on that little 12" axle :huh:

The hardest part was "finaglin" the (3) separate keys, into their correct positions
...couldn't just use (1) big/long key 'cause their are spacers, in between, each of those parts :ack2:
 

Attachments

  • SAM_2440.JPG
    SAM_2440.JPG
    3.1 MB · Views: 1
  • SAM_2441.JPG
    SAM_2441.JPG
    3.1 MB · Views: 1
  • SAM_2442.JPG
    SAM_2442.JPG
    3.1 MB · Views: 1

Functional Artist

Well-known member
Messages
4,410
Reaction score
1,692
Location
Toledo, Ohio
Hey Mad Pro, notice it's ALL assembled with Nylock nuts :cheers2:
...even the "big one" :cornut:
SAM_2501.JPG
 

Attachments

  • SAM_2498.JPG
    SAM_2498.JPG
    3.1 MB · Views: 3
  • SAM_2500.JPG
    SAM_2500.JPG
    3.2 MB · Views: 3
  • SAM_2502.JPG
    SAM_2502.JPG
    2.8 MB · Views: 3

madprofessor

"Loose Cannon Creations"
Messages
2,899
Reaction score
888
Location
Jacksonville, Florida
I went deep into researching using an old junkyard title to also make my current " gokart" street legal here in Florida. Had planned to cut out a piece of the junkyard carcass with a VIN plate or sticker or stamping on it to weld into the kart. Total fail even if willing to pony up the overall expense for everything. Don't know what it'd take for you in Ohio, but there's a definition here of how much original vehicle you have to start with before modifying, basically the frame structure that holds the 3 "members". You can build a copy of the frame with mods to suit your needs and splice in the cutout VIN section, but that's pretty much the limit.
We have a law for legalizing what you have already as a "slow moving vehicle", think golf cart, that must be able to reach 20 mph, but unable to top 25 mph, and you can't drive it on any road that has a speed limit over 35 mph.
So I'm never going to build out something to be a street legal machine that must pass all the safety requirements inspection of a new car in Florida. Even bumper height and ground clearance matters for that, and a whole laundry list of crazy stuff. Guess I'll just have to build everything to be fast enough to outrun the lawyers.
 

madprofessor

"Loose Cannon Creations"
Messages
2,899
Reaction score
888
Location
Jacksonville, Florida
ALL assembled with Nylock nuts
I've been inspired by that since seeing it on your steering bracketry, and I like it. Thought about it and concluded that since nearly all of my hardware came hand-picked right out of the shelf bins at H.D., it's understandable how I ended up double-nutting everything against vibration. Better pre-production planning on next build will allow me to go with the nylocks instead of the P-in-the-A of double-nutting.
Have grown a fondness for Zorotools.com, have gotten bulk .75" nuts (gr. 5), .75" axle nuts, and some odd stuff from them. Thinking an early order of about twice as many nylocks as I plan for would make that next build so much better, thanx for the inspiration, will save me some perspiration.
 
Top