Ean Gdaniec
New member
My DIY Kart
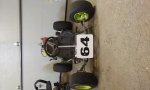
{"1964 Bug Sprint"}(The frame, steering rod, tie rods, spindles, and steering wheel and pedals are original)
{Custom build/built by me, my dad, Tom, Tom, and the frame was given to me by another Tom}
{Kawasaki/5 HP/181cc}(for potential comparisons)
{40 tooth or 60 tooth/4-1 to 6-1/front= 12-6x6, rear=15-6x6}
{ON road usage}
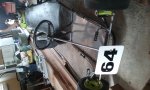
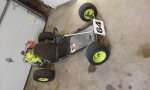
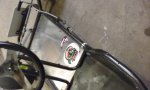
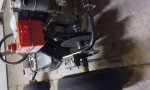
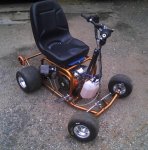
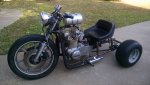
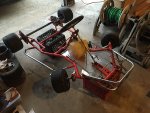
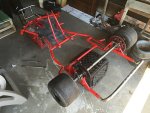
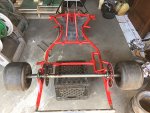
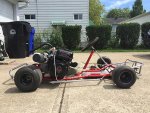
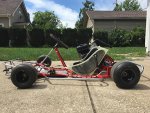
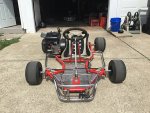
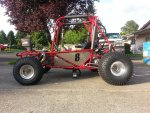
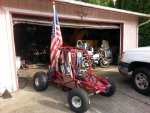
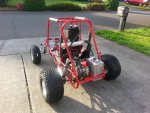
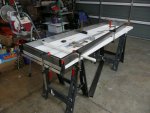
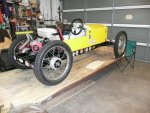
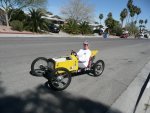
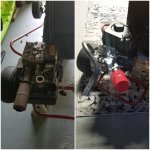
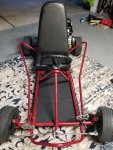
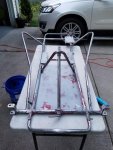
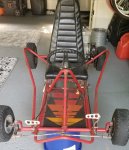
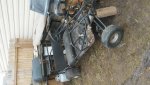
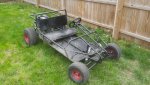
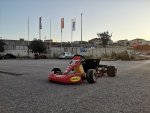
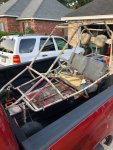
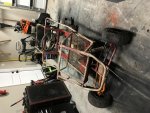
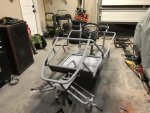
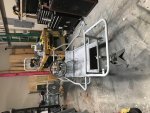
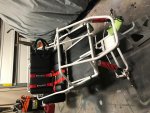
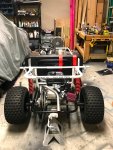
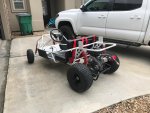
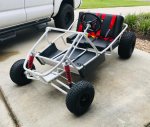
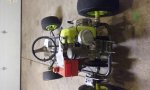
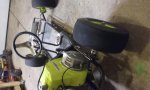
ATTACHMENTS:{4 pics(minimal) of the kart from the 4 angles}(low front, high front corner, low side, and hi
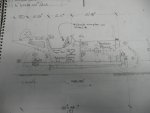
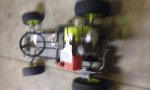
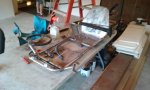
The frame was extremely rusty, had four paint-jobs underneath. Took a month to professionally sand all parts and frame down to bare metal (I have a busy schedule). Unfortunately the seat was extremely damaged with minor holes and pits, but it will hold the driver. The body and parts were primed, then painted, while some parts were shined, then glossed. Bolts were bought to hold the tie rods onto the column, and two large bolts for the frame to the spindles. The spindle and tie rod connections were bolted, and nylocked, while the center bolt where the tie rods meet with the steering shaft was a custom drilled bolt for a cotter pin.My dad’s friend had a few spare engines to give: A 5 HP Kawasaki(kawasaki outputs are different, so it probably gives out 6.5)with an organ donor, and another engine that doesn’t matter to the story, he also had spare rims. Soon later, a new friend Tom (who I made good friends in this) had 4 spare tires, 12-6x6. They were a perfect for for the rims. A friend of mine had a clutch, 40T gear, chain, clutch oil guard, and axle bearings(2) for the kart. Me and dad worked on a real size replica of a swing mount, and over time it was constantly modified(It was built of hardboard and glue from a hot glue gun). We bought bolts for the axle bearings. I bought an axle with keystocks and a pair of the wrong rear rims, so I returned them and bought off of ebay (Jed’sWholesaleTires) a pair of rear rims, 1in center bore diameter with key hole slots. Shortly after, I had bought 15-6x6 rear tires slick. I sprayed painted the rims after a soft sanding was done to the original paint prior to painting. We then baked the rims in our home oven (for high quality paint adhesive). After that, we bought a washer, lock washer, and lug nut for each side. It’s finally rolling, and after some clean up with the steering wheel, because it was badly weathered chrome, I put that back on the steering rod with the mid-sect, whatever that is called, and bolted the two bottom with the original cotter pins, then placed the original lock nut to secure the rod from sliding down. We bought a Bug dual brake bracket with a whole disc brake assembly, after its shipment, we went towards building a replica sized hardboard for the caliper bracket. We bought cables soon after and mounted the brake cable up, in the process of using one steering wheel bolt with the cotter pin for the connection to the pedal, and we bought earlier, a few extra clamps, and on the other side, had the throttle cable ready. We brought the new replica brake caliper holder to our new friend other Tom, and he made it in a few weeks. We quickly assembled it and the brake was ready. We custom fitted the spring, housing tension, inner housing tension with some things like the inner housing running through a bolt of the brake lever, then tightened with two bolts and two washers. After this, we soon gave other Tom our swing mount replica, and waited. While our waiting after 2 weeks, we went to Kralz scrap yard and bought what was a very large aluminum plate, 3/16 inch thick, all for a very cheap price. We cut it to size using a jigsaw. We slid it into the kart, then marked where the holes for bolting needed drilling, then, after drilling, We polished using two polishers, the first, a rougher polishing compound, then a fine polishing compound. After that, we bolted the allen bolts in and threaded with nylock, then added stickers (adding stickers happened dead last after everything for touches). The original parts were repainted, chrome paint, then a gloss, the engine was painted and those parts were baked on low in our outer grill, and other parts on it were appropriately painted chrome.The throttle was clamped on, but it was difficult to modify the odd japanese throttle back, idle, governor, and spring. We bought and cut to length the fuel line, got a fuel tank, cut out, drilled, and had other Tom press bend a crease in the will be fuel mount. After that, we bought all the remaining bolts necessary, extra locking collars, spacers with set screws, and finally, days later, the mount was completed. We bolted and set to fine measure everything on the back. For suppressing the vibration, we used tightly folded, thin rubber, then placed it between the frame and the underbelly of the back of the mount, and added zip ties. We mounted the engine, set the 60 and 40 tooth on in case we want to change gears (5 min manuel change), chained up the gear to the clutch, bolted the clutch in (the set screw was almost useless). We tightened everything again, bolting the fuel tank in the mount, cleaned the oil, filled the gas, and we were ready. The number plate was made a bit before the final product, custom cut and grinded aluminum with only white primer, 7 by 10 in. , with purchased number plate sticker decals, 64, in honor of the year of the frame and other small parts, almost perfectly center, with only 1/32 margin error, bolt holes were measured, then drilled, then fitted with allen wrench bolts with nylon washers, and nylock ends. The whole project over ten months to complete, mostly because this was my first time ever building anything, and my dads first on a kart, and me and my dads schedule in between.
Other: There was originally, a temporary fuel mount, that was bolting the bottom of the fuel tank, so the tank stood up, which was ugly, that and the mount only had one hole to bolt to the engine. It broke during one of my runs, having the gas tank fly off, and burned against the muffler. The number prints was added on later after the few first drives, including the stickers, adjustment of the brake, and rubber mesh underneath.
{"1964 Bug Sprint"}(The frame, steering rod, tie rods, spindles, and steering wheel and pedals are original)
{Custom build/built by me, my dad, Tom, Tom, and the frame was given to me by another Tom}
{Kawasaki/5 HP/181cc}(for potential comparisons)
{40 tooth or 60 tooth/4-1 to 6-1/front= 12-6x6, rear=15-6x6}
{ON road usage}
ATTACHMENTS:{4 pics(minimal) of the kart from the 4 angles}(low front, high front corner, low side, and hi
The frame was extremely rusty, had four paint-jobs underneath. Took a month to professionally sand all parts and frame down to bare metal (I have a busy schedule). Unfortunately the seat was extremely damaged with minor holes and pits, but it will hold the driver. The body and parts were primed, then painted, while some parts were shined, then glossed. Bolts were bought to hold the tie rods onto the column, and two large bolts for the frame to the spindles. The spindle and tie rod connections were bolted, and nylocked, while the center bolt where the tie rods meet with the steering shaft was a custom drilled bolt for a cotter pin.My dad’s friend had a few spare engines to give: A 5 HP Kawasaki(kawasaki outputs are different, so it probably gives out 6.5)with an organ donor, and another engine that doesn’t matter to the story, he also had spare rims. Soon later, a new friend Tom (who I made good friends in this) had 4 spare tires, 12-6x6. They were a perfect for for the rims. A friend of mine had a clutch, 40T gear, chain, clutch oil guard, and axle bearings(2) for the kart. Me and dad worked on a real size replica of a swing mount, and over time it was constantly modified(It was built of hardboard and glue from a hot glue gun). We bought bolts for the axle bearings. I bought an axle with keystocks and a pair of the wrong rear rims, so I returned them and bought off of ebay (Jed’sWholesaleTires) a pair of rear rims, 1in center bore diameter with key hole slots. Shortly after, I had bought 15-6x6 rear tires slick. I sprayed painted the rims after a soft sanding was done to the original paint prior to painting. We then baked the rims in our home oven (for high quality paint adhesive). After that, we bought a washer, lock washer, and lug nut for each side. It’s finally rolling, and after some clean up with the steering wheel, because it was badly weathered chrome, I put that back on the steering rod with the mid-sect, whatever that is called, and bolted the two bottom with the original cotter pins, then placed the original lock nut to secure the rod from sliding down. We bought a Bug dual brake bracket with a whole disc brake assembly, after its shipment, we went towards building a replica sized hardboard for the caliper bracket. We bought cables soon after and mounted the brake cable up, in the process of using one steering wheel bolt with the cotter pin for the connection to the pedal, and we bought earlier, a few extra clamps, and on the other side, had the throttle cable ready. We brought the new replica brake caliper holder to our new friend other Tom, and he made it in a few weeks. We quickly assembled it and the brake was ready. We custom fitted the spring, housing tension, inner housing tension with some things like the inner housing running through a bolt of the brake lever, then tightened with two bolts and two washers. After this, we soon gave other Tom our swing mount replica, and waited. While our waiting after 2 weeks, we went to Kralz scrap yard and bought what was a very large aluminum plate, 3/16 inch thick, all for a very cheap price. We cut it to size using a jigsaw. We slid it into the kart, then marked where the holes for bolting needed drilling, then, after drilling, We polished using two polishers, the first, a rougher polishing compound, then a fine polishing compound. After that, we bolted the allen bolts in and threaded with nylock, then added stickers (adding stickers happened dead last after everything for touches). The original parts were repainted, chrome paint, then a gloss, the engine was painted and those parts were baked on low in our outer grill, and other parts on it were appropriately painted chrome.The throttle was clamped on, but it was difficult to modify the odd japanese throttle back, idle, governor, and spring. We bought and cut to length the fuel line, got a fuel tank, cut out, drilled, and had other Tom press bend a crease in the will be fuel mount. After that, we bought all the remaining bolts necessary, extra locking collars, spacers with set screws, and finally, days later, the mount was completed. We bolted and set to fine measure everything on the back. For suppressing the vibration, we used tightly folded, thin rubber, then placed it between the frame and the underbelly of the back of the mount, and added zip ties. We mounted the engine, set the 60 and 40 tooth on in case we want to change gears (5 min manuel change), chained up the gear to the clutch, bolted the clutch in (the set screw was almost useless). We tightened everything again, bolting the fuel tank in the mount, cleaned the oil, filled the gas, and we were ready. The number plate was made a bit before the final product, custom cut and grinded aluminum with only white primer, 7 by 10 in. , with purchased number plate sticker decals, 64, in honor of the year of the frame and other small parts, almost perfectly center, with only 1/32 margin error, bolt holes were measured, then drilled, then fitted with allen wrench bolts with nylon washers, and nylock ends. The whole project over ten months to complete, mostly because this was my first time ever building anything, and my dads first on a kart, and me and my dads schedule in between.
Other: There was originally, a temporary fuel mount, that was bolting the bottom of the fuel tank, so the tank stood up, which was ugly, that and the mount only had one hole to bolt to the engine. It broke during one of my runs, having the gas tank fly off, and burned against the muffler. The number prints was added on later after the few first drives, including the stickers, adjustment of the brake, and rubber mesh underneath.
Attachments
-
 20160523_210644 (1).jpg192.2 KB · Views: 113
 -
 20160523_210558.jpg199.2 KB · Views: 105
 -
 20160507_010619.jpg187 KB · Views: 101
 -
 20160523_210637.jpg169 KB · Views: 95
 -
 20150725_193045.jpg201.2 KB · Views: 113