Has anyone here tried this or at least seen it?

bob58o

SuckSqueezeBangBlow
Messages
8,818
Reaction score
893
Location
Chicago-town USA
41 works, 40 is better, 420 is best for common half inch pitch on karts and minibikes. I’m not too familiar with 415 and didn’t verify your sprockets.
 

Attachments

  • IMG_4761.png
    IMG_4761.png
    391 KB · Views: 1
  • IMG_4762.jpeg
    IMG_4762.jpeg
    57.2 KB · Views: 1
  • IMG_4764.jpeg
    IMG_4764.jpeg
    124.2 KB · Views: 1
Last edited:

ididitlasterday

Active member
Messages
92
Reaction score
114
If I'm reading that right, 120 links =60 inches, 5 feet? Seems kind of long, I have to count how many links I have, I'll do that when I get home from work.
 

ididitlasterday

Active member
Messages
92
Reaction score
114
41 works, 40 is better, 420 is best for common half inch pitch on karts and minibikes. I’m not too familiar with 415 and didn’t verify your sprockets.
So a basic 420 should work at the correct length? This is only 7.5 hp directly driving the sprocket, no live Axle.
 

ididitlasterday

Active member
Messages
92
Reaction score
114
On another note I was in hazard freight yesterday and noticed this. Looks to be the same effect key/fuse panel as my ali Express motor. It was on a predator electric start.
 

Attachments

  • IMG_20231210_143331751_HDR.jpg
    IMG_20231210_143331751_HDR.jpg
    3.3 MB · Views: 5

Rat

Well-known member
Messages
1,525
Reaction score
997
Location
SW Virginia
If I'm reading that right, 120 links =60 inches, 5 feet? Seems kind of long, I have to count how many links I have, I'll do that when I get home from work.
ANY chain you buy is likely to be too long, that's why chain breakers exsist... or just use a punch since I know for a fact that the PT415MX is more than well designed enough to break most cheap breakers because they used a slightly longer rivet pin than most so they could make the mushroom bigger.
That ProTaper Chain is a beast that is more than sufficient since the near 5k lbs tensile strength is far higher than the amount of torque you be pulling on it with.

Overkill? Not when it translates to lasting you a very long time.

The MX designation only means it's engineered for motocross applications where chain strength can be the difference between sticking the landing and sticking the bars down your throat
 
Last edited:

Rat

Well-known member
Messages
1,525
Reaction score
997
Location
SW Virginia
On another note I was in hazard freight yesterday and noticed this. Looks to be the same effect key/fuse panel as my ali Express motor. It was on a predator electric start.
I won't use those personally, I find them to be more hassle than they're worth, they're fine for a log splitter or other stationary equipment but its a matter of preference and experience I suppose.

I personally just wire up a keyswitch gotten from fleabay, advance auto, or the like. It starts my engine, gates my electrical just fine, and I use a separate toggle (because push buttons love to get stuck and prevent spark) for killing the coil since most of the common ones aren't dual polarity with a shut down terminal
 
Last edited:

ididitlasterday

Active member
Messages
92
Reaction score
114
I won't use those personally, I find them to be more hassle than they're worth, they're fine for a log splitter or other stationary equipment but its a matter of preference and experience I suppose.

I personally just wire up a keyswitch gotten from fleabay, advance auto, or the like. It starts my engine, gates my electrical just fine, and I use a separate toggle (because push buttons love to get stuck and prevent spark) for killing the coil since most of the common ones aren't dual polarity with a shut down terminal
Just making an observation, the whole panel is identical. I've already bought it and it works fine so I'm going to use it for now. If I have problems I'll replace it.
 

bob58o

SuckSqueezeBangBlow
Messages
8,818
Reaction score
893
Location
Chicago-town USA
420 should work. A 415 sprocket might be a bit thinner than a 420 sprocket. They are similar chains but the 420 has a beefier pin (with same roller diameter). And the 420 chain is 4/16” between plates and 415 is 3/16”.

So yes, 420 chain would work on 415 sprockets, but a 415 chain might not work on 420 sprockets.
 

bob58o

SuckSqueezeBangBlow
Messages
8,818
Reaction score
893
Location
Chicago-town USA
I’ve got 132 link 420 chain with master links and a chain breaker tool. I can sell it cheap plus shipping.

Shipping weight is 3lb 1.2oz.
 

Attachments

  • image.jpg
    image.jpg
    3.7 MB · Views: 5
  • image.jpg
    image.jpg
    2.4 MB · Views: 4
Last edited:

Rat

Well-known member
Messages
1,525
Reaction score
997
Location
SW Virginia
420 should work. A 415 sprocket might be a bit thinner than a 420 sprocket. They are similar chains but the 420 has a beefier pin (with same roller diameter). And the 420 chain is 4/16” between plates and 415 is 3/16”.

So yes, 420 chain would work on 415 sprockets, but a 415 chain might not work on 420 sprockets.
420 would absolutely work, but if his sprockets are profiled for #415 the way he measured, a #41 will wander on the teeth a bit and a 420 will be even worse.
No a 415 Chain will only work on 415 sprockets because it's the baby of the half inch pitch chains (after bicycle chain of course).

My TC came with a #40 10t and I spun that bastard on the end of the shaft with the grinder to recut the profile it till the PT415MX I already had fit... did the same thing to the 9t I got.

I will admit though, using a wider chain than you need is an old trick to overcome minor alignment issues where shimming isn't ideal or an option.
 

ididitlasterday

Active member
Messages
92
Reaction score
114
So time for a progress update. Between the weather, work, and being 🤢 
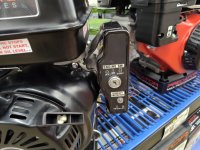
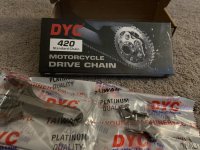
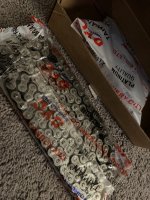
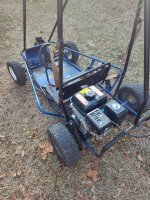
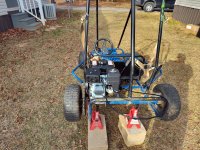
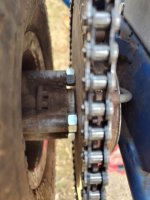
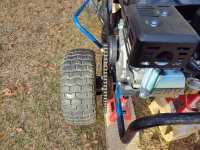
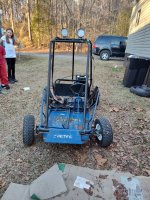
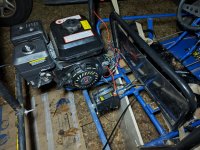
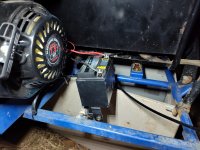
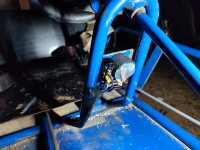
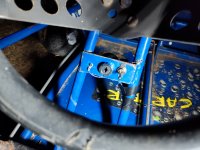
sick I finally made some progress. I bought a dyc 420 chain with breaker and extra links from Amazon for 17.99. I had to buy new bolts and some nuts for spacers but was able to line up the sprocket on the wheel with the sprocket on the engine and use the original mounting slots. So I didn't have to modify the engine mount like I previously anticipated. I had to trim the brake band peg and it still rubs a little, but I think I can shorten the brake rod and convert it to a cable pull.
 

Attachments

  • IMG_20231222_150117654_HDR.jpg
    IMG_20231222_150117654_HDR.jpg
    3.3 MB · Views: 8
  • IMG_20231222_143130432_HDR.jpg
    IMG_20231222_143130432_HDR.jpg
    6.5 MB · Views: 8
  • IMG_20231222_142247552_HDR.jpg
    IMG_20231222_142247552_HDR.jpg
    1.6 MB · Views: 7
  • IMG_20231222_142244215_HDR.jpg
    IMG_20231222_142244215_HDR.jpg
    5.2 MB · Views: 9
  • IMG_20231222_160431953_HDR.jpg
    IMG_20231222_160431953_HDR.jpg
    3.6 MB · Views: 8

Rat

Well-known member
Messages
1,525
Reaction score
997
Location
SW Virginia
I think I can shorten the brake rod and convert it to a cable pull.
No, you'd still need a fixed peg attached to the frame to keep the brake in place, however the peg doesn't need to exceed the width of the brake band itself in fact it can be a little shorter than the band is wide if you have a center pin to keep it in place.

Otherwise converting to cable you'd need to add fixed cable stop above the band peg. Then drill a hole through the center of a bolt to feed the cable through, put a nut it and it becomes a tension adjuster and you just need a hole through one side into the center to thread for a set screw.
 

ididitlasterday

Active member
Messages
92
Reaction score
114
No, you'd still need a fixed peg attached to the frame to keep the brake in place, however the peg doesn't need to exceed the width of the brake band itself in fact it can be a little shorter than the band is wide if you have a center pin to keep it in place.

Otherwise converting to cable you'd need to add fixed cable stop above the band peg. Then drill a hole through the center of a bolt to feed the cable through, put a nut it and it becomes a tension adjuster and you just need a hole through one side into the center to thread for a set screw.
Yeah I intend to keep the peg, I made it shorter but may need to take another 1/8 inch off of it. I have some steel braided cable, copper tubing, and cable stops. I also have another rod, so I can take the original off and not have to modify it in case I decide to put it back to original. I will post pics of I modify it. I'm also considering making the slots for the motor bolts a tiny bit wider so I have a tad more room in that direction. I'm which case I can add a washer to the axel moving the sprocket away from the peg. So far we have had a few good rides up and down the driveway. He loves it although he is still kind of scared of it. One other issue I have to fix, the seat doesn't come with holes for the seat belt buckles. I'm going to have to cut and sew a hole for them to pass through.
 

Rat

Well-known member
Messages
1,525
Reaction score
997
Location
SW Virginia
One other issue I have to fix, the seat doesn't come with holes for the seat belt buckles. I'm going to have to cut and sew a hole for them to pass through.
Why would you do that when you can pass it through where the back cusion meets the seat cushion? Far as I can see you have no cushions and that by itself is only slightly problematic.
 

ididitlasterday

Active member
Messages
92
Reaction score
114
Why would you do that when you can pass it through where the back cusion meets the seat cushion? Far as I can see you have no cushions and that by itself is only slightly problematc
I bought a cushion from bmi carts that was mentioned earlier in this thread. It's a one piece cushion that hangs over the seat back and folds across the bottom. It fits perfect and is comfortable, but doesn't come with a hole for the buckles.
 

ididitlasterday

Active member
Messages
92
Reaction score
114
Quick update, it was raining and it's cold AF here (we had snow this morning) but I managed to do a few things. Sorry but no pics because of the weather. I took the engine off and made the slots on the passenger side of the motor mount plate wider at the farthest to the rear. The motor has slotted holes on the output shaft side so this gave me enough movement to the left to line the chain up perfect even after adding a thick washer to the axle shaft pushing the sprocket farther away from the brake shoe peg. I also took another 1/8 inch off the brake peg and adjusted the bends on the brake rod. I also drilled a hole under the oil drain plug so oil changes will be easier.i pulled the cover on the key switch box so I know what I need to do to extend the wires to under the steering wheel. I discovered that the "circuit breaker"button is just a button. There is nothing connected to it. So I'm going to remove the panel and move the ignition switch to the place where the kill switch was and install a switch connected to a relay for the lights. Tonight I intend to modify the seat cushion. I'll keep you posted.
 
Last edited:

ididitlasterday

Active member
Messages
92
Reaction score
114
The weather is amazing today, I plan to get out side and get some stuff done. Including rides with my boy. I hopefully can wire the ignition switch and lights up and try to modify the cushion. I'll post pics.
 

Hellion

Disc brakes are for cowards
Messages
5,371
Reaction score
714
Location
Location: Location:
Hey, good progress here. I went missing because I was buying gifts for myself with all the sales and stuff. 🤩🤪 Hope everyone had a Happy New Year's Eve. We had a massive bonfire and cookout in the cold..🍾🥂

Good to see you modding things for best alignment and best function and your methods are sound and not just "baling wire and duct tape" remedies. Definitely go ahead and modify the seat cushion to let the seatbelts through. Cut a neat oval or round hole just big enough for the seat belt anchors in the middle where the horizontal and vertical cushion sections meet, or wherever. The only thing I would do is to hem (or bind) the hole with a separate strip of vinyl or something or maybe just glue it shut with contact cement to keep the water out.

Karting in the snow is fun if you go that route, but only on packed snow you can get through. Great fun with drifting and lots of wheelspin.

Don't be pressured to post pics for every single update; just compile them in a bulk picture post with some commentary if you like.
 

ididitlasterday

Active member
Messages
92
Reaction score
114
So I made a harness last night and today got out and installed it. I decided against using the original panel that had the switch. The"circuit breaker" was just a dummy button. I welded tabs to the frame and welded a bracket on the battery box so I can actually remove the battery box if necessary. I still have to clean up the routing of the wires and finish running the wires up to the lights.
 

Attachments

  • IMG_20240101_175412507.jpg
    IMG_20240101_175412507.jpg
    4.2 MB · Views: 4
  • IMG_20240101_175407559_HDR.jpg
    IMG_20240101_175407559_HDR.jpg
    4.1 MB · Views: 4
  • IMG_20240101_175348127_HDR.jpg
    IMG_20240101_175348127_HDR.jpg
    3.2 MB · Views: 3
  • IMG_20240101_175333128_HDR.jpg
    IMG_20240101_175333128_HDR.jpg
    3.3 MB · Views: 4

ididitlasterday

Active member
Messages
92
Reaction score
114
Today I'm about to wire brush my welds and put some paint on them, finish wiring the lights. I think the drive wheel inside bearing seems worn out. I'm going to measure the axle and the hub diameters, any one have recommendations for bearings?
 
Top