Father and son build, need help

Status
Not open for further replies.

mckutzy

Well-known member
Messages
8,353
Reaction score
108
Location
bc, canada
Square is fine. just notch it so it fits the curve right, you also might have to pinch it slightly to minimize the gap if any...
 

45pro

New member
Messages
66
Reaction score
0
Location
Northern indiana
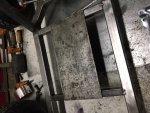
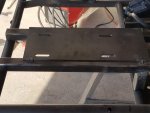
So I'm thinking I'll run a cross member along the backside of the motor close to where the board is now, then run two towards the back off of it and weld them where the sharpie marks are on there. Then my mounting plate will have a sturdy surface to attach to. After that I can mount my motor and then I'll have an idea where to start cutting my keyway. From what I've seen this is the backwards way of doing it but since I have no keystock already done on my axle it seems like it would be better for me to make sure my engine has room to mount then find where my sprocket will go. If I'm missing something tho please let me know.
 

Attachments

  • 20160911_173933.jpg
    20160911_173933.jpg
    346.8 KB · Views: 13

chancer

ɔ ɥ ɐ u ɔ ǝ ɹ
Messages
9,358
Reaction score
88
Location
COMFORT, TEXAS
The important thing is getting the engine plate Perfectly Square with the Axle. That way the sprockets are lined up. If the engine is Crooked with the Axle the chain may derail.

I like Kartfabs way of doing it, but I have never done it that way either. I use a square to make sure the Axle is square to the plate.

Another Tip I have Is the long runners that go along the sides of the mount. Keep them as Wide as possible. Otherwise it can be difficult to get a Wrench on the bolts.
 

45pro

New member
Messages
66
Reaction score
0
Location
Northern indiana
I suppose I can mock it up and find the general area within an inch and then mount the sprocket, then square the mount up with it. I just need to know where about to start trying to cut the keyway. I just didn't want to go through all that trouble then realize my motor needs slid over more to clear the cage.

---------- Post added at 04:25 PM ---------- Previous post was at 04:24 PM ----------

With my brake on the drivers side it's gonna be a tad bit crampt over there.
 

chancer

ɔ ɥ ɐ u ɔ ǝ ɹ
Messages
9,358
Reaction score
88
Location
COMFORT, TEXAS
Ok that will work. That is all I have on my current build.
 

Attachments

  • IMG_1755.JPG
    IMG_1755.JPG
    143.7 KB · Views: 5
  • IMG_2280.JPG
    IMG_2280.JPG
    138 KB · Views: 4

45pro

New member
Messages
66
Reaction score
0
Location
Northern indiana
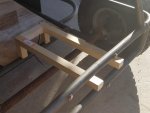
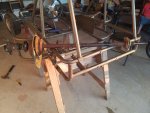
Ok guys, so a few things got accomplished today in the few hours I had. First off I'll be bringing home my 1" square tube steel tomorrow along with my buddies welder to make my motor mount platform. I decided to mock up the way I'm going to do it (yes chancer it's a tad different than my first plan, although I think an overall better design) with 1" dowels just to see what it's going to look like finished and to take the guessing game out if it when I'm cutting the steel. What do you guys think? I'm thinking it will work well. I tried to keep the sprockets close together but still have plenty of clearance. Reason for doing it differently than I had planned b4 was to 1- get the motor closer to the rear sprocket because the chain provided didn't seem long enough and 2- this way mounts the motor in a lower position therefor creating a lower center of gravity. If you see something troublesome about my plan please let me know.
 

Attachments

  • 20160912_181402.jpg
    20160912_181402.jpg
    295.4 KB · Views: 4
  • 20160912_181054.jpg
    20160912_181054.jpg
    233.2 KB · Views: 7
  • 20160912_180633.jpg
    20160912_180633.jpg
    219.5 KB · Views: 5
  • 20160912_180644.jpg
    20160912_180644.jpg
    231.1 KB · Views: 5

45pro

New member
Messages
66
Reaction score
0
Location
Northern indiana
Also, I found a machinist that will cut the keyway in my axle for $20. So the axle is off, which don't get me started, was a PITA because of the braking system. I didn't remove everything for that reason, hopefully it won't be an issue for the guy.

While it's apart, what do I need to do to make my axle posi ? Currently my right wheel is free turning.
 

Attachments

  • 20160912_194500.jpg
    20160912_194500.jpg
    270.5 KB · Views: 16

chancer

ɔ ɥ ɐ u ɔ ǝ ɹ
Messages
9,358
Reaction score
88
Location
COMFORT, TEXAS
Is there a keyway in the R wheel? you just put a key in it and it locks it to the axle.

I think the engine mount looks fine.
 

Hellion

Moderator
Messages
8,530
Reaction score
3,622
I like the square tubing use; should be quite strong. Also agree with cutting a keyway for the right wheel on the end of the axle. These live axles with a free-wheeling wheel--that's just weird. :eek:

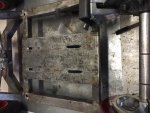
Examining the back end, I see some flat marks on the tubing (in the yellow rectangle) undoubtedly made by a grinder in the kart's past life. This was probably the area of the original engine mount. The area in the yellow circle just hanging there bugs me a little but if it's non-critical for the brake caliper, it should be ok. Just a heads up.

And thanks Chancer for the needless reminder that the kart most likely had a stint as an unpowered downhill racer. It's Mr. Kartman that forgets what he reads, not me. :p
 

Attachments

  • Engine mount.jpg
    Engine mount.jpg
    238.1 KB · Views: 9

mckutzy

Well-known member
Messages
8,353
Reaction score
108
Location
bc, canada
Ya see if he will cut the keyway for the wheel, and when he cuts the main keyway..... see if he can make it indexed with the key already cut for the brake disc, and make it at least if not more than half way across the axle...
When youll need a short bit that isnt there, it makes it worthwile to have it so...
Get a clamp on hub for your sprocket and you'll be rockin...
 

45pro

New member
Messages
66
Reaction score
0
Location
Northern indiana
Ya see if he will cut the keyway for the wheel, and when he cuts the main keyway..... see if he can make it indexed with the key already cut for the brake disc, and make it at least if not more than half way across the axle...
When youll need a short bit that isnt there, it makes it worthwile to have it so...
Get a clamp on hub for your sprocket and you'll be rockin...


Clamp on hub? The one I bought is 1 piece, I was wondering how I was gonna get it slid on. This is what I got. Do I need to buy something else? Do they have split hubs?

https://www.gopowersports.com/1-sprocket-carrier/

---------- Post added at 03:20 AM ---------- Previous post was at 03:17 AM ----------

I like the square tubing use; should be quite strong. Also agree with cutting a keyway for the right wheel on the end of the axle. These live axles with a free-wheeling wheel--that's just weird. :eek:

Examining the back end, I see some flat marks on the tubing (in the yellow rectangle) undoubtedly made by a grinder in the kart's past life. This was probably the area of the original engine mount. The area in the yellow circle just hanging there bugs me a little but if it's non-critical for the brake caliper, it should be ok. Just a heads up.

And thanks Chancer for the needless reminder that the kart most likely had a stint as an unpowered downhill racer. It's Mr. Kartman that forgets what he reads, not me. :p
The part you circled is where my brake caliper mounts. As far as the other spot I'm not really sure
 

qtband

Well-known member
Messages
1,766
Reaction score
61
Location
St. Louis, MO
To use the hub you purchased, you will have to remove the bearing from the right axle, then slide the hub on. I always clean up the rust and debris from the entire axle to help things move along.
 

45pro

New member
Messages
66
Reaction score
0
Location
Northern indiana
To use the hub you purchased, you will have to remove the bearing from the right axle, then slide the hub on. I always clean up the rust and debris from the entire axle to help things move along.

That's what I figured, is there a 2 piece hub I could buy for next time to make it easier?
 

mckutzy

Well-known member
Messages
8,353
Reaction score
108
Location
bc, canada
I have seen them for bigger machines, where it would be totally impractical to have everything captive like that....
Im not too sure if they were custom made hubs though...
I look around and see where I saw them...
 

45pro

New member
Messages
66
Reaction score
0
Location
Northern indiana
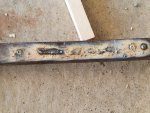
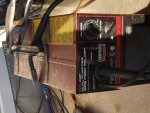
Well this is embarrassing. Let me start off by saying I had a 2 day class on how to weld when I was 17. Fast forward 12 years and I haven't touched one again until now but I still don't think it's totally me. So I borrowed my buddies welder and for the life of me I cannot get it to drop a consistent bead. It's spitting and the wire won't consistently feed. Now this one I'm using is a different kind of mig welder than I used b4. The one I was taught on had gas with it, this one is all electric. Is there a trick to it that I don't get or is there something wrong with it? Here are pics pics of the welder and what it's doing. My buddy has never used it before. He picked it up at an auction a few months back
 

Attachments

  • 20160915_183013.jpg
    20160915_183013.jpg
    221.4 KB · Views: 5
  • 20160915_183813.jpg
    20160915_183813.jpg
    314.8 KB · Views: 3

45pro

New member
Messages
66
Reaction score
0
Location
Northern indiana
This is what it's doing on a test piece, I don't get it, I never had a problem running a nice bead back when I was taught.
 

Attachments

  • 20160915_184217.jpg
    20160915_184217.jpg
    392.3 KB · Views: 6
Status
Not open for further replies.
Top