Damien

Status
Not open for further replies.

Functional Artist

Well-known member
Messages
5,320
Reaction score
2,782
Location
Toledo, Ohio
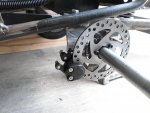
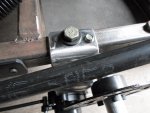
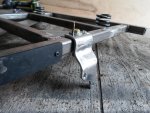
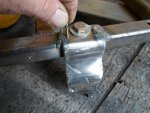
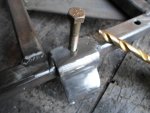
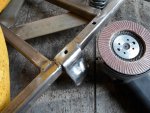
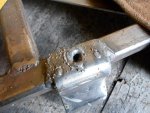
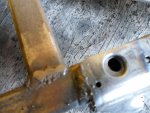
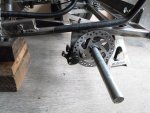
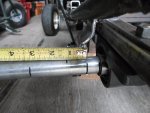
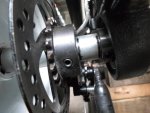
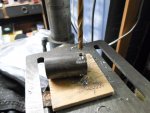
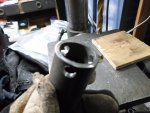
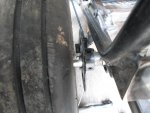
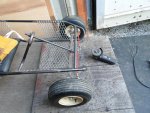
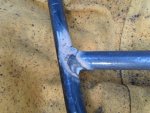
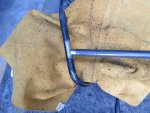
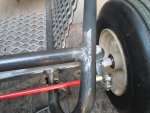
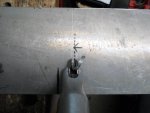
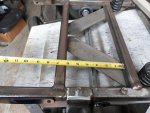
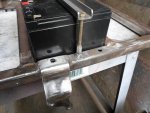
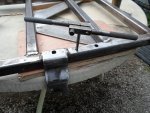
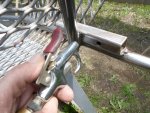
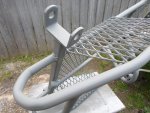
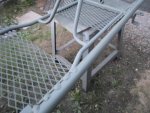
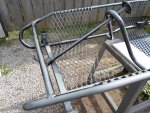
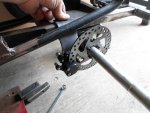
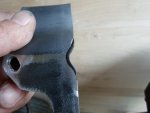
Now, lets see how this one works

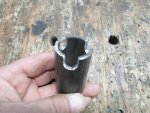
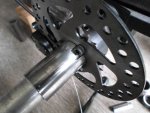
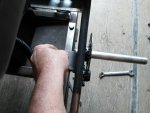
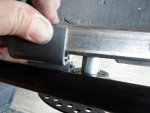
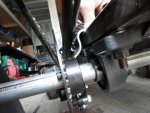
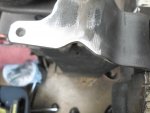
1.) The bracket sits nice-n-flush on the top of the swing arm, as to, where the pillow block bearing nut-n-bolt can do double duty & bolt the caliper bracket down too. :thumbsup:

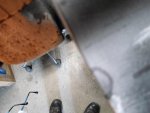
2.) It seems to clear the "moving" frame rail
...& holds the caliper "pretty close" to where it needs to be :cheers2:

3.) But, for the brake pads to align with the rotor properly, it looks like it needs to be a bit closer

So, we'll have to "snug" 'er up to/around the axle a bit more
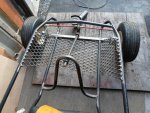
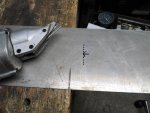
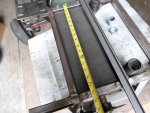
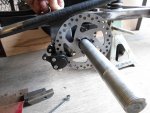
 :2guns:
 

Attachments

  • SAM_0556.jpg
    SAM_0556.jpg
    292.2 KB · Views: 5
  • SAM_0557.jpg
    SAM_0557.jpg
    269.1 KB · Views: 6
  • SAM_0558.jpg
    SAM_0558.jpg
    268.4 KB · Views: 3
  • SAM_0559.jpg
    SAM_0559.jpg
    259.1 KB · Views: 3
  • SAM_0560.jpg
    SAM_0560.jpg
    233.1 KB · Views: 3
  • SAM_0569.jpg
    SAM_0569.jpg
    224.4 KB · Views: 3
  • SAM_0567.jpg
    SAM_0567.jpg
    194.3 KB · Views: 3
  • SAM_0564.jpg
    SAM_0564.jpg
    227.6 KB · Views: 3
  • SAM_0561.jpg
    SAM_0561.jpg
    214 KB · Views: 4

Functional Artist

Well-known member
Messages
5,320
Reaction score
2,782
Location
Toledo, Ohio
I drilled a couple of holes so, I could "lock" the caliper bracket in this exact position.
I used a small screw to actually hold the bracket in place & the second hole was just for a "double check" alignment pin. (I just used the drill bit as a pin)

This way I could remove the bearings/axle & know "for sure" that the bracket did not move or change positions. :cheers2:

I put the bolt back in to "lock it down" for welding.
…& once I had 'er welded down good I double checked the alignment with the drill bit.
Yup, looks good. :thumbsup:

Next, I removed the screw & bolt to weld up the "pin" holes.

* I had to over drill the big bolt hole (for alignment purposes)
...so, I "filled in" welded around it a bit (to re-establish the edge).

Then, re-drilled it to the proper size. :2guns:
 

Attachments

  • SAM_0571.jpg
    SAM_0571.jpg
    257.2 KB · Views: 7
  • SAM_0576.jpg
    SAM_0576.jpg
    276.4 KB · Views: 6
  • SAM_0580.jpg
    SAM_0580.jpg
    363.8 KB · Views: 4
  • SAM_0584.jpg
    SAM_0584.jpg
    303.6 KB · Views: 3
  • SAM_0585.jpg
    SAM_0585.jpg
    322.8 KB · Views: 4
  • SAM_0593.jpg
    SAM_0593.jpg
    218.2 KB · Views: 3
  • SAM_0590.jpg
    SAM_0590.jpg
    409.6 KB · Views: 4
  • SAM_0587.jpg
    SAM_0587.jpg
    328.2 KB · Views: 3
  • SAM_0586.jpg
    SAM_0586.jpg
    371.4 KB · Views: 4
  • SAM_0594.jpg
    SAM_0594.jpg
    329 KB · Views: 5

Functional Artist

Well-known member
Messages
5,320
Reaction score
2,782
Location
Toledo, Ohio
After installing a brake cable, everything seems to work well. :thumbsup:

Next, I need to make some spacers.

* These bearings & hubs (sprocket & rotor) have set screws to lock 'em in place, on the axle
...but, the wheels (rims) don't.

A couple of simple spacers will help keep 'em in where they need to be. :cheers2:

First, I marked the edges of where the rims, bearings & hubs stop, on the axle
...then, did some mearurin' & cut some spacers

The bolt heads for the rotor are in line/in the way of the spacer sitting flush
...so, had ta do some machinin' :2guns:
 

Attachments

  • SAM_0654.jpg
    SAM_0654.jpg
    200.5 KB · Views: 2
  • SAM_0642.jpg
    SAM_0642.jpg
    371.8 KB · Views: 2
  • SAM_0640.jpg
    SAM_0640.jpg
    276.2 KB · Views: 2
  • SAM_0634.jpg
    SAM_0634.jpg
    203.7 KB · Views: 3
  • SAM_0633.jpg
    SAM_0633.jpg
    255.5 KB · Views: 5
  • SAM_0657.jpg
    SAM_0657.jpg
    241.3 KB · Views: 2
  • SAM_0659.jpg
    SAM_0659.jpg
    255.4 KB · Views: 2
  • SAM_0663.jpg
    SAM_0663.jpg
    268.2 KB · Views: 2
  • SAM_0666.jpg
    SAM_0666.jpg
    246.9 KB · Views: 4
  • SAM_0667.jpg
    SAM_0667.jpg
    256.3 KB · Views: 4

Functional Artist

Well-known member
Messages
5,320
Reaction score
2,782
Location
Toledo, Ohio
One of the last few things that I wanted to do was add a foot bar.
...somewhere to "prop" your feet.

It would act as a cross bar, strengthening the upper frame
…& also add some tie rod protection. :thumbsup:

One of the "unused" dash bars that I made up for the Atom kart seemed to work well.

So, I just "notched 'er a bit on each end, cleaned the areas up, covered the wheels & welded 'er on good. :2guns:
 

Attachments

  • SAM_0678.jpg
    SAM_0678.jpg
    380.3 KB · Views: 5
  • SAM_0675.jpg
    SAM_0675.jpg
    429.2 KB · Views: 4
  • SAM_0671.jpg
    SAM_0671.jpg
    362.8 KB · Views: 3
  • SAM_0670.jpg
    SAM_0670.jpg
    426.5 KB · Views: 3
  • SAM_0669.jpg
    SAM_0669.jpg
    433.6 KB · Views: 4
  • SAM_0688.jpg
    SAM_0688.jpg
    307.4 KB · Views: 5
  • SAM_0687.jpg
    SAM_0687.jpg
    261.3 KB · Views: 3
  • SAM_0685.jpg
    SAM_0685.jpg
    396.5 KB · Views: 3
  • SAM_0681.jpg
    SAM_0681.jpg
    317.8 KB · Views: 4
  • SAM_0677.jpg
    SAM_0677.jpg
    345.2 KB · Views: 3

Functional Artist

Well-known member
Messages
5,320
Reaction score
2,782
Location
Toledo, Ohio
a few more pics of the "foot bar", after weldin' :thumbsup:
 

Attachments

  • SAM_0691.jpg
    SAM_0691.jpg
    291.8 KB · Views: 3
  • SAM_0690.jpg
    SAM_0690.jpg
    278.7 KB · Views: 5
  • SAM_0692.jpg
    SAM_0692.jpg
    392.8 KB · Views: 4
  • SAM_0693.jpg
    SAM_0693.jpg
    360 KB · Views: 3

Functional Artist

Well-known member
Messages
5,320
Reaction score
2,782
Location
Toledo, Ohio
I measured, marked & cut a piece of aluminum to use as a battery box liner :thumbsup:

The cutter removes ~1/4" of material while cutting so, we need to be sure to cut on the "outside" of the piece that we need.

To "highlight" this concept & make sure I don't cut on the wrong side of the line, I marked the "cut" with a sharpie. :cheers2:

Yup. fits pretty good :cheers2:
...then, I cut & threw in a piece of ~1/4" rubber to use as a bit of a cushion. :idea2:
 

Attachments

  • SAM_0708.jpg
    SAM_0708.jpg
    230.4 KB · Views: 3
  • SAM_0707.jpg
    SAM_0707.jpg
    283.2 KB · Views: 3
  • SAM_0706.jpg
    SAM_0706.jpg
    338.4 KB · Views: 3
  • SAM_0697.jpg
    SAM_0697.jpg
    356.2 KB · Views: 3
  • SAM_0696.jpg
    SAM_0696.jpg
    374.8 KB · Views: 4
  • SAM_0709.jpg
    SAM_0709.jpg
    281.4 KB · Views: 4
  • SAM_0710.jpg
    SAM_0710.jpg
    273.5 KB · Views: 3
  • SAM_0712.jpg
    SAM_0712.jpg
    267.2 KB · Views: 3
  • SAM_0714.jpg
    SAM_0714.jpg
    221.7 KB · Views: 3
  • SAM_0715.jpg
    SAM_0715.jpg
    307.2 KB · Views: 3

Functional Artist

Well-known member
Messages
5,320
Reaction score
2,782
Location
Toledo, Ohio
Battery "hold down"

I'm gonna use a piece of "channel" steel to secure the batteries.:thumbsup:

I have found that it works better than just a piece of flat steel, to hold down a row of them.
...because it provides consistent pressure across/to all of the batteries (not just the ones on the ends) :cheers2:

I measured, marked & cut it (to the same length as the swing arm), rounded the ends
...& drilled 1/4" holes thru each end of it (& the frame too)

I went ahead & tapped the frame holes.
...but, I didn't want to rely on just 1/8" thickness of threads (the thickness of the swing arm tubing) to hold/secure the weight of these (4) 10lb. batteries (in a potential crash or roll over situation) :ack2:

So, I welded a couple of "tall" nuts to each side to add extra "threads" to increase the holding capacity. :2guns:
 

Attachments

  • SAM_0730.jpg
    SAM_0730.jpg
    404 KB · Views: 2
  • SAM_0728.jpg
    SAM_0728.jpg
    311 KB · Views: 2
  • SAM_0722.jpg
    SAM_0722.jpg
    359.8 KB · Views: 2
  • SAM_0720.jpg
    SAM_0720.jpg
    331.6 KB · Views: 2
  • SAM_0695.jpg
    SAM_0695.jpg
    219.9 KB · Views: 3
  • SAM_0745.jpg
    SAM_0745.jpg
    317.8 KB · Views: 3
  • SAM_0743.jpg
    SAM_0743.jpg
    230.2 KB · Views: 3
  • SAM_0734.jpg
    SAM_0734.jpg
    503.5 KB · Views: 3
  • SAM_0732.jpg
    SAM_0732.jpg
    544.5 KB · Views: 3
  • SAM_0731.jpg
    SAM_0731.jpg
    355.3 KB · Views: 2

Functional Artist

Well-known member
Messages
5,320
Reaction score
2,782
Location
Toledo, Ohio
Final clean up

I think everything mechanical is done
...so, after a quick clean up, we'll seal 'er up with some primer.:thumbsup:

I disassembled everything then, started smoothing/cleaning
...every single piece, every nook & cranny

After going over this thing 100 times, every time that I think I'm done, I find more roughness
...or splatter
...or sharp edges :mad:

After cleaning (4 hours later) :ack2: I gave everything a "good" wipe down with paint thinner.

I cleaned & primed the frame on a small workbench
...all of the small pieces, I hung from a clothes line

* Since most of the frame/pieces are bare metal, I am using Self Etching primer.
It's supposed to "bite" into the metal & help the paint stick better. :2guns:
 

Attachments

  • SAM_0746.jpg
    SAM_0746.jpg
    478.4 KB · Views: 3
  • SAM_0749.jpg
    SAM_0749.jpg
    515.2 KB · Views: 3
  • SAM_0748.jpg
    SAM_0748.jpg
    443.3 KB · Views: 3
  • SAM_0756.jpg
    SAM_0756.jpg
    621.4 KB · Views: 3
  • SAM_0750.jpg
    SAM_0750.jpg
    287.5 KB · Views: 3
  • SAM_0764.jpg
    SAM_0764.jpg
    419.5 KB · Views: 3
  • SAM_0761.jpg
    SAM_0761.jpg
    523.5 KB · Views: 3
  • SAM_0759.jpg
    SAM_0759.jpg
    444.9 KB · Views: 3
  • SAM_0773.jpg
    SAM_0773.jpg
    587.7 KB · Views: 3
  • SAM_0776.jpg
    SAM_0776.jpg
    301.3 KB · Views: 3

Functional Artist

Well-known member
Messages
5,320
Reaction score
2,782
Location
Toledo, Ohio
I let the bottom side of the frame & a first batch of small parts dry for ~1 hour. :thumbsup:

Then, set the frame down level & hung a second batch of small parts. :cheers2:

This Self Etching primer dries into a kool bluish-green "patina" color. :2guns:
 

Attachments

  • SAM_0779.jpg
    SAM_0779.jpg
    488.6 KB · Views: 2
  • SAM_0780.jpg
    SAM_0780.jpg
    477.4 KB · Views: 2
  • SAM_0767.jpg
    SAM_0767.jpg
    212.4 KB · Views: 2
  • SAM_0793.jpg
    SAM_0793.jpg
    283 KB · Views: 2
  • SAM_0791.jpg
    SAM_0791.jpg
    298.3 KB · Views: 1
  • SAM_0790.jpg
    SAM_0790.jpg
    379.2 KB · Views: 1

Functional Artist

Well-known member
Messages
5,320
Reaction score
2,782
Location
Toledo, Ohio
Gettin' ahead of ourselves. :oops:

Before we get to paint, I noticed that I got the nooks & crannies cleaned up pretty good
...but, I just scuffed over the long straight bars.

There was chips & scrapes in the paint on the some of the pipes
…& they showed up really well after priming. :ack2:

So, some (lots) more smoothin' :smiley_omg:

Yup, that's better. :2guns:
 

Attachments

  • SAM_0782.jpg
    SAM_0782.jpg
    175.1 KB · Views: 1
  • SAM_0783.jpg
    SAM_0783.jpg
    219.3 KB · Views: 1
  • SAM_0785.jpg
    SAM_0785.jpg
    325.9 KB · Views: 1
  • SAM_0791.jpg
    SAM_0791.jpg
    298.3 KB · Views: 1
  • SAM_0794.jpg
    SAM_0794.jpg
    294 KB · Views: 2

Functional Artist

Well-known member
Messages
5,320
Reaction score
2,782
Location
Toledo, Ohio
Black Mirror

I have been doin some research lately on different painting techniques. :thumbsup:

I'm really interested in these "chameleon" or color shifting paints
…& also chrome paint (for rims, steering wheels, linkages etc.)

* I'm NOT talkin' about those "fake chrome" spray paints :ack2:
...more on that later. :cheers2:

So, from what I understand both types/techniques require a really shinny black base to produce/enhance their effect.

So, yup I gave everything a few coats of high gloss black. :2guns:
...bottom side first (always) & let 'er dry for & 45 min.

Then, set 'er down level & layed a few good coats on the top side.

At first just a real light "pizz" coat
...spraying the edges & nooks & crannies
...then, the smooth straight surfaces & bars

I let that "flash" or get tacky
...then, layed a nice-n-glossy coat
...let that tack up a bit & then, layed another. :2guns:
 

Attachments

  • SAM_0810.jpg
    SAM_0810.jpg
    568.9 KB · Views: 0
  • SAM_0808.jpg
    SAM_0808.jpg
    548.3 KB · Views: 0
  • SAM_0807.jpg
    SAM_0807.jpg
    546.2 KB · Views: 0
  • SAM_0804.jpg
    SAM_0804.jpg
    533.1 KB · Views: 0
  • SAM_0799.jpg
    SAM_0799.jpg
    305.5 KB · Views: 0
  • SAM_0819.jpg
    SAM_0819.jpg
    571 KB · Views: 0
  • SAM_0817.jpg
    SAM_0817.jpg
    497.9 KB · Views: 1
  • SAM_0816.jpg
    SAM_0816.jpg
    575.4 KB · Views: 1
  • SAM_0815.jpg
    SAM_0815.jpg
    506.8 KB · Views: 1
  • SAM_0811.jpg
    SAM_0811.jpg
    565 KB · Views: 0

Functional Artist

Well-known member
Messages
5,320
Reaction score
2,782
Location
Toledo, Ohio
While that stuff was drying, I went to work on the rims.

I have (4) new 6 x 5 rims but, the rears are white
...& the fronts are silver/grey :ack2:

So, I'ma gonna paint them to match :thumbsup:

* I'm not sure if they are painted or powder coated (the white ones seem to have a thicker coating on them)

I scuffed 'em up with a "Scotch Bright" pad to knock off the shine/gloss (this will give the black paint something to "bite" into) :cheers2:

I also cleaned up, masked & sprayed the back side of (2) of the plastic/composite rims (off of the Torsk kart)

I wasn't sure how well the paint would stick to this plastic
...so, as a test, I primed (1) rim with the self etching primer (don't know if the "etching effect" will even affect plastic) & just scuffed the other one up like I did on the steel rims.

** I leaned the table on, on a bit of an angle to get a better spraying angle. :2guns:
 

Attachments

  • SAM_0820.jpg
    SAM_0820.jpg
    326.5 KB · Views: 1
  • SAM_0822.jpg
    SAM_0822.jpg
    229.3 KB · Views: 1
  • SAM_0823.jpg
    SAM_0823.jpg
    289.7 KB · Views: 1
  • SAM_0825.jpg
    SAM_0825.jpg
    551 KB · Views: 1
  • SAM_0826.jpg
    SAM_0826.jpg
    300.4 KB · Views: 1
  • SAM_0829.jpg
    SAM_0829.jpg
    455.3 KB · Views: 1
  • SAM_0828.jpg
    SAM_0828.jpg
    421.2 KB · Views: 3

Functional Artist

Well-known member
Messages
5,320
Reaction score
2,782
Location
Toledo, Ohio
I let them dry for a couple of hours then, flipped 'em over, wiped 'em down & sprayed the front side. :thumbsup:

First a light coat then a couple of good gloss coats. :cheers2:

* I didn't do the front side of the plastic rims
...still want to evaluate if priming is needed or helps :cheers2:

They seemed to come out pretty good. :wai:
...circular black mirrors :2guns:
 

Attachments

  • SAM_0834.jpg
    SAM_0834.jpg
    257.9 KB · Views: 0
  • SAM_0837.jpg
    SAM_0837.jpg
    395.3 KB · Views: 0
  • SAM_0839.jpg
    SAM_0839.jpg
    457.3 KB · Views: 0
  • SAM_0840.jpg
    SAM_0840.jpg
    363.6 KB · Views: 0
  • SAM_0842.jpg
    SAM_0842.jpg
    402.5 KB · Views: 0
  • SAM_0843.jpg
    SAM_0843.jpg
    292.3 KB · Views: 1
  • SAM_0844.jpg
    SAM_0844.jpg
    301.1 KB · Views: 1

bthompson224

New member
Messages
298
Reaction score
2
Location
DFW
Krylon makes an excellent rattle can paint for plastics. Same thing, scuff 'em a little and spray.
 

Functional Artist

Well-known member
Messages
5,320
Reaction score
2,782
Location
Toledo, Ohio
DIY paint booth

I've been wantin' to finish paintin' the Damien kart for nearly a week now :huh:
...but, we keep gettin' on-off rain

I figured why not throw together a DIY paint booth?

Nuthin' fancy, mainly just out of the weather. :thumbsup:

So, I simply lined the inside of one of the box trucks, box with some plastic.

I ran the plastic up one side, across the top & down the other side.

I kept it below the roll-up door so, It would still be closeable. :2guns:
 

Attachments

  • SAM_0865.jpg
    SAM_0865.jpg
    333.7 KB · Views: 0
  • SAM_0866.jpg
    SAM_0866.jpg
    357 KB · Views: 0
  • SAM_0867.jpg
    SAM_0867.jpg
    348.7 KB · Views: 0
  • SAM_0868.jpg
    SAM_0868.jpg
    234.5 KB · Views: 0
  • SAM_0869.jpg
    SAM_0869.jpg
    217.2 KB · Views: 0

Functional Artist

Well-known member
Messages
5,320
Reaction score
2,782
Location
Toledo, Ohio
Usually, your supposed to "rough up" a surface before applying a "top coat"
...but, most of the research that I have done says that a glossy black "back ground" works best with Silver/Chrome paint & these Color Shifting Pearls.

As far as I have ever heard this usually leads to "delamination" (top surface not adhering properly to the base)

I/we are gonna find out. :cheers2:
So, lets just clean 'em up good & see what happens. :smiley_omg:

I didn't want to rub the dust/dirt in to the glossy base so, I blew them off good with the air gun (still dusty)
...then, I tried a feather duster (still dusty)
...then, I tried a microfiber cloth (seemed to remove most of the dust)
…finally, I went over them with a tac cloth (about the best were gonna get)

I was gonna spray them to have a chrome look
...but, the Unelli tires look like a racecar tire & most racecars have just black rims.

So, I'll just put a coat of 2K clear to protect/harden the surface. :thumbsup:
 

Attachments

  • SAM_0879.jpg
    SAM_0879.jpg
    288.3 KB · Views: 0
  • SAM_0877.jpg
    SAM_0877.jpg
    333.4 KB · Views: 0
  • SAM_0873.jpg
    SAM_0873.jpg
    369.4 KB · Views: 0
  • SAM_0872.jpg
    SAM_0872.jpg
    371.9 KB · Views: 0
  • SAM_0871.jpg
    SAM_0871.jpg
    342.9 KB · Views: 0
  • SAM_0881.jpg
    SAM_0881.jpg
    299.4 KB · Views: 0
  • SAM_0884.jpg
    SAM_0884.jpg
    313.8 KB · Views: 0
  • SAM_0876.jpg
    SAM_0876.jpg
    374.9 KB · Views: 1
Status
Not open for further replies.
Top