You are using an out of date browser. It may not display this or other websites correctly.
You should upgrade or use an alternative browser.
You should upgrade or use an alternative browser.
Building a go kart size Aerial Atom
- Thread starter Functional Artist
- Start date
Tpdingo
Member
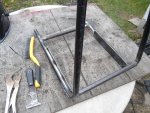
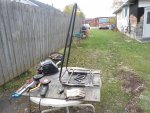
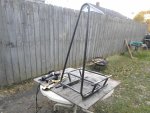
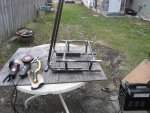
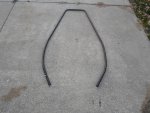
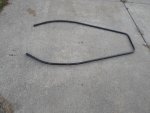
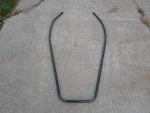
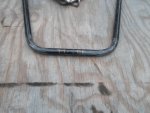
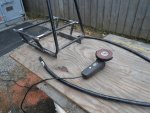
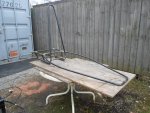
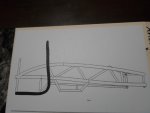
Lets bend some pipe
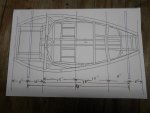
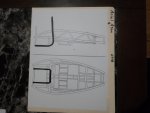
I think we can incorporate the seatback/rollbar in with the bottom of the motor box.
(see drawing below)
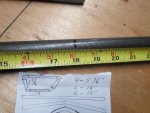
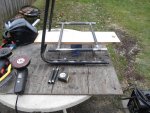
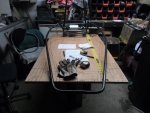
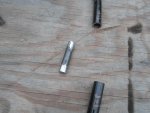
Started with a 10" piece of pipe.
Marked at 20", 60" & then, at 100"
Bent it at the 20" mark to ~75* angle & also at the 100" mark to ~75*
(being sure to keep 'em in alignment)
Then, turned 'er ~90* & bent 'er to the max right in the middle at the 60* mark.
A ratchet strap easily draws 'em together to ~12" apart.
I used my flexy straws and now my own Ariel Atom is done. I made sure to use my Harbor Freight hydraulic flexy straw bender.
It runs off coin cells and can haul two fat ants around.
I don't have any flexy straws

Nice work though! In its current state...it makes a nice coat hook! I'm sure the people at Ariel must love having their car being used as a coat hook

Functional Artist
Well-known member
Rear Suspension
Well, that's a beginning, but what's next?
I guess we'll start @ the back & work our way forward.
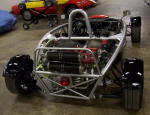
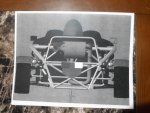
An actual Ariel Atom has an independent rear suspension with a transaxle & individual axles going to each wheel.
Were not doin that. (at least not on this one) too complicated & expensive
I think a swing arm that travels in between the bottom motor box rails might work pretty good in this situation..
So, next is to make a swing arm.
On this one, I'll just mount the motor & axle to the swing arm & then mount the batteries elsewhere.
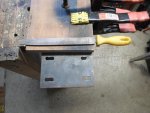
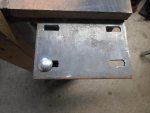
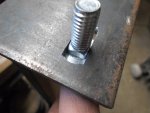
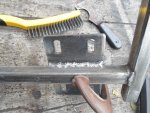
First, we need to make a motor mount plate. (3/16" x 4" x 6" steel)
Measured, marked & drilled (8) 3/8" holes, (2) for each slot.
I used a Dremel to cut out the remainder of material & then, filed 'em 'till the bolts slid easily, in the slots.
* I am using 3/8" round headed bolts so, I don't need to use a wrench from the bottom side, when mounting the motor.
Well, that's a beginning, but what's next?
I guess we'll start @ the back & work our way forward.
An actual Ariel Atom has an independent rear suspension with a transaxle & individual axles going to each wheel.
Were not doin that. (at least not on this one) too complicated & expensive
I think a swing arm that travels in between the bottom motor box rails might work pretty good in this situation..
So, next is to make a swing arm.
On this one, I'll just mount the motor & axle to the swing arm & then mount the batteries elsewhere.
First, we need to make a motor mount plate. (3/16" x 4" x 6" steel)
Measured, marked & drilled (8) 3/8" holes, (2) for each slot.
I used a Dremel to cut out the remainder of material & then, filed 'em 'till the bolts slid easily, in the slots.
* I am using 3/8" round headed bolts so, I don't need to use a wrench from the bottom side, when mounting the motor.
Attachments
-
 untitled.png237.8 KB · Views: 6
 -
 SAM_2837.jpg256.3 KB · Views: 2
 -
 SAM_2904.jpg263 KB · Views: 4
 -
 SAM_2905.jpg243.1 KB · Views: 4
 -
 SAM_2907.jpg246.2 KB · Views: 5
Functional Artist
Well-known member
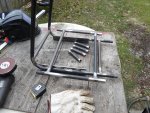
Swing Arm
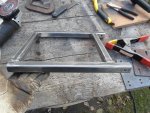
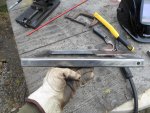
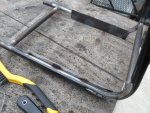
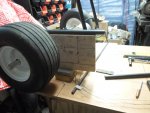
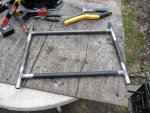
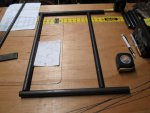
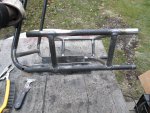
For the swing arm I'll use 1" square tube, because it's easier to "square up" & the flat sides help the "rub rails" slide smoothly.
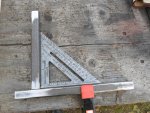
First, I lined the (2) main rails up & drilled the "hinge holes".
Next, I squared a main rail up with a cross rail & tacked 'em together.
Then, squared & tacked the other (3) corners, double checked everything & welded 'er up good.
* I left ~2" in front for the "hinge" bolts & made the rear nice-n-flush.
For the swing arm I'll use 1" square tube, because it's easier to "square up" & the flat sides help the "rub rails" slide smoothly.
First, I lined the (2) main rails up & drilled the "hinge holes".
Next, I squared a main rail up with a cross rail & tacked 'em together.
Then, squared & tacked the other (3) corners, double checked everything & welded 'er up good.
* I left ~2" in front for the "hinge" bolts & made the rear nice-n-flush.
Attachments
-
 SAM_2919.jpg495.2 KB · Views: 5
 -
 SAM_2917.jpg440 KB · Views: 1
 -
 SAM_2915.jpg315.9 KB · Views: 2
 -
 SAM_2913.jpg433.4 KB · Views: 1
 -
 SAM_2911.jpg416.1 KB · Views: 2
ezcome-ezgo
G'me sumthin to write on
* I am using 3/8" round headed bolts so, I don't need to use a wrench from the bottom side, when mounting the motor.
You are using carriage bolts, an excellent idea.
Functional Artist
Well-known member
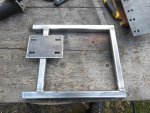
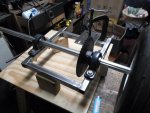
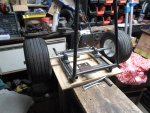
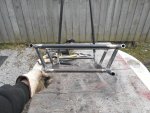
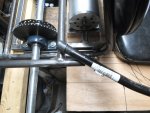
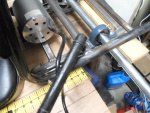
Before mounting the motor plate we need to mount the axle, sprocket & bearings so, we can line everything up.
I sat the motor in place, too (didn't get any pics) & made sure everything was in alignment & cleared nicely.
Then, welded the mount plate on good.
* Notice the way the motor mount plate got bowed a bit from welding.
I sat the motor in place, too (didn't get any pics) & made sure everything was in alignment & cleared nicely.
Then, welded the mount plate on good.
* Notice the way the motor mount plate got bowed a bit from welding.
Attachments
-
 SAM_2923.jpg275.1 KB · Views: 4
 -
 SAM_2924.jpg242.2 KB · Views: 4
 -
 SAM_2936.jpg406.8 KB · Views: 4
 -
 SAM_2937.jpg425.7 KB · Views: 4
 -
 SAM_2940.jpg461 KB · Views: 5
Functional Artist
Well-known member
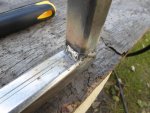
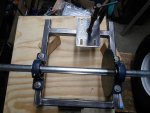
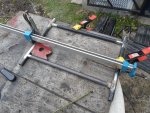
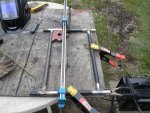
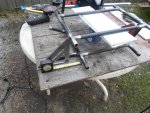
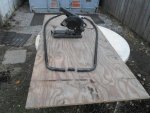
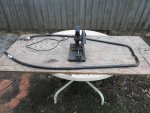
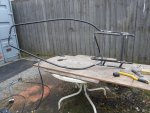
Now that we have a swing arm we can get back to the rear of the frame.
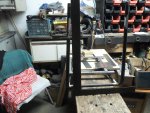
Went to set it in between the frame rails, but they seemed kinda tweaked.
I know the swing arm is square so...
Checked with a "big" square & yup, the one on the right os off just a bit, but the one on the left is off quite a bit.
Guess we are gonna have ta do some "body work"
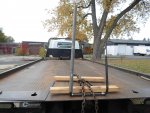
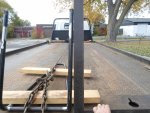
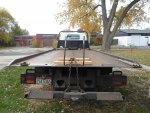
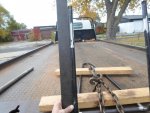
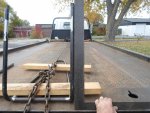
Clamped 'er down on the back of my truck (a 10,000 lb. winch will do the trick) using a couple of 2 x 4's to spread out the pressure.
Then, slid a piece of scrap 1 1/2" pipe (for leverage) over each side & tweaked 'em back to being square.
(90* with the seatback)
Went to set it in between the frame rails, but they seemed kinda tweaked.
I know the swing arm is square so...
Checked with a "big" square & yup, the one on the right os off just a bit, but the one on the left is off quite a bit.
Guess we are gonna have ta do some "body work"
Clamped 'er down on the back of my truck (a 10,000 lb. winch will do the trick) using a couple of 2 x 4's to spread out the pressure.
Then, slid a piece of scrap 1 1/2" pipe (for leverage) over each side & tweaked 'em back to being square.
(90* with the seatback)
Attachments
-
 SAM_2969.jpg439.1 KB · Views: 2
 -
 SAM_2967.jpg414.2 KB · Views: 3
 -
 SAM_2966.jpg419.7 KB · Views: 2
 -
 SAM_2968.jpg499.1 KB · Views: 2
 -
 SAM_2962.jpg344 KB · Views: 2
 -
 SAM_2974.jpg340.8 KB · Views: 1
 -
 SAM_2973.jpg408.8 KB · Views: 1
Functional Artist
Well-known member
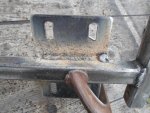
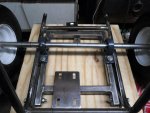
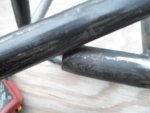
Next, I added a couple of "outer" rub rails. (in side of the motor box)
This way the swing arm doesn't bump, catch or clash with the lower motor box tubes
Also added a couple of wear pads (in between the hinge rails) to avoid metal to metal scraping.
Will probably add a couple further back. (for power sliding)
Once we knew what the dimensions needed to be I made up a couple of "cross bars" & welded 'em in to "lock 'er together"
Attachments
-
 SAM_2986.jpg485.2 KB · Views: 4
 -
 SAM_2987.jpg372.9 KB · Views: 4
 -
 SAM_2989.jpg320.7 KB · Views: 5
 -
 SAM_2990.jpg248.4 KB · Views: 9
Functional Artist
Well-known member
Still workin' & figurin' on how to do those "bows" or arches.
Doin' research, I found this:
https://www.youtube.com/watch?v=PfD7ST1Dvd0
...but, that's a whole 'nother tool & looks like a lot of work for as many different ones we would need & the size that they would need to be.
Doin' research, I found this:
https://www.youtube.com/watch?v=PfD7ST1Dvd0
...but, that's a whole 'nother tool & looks like a lot of work for as many different ones we would need & the size that they would need to be.
Functional Artist
Well-known member
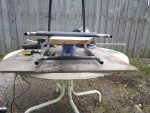
Motor Box
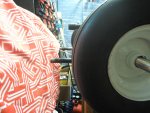
Now that the bottom of the motor box, with swing arm, is done lets "build 'er up" (work on the sides & top)
First, had to do some "mock up" work to get the measurements.
According to the pics, the bottom of the motor box should be just below the axle & the top should be just above the top of the rim, but not the tire.
The bottom of the motor box was supposed to be ~12" wide (between the wheels)
...but, ended up a little wider. (~14")
So, where the top should have been ~16" previously, (we had to adjust it accordingly)
…it now needs to be ~18" wide
Then, another quick "mock up" using those figures & factoring in the angles, it looks like we would need to make the upright "pillars" ~5 3/8".
This should put the top of the motor box just about where we need it to be.
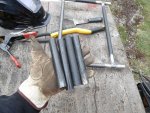
I finally get to use a bunch of scrap pipe that I've has in a bucket for years.
2 - 18" pieces for upper cross bars
2 - 12" pieces for the rear ends of the lower "rib rails"
4 - 5 3/8" pieces for the upright pillars.
Cleaned 'em up, squared 'em up & welded 'em up.
Now that the bottom of the motor box, with swing arm, is done lets "build 'er up" (work on the sides & top)
First, had to do some "mock up" work to get the measurements.
According to the pics, the bottom of the motor box should be just below the axle & the top should be just above the top of the rim, but not the tire.
The bottom of the motor box was supposed to be ~12" wide (between the wheels)
...but, ended up a little wider. (~14")
So, where the top should have been ~16" previously, (we had to adjust it accordingly)
…it now needs to be ~18" wide
Then, another quick "mock up" using those figures & factoring in the angles, it looks like we would need to make the upright "pillars" ~5 3/8".
This should put the top of the motor box just about where we need it to be.
I finally get to use a bunch of scrap pipe that I've has in a bucket for years.
2 - 18" pieces for upper cross bars
2 - 12" pieces for the rear ends of the lower "rib rails"
4 - 5 3/8" pieces for the upright pillars.
Cleaned 'em up, squared 'em up & welded 'em up.
Attachments
-
 SAM_3023.jpg309.3 KB · Views: 5
 -
 SAM_3022.jpg258.2 KB · Views: 6
 -
 SAM_3019.jpg286.6 KB · Views: 6
 -
 SAM_3016.jpg296.9 KB · Views: 6
 -
 SAM_3017.jpg231.8 KB · Views: 9
 -
 SAM_3030.jpg511.5 KB · Views: 7
 -
 SAM_3029.jpg520.4 KB · Views: 7
 -
 SAM_3028.jpg555 KB · Views: 6
 -
 SAM_3025.jpg531.5 KB · Views: 6
 -
 SAM_3024.jpg275.4 KB · Views: 5
Functional Artist
Well-known member
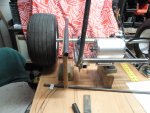
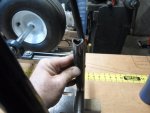
Now we need the pillars to hold 'er up.
Used the "rough" grinder to "notch" the ends of the (4) "pillars" (5 3/8" pieces of pipe)
I sat the rear frame section (lower motor box) on the bench, sat the upper motor box on a coffee can & used a couple of boards til' the pillars would just fit in.
Then, used a square & tape measure to get 'er centered & squared
Attachments
-
 SAM_3032.jpg500.3 KB · Views: 6
 -
 SAM_3034.jpg309.5 KB · Views: 6
 -
 SAM_3036.jpg224.3 KB · Views: 6
 -
 SAM_3037.jpg530.5 KB · Views: 6
 -
 SAM_3038.jpg571.1 KB · Views: 6
 -
 SAM_3046.jpg483.8 KB · Views: 7
 -
 SAM_3042.jpg477 KB · Views: 7
 -
 SAM_3040.jpg512.1 KB · Views: 7
Functional Artist
Well-known member
I used the magnetic square to help keep the pillars ~90* (from front to back) & ~45* (from side to side)
Tack welded 'er all the way around (top & bottom of all (4) pillars)
Double checked everything (distances, angles & "the look")
Then, welded 'er on good.
Looks like somethin' is startin' to take shape
Tack welded 'er all the way around (top & bottom of all (4) pillars)
Double checked everything (distances, angles & "the look")
Then, welded 'er on good.
Looks like somethin' is startin' to take shape
Attachments
-
 SAM_3053.jpg407.8 KB · Views: 8
 -
 SAM_3051.jpg468.8 KB · Views: 8
 -
 SAM_3050.jpg387.1 KB · Views: 6
 -
 SAM_3048.jpg426.7 KB · Views: 6
 -
 SAM_3047.jpg477.2 KB · Views: 7
It is starting to take shape quite nicely. Thanks for all the pics. Even though I don't comment too often, I find myself living vicariously through your builds
Functional Artist
Well-known member
It is starting to take shape quite nicely. Thanks for all the pics. Even though I don't comment too often, I find myself living vicariously through your builds
Thank you very much.
I kinda try to do my "build threads" like they did in the old Hot Rod magazines.
Step by step with lots of pics & details.
…& hopefully we have something kool in the end
* If ya think about it, Go karts are mini Hot Rods

Functional Artist
Well-known member
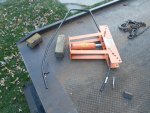
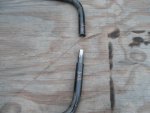
I think I did it!
I made some "bows"
I made some "bows"
Attachments
-
 SAM_3101.jpg457.9 KB · Views: 2
 -
 SAM_3102.jpg504.1 KB · Views: 2
 -
 SAM_3103.jpg488.6 KB · Views: 2
Functional Artist
Well-known member
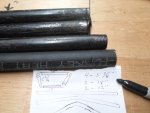
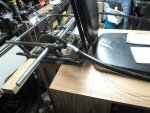
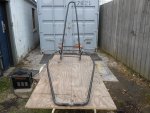
Instead of making (2) separate "lower rib rails", I figured I'd try to make (1) big "U" for the "nose"
...& then see If I could add the "bows" to it
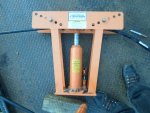
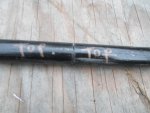
First, I measured & marked another 10' piece of pipe in the middle (@60")
...& then 6" each way (@ 54" & 66") for the "nose" bends
I also measured & marked it @ 6", 12", 16", 20", 24" & 30" (from each end) for the "bows"
It took ~40 pumps @ the 54" & the 66" marks to establish the "nose"
To help "widen" the bend, I adjusted the rollers "out" a couple of notches
(It's adjustable for bending larger diameter pipes)
Then, I did 5 pumps @ the 12", 16", 20", 24" & 30" marks (on each side)
...which "bowed it in" to meet up with the upper motor box rails pretty nicely.
...& then see If I could add the "bows" to it
First, I measured & marked another 10' piece of pipe in the middle (@60")
...& then 6" each way (@ 54" & 66") for the "nose" bends
I also measured & marked it @ 6", 12", 16", 20", 24" & 30" (from each end) for the "bows"
It took ~40 pumps @ the 54" & the 66" marks to establish the "nose"
To help "widen" the bend, I adjusted the rollers "out" a couple of notches
(It's adjustable for bending larger diameter pipes)
Then, I did 5 pumps @ the 12", 16", 20", 24" & 30" marks (on each side)
...which "bowed it in" to meet up with the upper motor box rails pretty nicely.
Attachments
-
 SAM_3111.jpg246.3 KB · Views: 8
 -
 SAM_3100.jpg263.5 KB · Views: 5
 -
 SAM_3099.jpg430.3 KB · Views: 5
 -
 SAM_3105.jpg262.9 KB · Views: 7
 -
 SAM_3106.jpg264.7 KB · Views: 7
 -
 SAM_3108.jpg264.4 KB · Views: 7
 -
 SAM_3110.jpg260.3 KB · Views: 7
Functional Artist
Well-known member
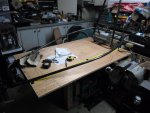
Our lower rib rail looks pretty good
...but (sorry to say) it's a little bit too wide.
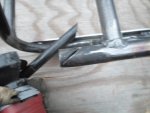
So, I measured 1" each way from the center mark & cut a 2" piece out of the middle.
I'll use a 3" piece of 5/8" rod to "pin" 'em back together & then, weld 'er up good.
The "nose" was ~14" wide, now it's ~12", much better.
...but (sorry to say) it's a little bit too wide.
So, I measured 1" each way from the center mark & cut a 2" piece out of the middle.
I'll use a 3" piece of 5/8" rod to "pin" 'em back together & then, weld 'er up good.
The "nose" was ~14" wide, now it's ~12", much better.
Attachments
-
 SAM_3118.jpg309.7 KB · Views: 4
 -
 SAM_3117.jpg286.1 KB · Views: 4
 -
 SAM_3114.jpg326.4 KB · Views: 4
 -
 SAM_3113.jpg336.3 KB · Views: 4
 -
 SAM_3112.jpg363.6 KB · Views: 4
 -
 SAM_3120.jpg233.4 KB · Views: 4
 -
 SAM_3119.jpg265.8 KB · Views: 4
Functional Artist
Well-known member
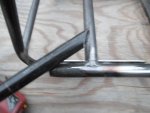
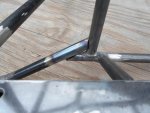
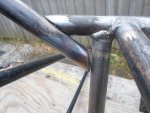
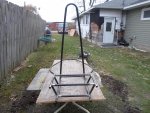
Lets see if we can "get 'er together"
Marked, trimmed & cleaned the ends up a bit.
How's that for "triangulation"? 
Propped 'er up on the "right" angle & clamped 'er down
Tacked 'er on (both sides) double checked everything (height, width, length & the angle)
...& welded the lower rib rail to the motor box.
Marked, trimmed & cleaned the ends up a bit.
How's that for "triangulation"? Propped 'er up on the "right" angle & clamped 'er down
Tacked 'er on (both sides) double checked everything (height, width, length & the angle)
...& welded the lower rib rail to the motor box.
Attachments
-
 SAM_3121.jpg181.3 KB · Views: 3
 -
 SAM_3123.jpg211.7 KB · Views: 2
 -
 SAM_3125.jpg200 KB · Views: 2
 -
 SAM_3132.jpg415.5 KB · Views: 2
 -
 SAM_3136.jpg427.5 KB · Views: 2
 -
 SAM_3135.jpg273.1 KB · Views: 3
 -
 SAM_3134.jpg229.8 KB · Views: 3
Functional Artist
Well-known member
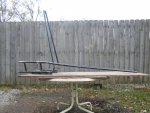
Not perfect 
...but, looks pretty good!
...but, looks pretty good!
Attachments
-
 SAM_3141.jpg504.7 KB · Views: 4
 -
 SAM_3140.jpg367.3 KB · Views: 4
 -
 SAM_3138.jpg378.7 KB · Views: 3
 -
 SAM_3137.jpg387.5 KB · Views: 3
 -
 SAM_3139.jpg397.1 KB · Views: 3
Functional Artist
Well-known member
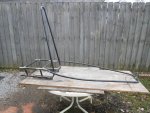
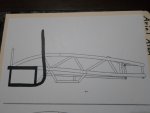
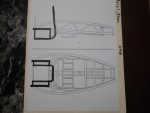
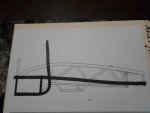
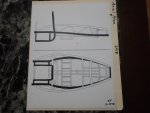
Lets catch up a little paperwork
I made some adjustments to the measurements, again (for like the 56th time)
Now, it looks like we'll have ~48" wheelbase & ~60" overall.
So far, we have made
1.) seatback/lower motor box combination
2.) the rest of the motor box
3.) & the lower rib rail
I made some adjustments to the measurements, again (for like the 56th time)
Now, it looks like we'll have ~48" wheelbase & ~60" overall.
So far, we have made
1.) seatback/lower motor box combination
2.) the rest of the motor box
3.) & the lower rib rail
Attachments
-
 SAM_3156.jpg231.9 KB · Views: 4
 -
 SAM_3158.jpg155.3 KB · Views: 4
 -
 SAM_3157.jpg192.6 KB · Views: 4
 -
 SAM_3160.jpg164.7 KB · Views: 4
 -
 SAM_3159.jpg196.2 KB · Views: 5
 -
 SAM_3162.jpg167.1 KB · Views: 5
 -
 SAM_3161.jpg203.7 KB · Views: 5