You are using an out of date browser. It may not display this or other websites correctly.
You should upgrade or use an alternative browser.
You should upgrade or use an alternative browser.
2016 - My go kart rebuild
- Thread starter David Ham
- Start date
- Status
- Not open for further replies.


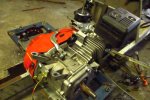
Just some (slightly) finer details, adding tubing so the suspension wont slide around

axle is mounted!


a piece of aluminium I will use for the engine mount

cut to size using a waning cutting disk on a grinder with the help of a hacksaw!

axle is mounted!
a piece of aluminium I will use for the engine mount
cut to size using a waning cutting disk on a grinder with the help of a hacksaw!
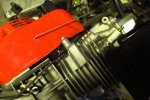
engine plate thingo

I have added some neoprene rubber to help absorb a little bit of vibration

oil drops might be a little tricky...

lining things up...

...and i have to remove more links!

finally, after many hours and washers, the chain is tight and ready to go!

 Yeahh!!
ground clearance may be an issue, which is why I want bigger wheels but they're hard to find

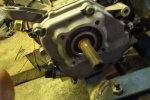
brake drum

brake drum with the brake belt around it.

I have added some neoprene rubber to help absorb a little bit of vibration
oil drops might be a little tricky...
lining things up...
...and i have to remove more links!
finally, after many hours and washers, the chain is tight and ready to go!
Yeahh!!ground clearance may be an issue, which is why I want bigger wheels but they're hard to find
brake drum
brake drum with the brake belt around it.


chancer
ɔ ɥ ɐ u ɔ ǝ ɹ
Remove the Rubber engine pads. They just cause problems. Like chain tension.
Speaking of that. Usually engine plates are slotted so you can slide the engine to adjust chain tension.
Looking good though!
Speaking of that. Usually engine plates are slotted so you can slide the engine to adjust chain tension.
Looking good though!
Poboy kartman
Senior Moments Member
Remove the Rubber engine pads. They just cause problems. Like chain tension.
Speaking of that. Usually engine plates are slotted so you can slide the engine to adjust chain tension.
Looking good though!
Yes. and yes....Engine plates should be slotted....and rubber pads are a bad idea....HOWEVER... without slots..the "isolation pads" cannot allow the engine to creep.....sooooo...no chain loosening! BUT! It's gonna be a pain adjusting chain tension. Probably the best solution is a plywood base under the engine and a slotted plate....but...whatever...

I was planning on slotting the engine mounting plate but I wnat to take it for a test drive first. And I may remove the rubber if it causes problems...
anyway I began to set up the throttle, no mods or governor removal or anything, I think I will have enough power")
I took out the tightening washer cause its annoying

I seriously do not trust these wheels

wait, it needs a spring!

and its all set to go!

anyway I began to set up the throttle, no mods or governor removal or anything, I think I will have enough power
I took out the tightening washer cause its annoying
I seriously do not trust these wheels
wait, it needs a spring!
and its all set to go!
Well, I gave up trying to do the throttle as it is, and one of the springs on the governor thing came off, so I started ripping it to bits. But I'm not sure about taking this side off, do I need to mark the screws or not? I'll use the oil for the clutch
Attachments
-
 IMG_0026.JPG99.1 KB · Views: 4
 -
 IMG_0027.JPG127.5 KB · Views: 6
 -
 IMG_0028.JPG111.6 KB · Views: 5
 -
 IMG_0029.JPG108.3 KB · Views: 4
Jfive
New member
I don't like the throttle hook up on these either. Looks a lot easier on the new predator engines.
Functional Artist
Well-known member
Looks Good! Keep workin on it.
Is the steering wheel off a Kenworth? LOL
Is the steering wheel off a Kenworth? LOL


ultralight01
Senior Yet Young Member
Nice job! I did something similar with the governor arm and parts...
Nice
chancer
ɔ ɥ ɐ u ɔ ǝ ɹ
Yep. Looks good to me. Much simpler throttle.


I got some ideas from this website to make a muffler, I have got some steel wool at the moment but I might use something finer if I find it.
http://www.motoiq.com/MagazineArtic...o-Make-your-Own-Effective-Exhaust-System.aspx

the throttle setup at the moment

engine mount is slotted and rubber mounts removed, just testing it out

http://www.motoiq.com/MagazineArtic...o-Make-your-Own-Effective-Exhaust-System.aspx
the throttle setup at the moment
engine mount is slotted and rubber mounts removed, just testing it out
 !
!


chancer
ɔ ɥ ɐ u ɔ ǝ ɹ
Dang that is a lot of holes to drill!
- Status
- Not open for further replies.