2016 - Junk build the hard way

Status
Not open for further replies.

pRoFiT

Can't buy it?, build it!
Messages
1,135
Reaction score
32
Location
California
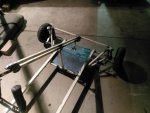
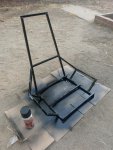
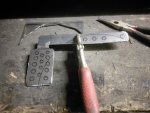
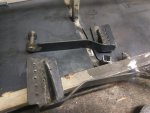
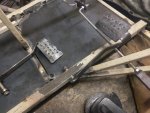
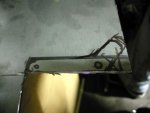
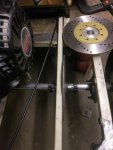
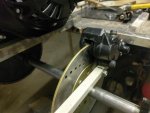
Well I picked up some good welding wire from the local welding supply. Seems to work good. Finished welding the axle hangers on.

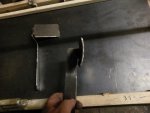
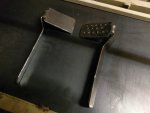
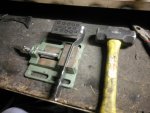
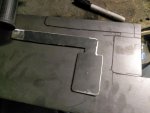
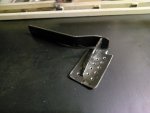
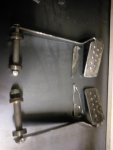
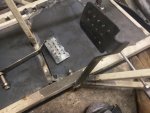
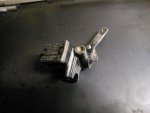
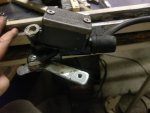
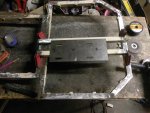
Made two supports for the engine mount. You think this will be good? Only sitting in place right now. I would put both on outside of mount but I'm trying to make it easy to install bolts. Don't want to block TC and chain if I go to far on outside.
 

Attachments

  • IMAG0104.jpg
    IMAG0104.jpg
    307.5 KB · Views: 6
  • IMAG0107.jpg
    IMAG0107.jpg
    337 KB · Views: 9

pRoFiT

Can't buy it?, build it!
Messages
1,135
Reaction score
32
Location
California
Slow progress but progress none the less.

Ordered some 1/4" keys, guess i will be needed some for the live axle..and some 1" collars.

Went down to scrap metal yard and picked up some sheet metal for the go kart floor panel (and some extra just in case) and a 1" ID pipe because im going to attempt to PAFR and build the brake hub for the live axle....this may turn out a waste of money and time and ill end up buying a pre-made one.... we shall see. scrap wass $0.75 a lbs. seems a little high but i guess metal has gone up over the years.

Oh and i think the engine mount is locked in place now! looks straight enough! :thumbsup:

This thing is getting to big for my bench. Think its time to clean out my garage this weekend so i can make some more room to work. :)

anyone want to buy some G Scale trains? i have a BNSF engine! and a bunch of cars :) taking up garage space.
 

Attachments

  • IMAG0118.jpg
    IMAG0118.jpg
    136.5 KB · Views: 5
  • IMAG0119.jpg
    IMAG0119.jpg
    252.5 KB · Views: 6
  • IMAG0120.jpg
    IMAG0120.jpg
    236.6 KB · Views: 6

pRoFiT

Can't buy it?, build it!
Messages
1,135
Reaction score
32
Location
California
Putting in floor panels. I work, get home, eat, get 8-10pm to make noise cutting and welding.

Sometimes I feel like I will never finish. I'll just keep moving. Maybe finish before end of year. Plus man this thing is getting heavy. Pretty soon I won't be able to just throw it around...going to need garage space for normal storage!

I need a drink :cheers2:

Need to weld In big panel still, ran out of noise time...:yawn:

Edit. OIC, iPad not uploading all photos. Oh well. Imagine uncut and unwelded steps...
 

Attachments

  • image.jpg
    image.jpg
    215.9 KB · Views: 7

pRoFiT

Can't buy it?, build it!
Messages
1,135
Reaction score
32
Location
California
made a little progress this weekend. finished putting in bottom pan. Welded up some slide mounts for my seat. Reinforced the back and Painted the seat frame.

I ordered some 1/4" keys so i could put the axle on....but i picked the wrong size and ended up with 3/16". i must of been tired and selected wrong size or something :( Oh well new order of 1/4" key stock.

Also need to get the brake disc mounted to a hub that i'm making. The ID is a little more the 1" so it isn't a tight fit.....hope that doesn't make it wobble. that would not be good for a brake rotor!

Slow and steady wins the race :)
 

Attachments

  • IMAG0137.jpg
    IMAG0137.jpg
    483.8 KB · Views: 4
  • IMAG0139.jpg
    IMAG0139.jpg
    289.2 KB · Views: 7

pRoFiT

Can't buy it?, build it!
Messages
1,135
Reaction score
32
Location
California
Started work on my pedals. Need to put pivot bolt and some hole to connect throttle cable to. Other then that I think they came out looking good. :thumbsup:
 

Attachments

  • IMAG0152.jpg
    IMAG0152.jpg
    199.3 KB · Views: 6
  • IMAG0151.jpg
    IMAG0151.jpg
    215.6 KB · Views: 7
  • IMAG0150.jpg
    IMAG0150.jpg
    200.7 KB · Views: 6
  • IMAG0149.jpg
    IMAG0149.jpg
    168.9 KB · Views: 5
  • IMAG0148.jpg
    IMAG0148.jpg
    222.4 KB · Views: 6

chancer

ɔ ɥ ɐ u ɔ ǝ ɹ
Messages
9,358
Reaction score
8
Location
COMFORT, TEXAS
I like those. nice work!
Cut out with an angle grinder?

You may want to add a brace, so the pedal does not bend when you mash the brakes.
 

pRoFiT

Can't buy it?, build it!
Messages
1,135
Reaction score
32
Location
California
I like those. nice work!
Cut out with an angle grinder?

You may want to add a brace, so the pedal does not bend when you mash the brakes.

Yah a little worried about bending. but i used a sledge hammer to get the shape. I did use some thick metal.

Oh and yes angle grinder!

Only equipment i have is Welder, Angle Grinder, Drill. Everything else hand tools. oh and small dremil :)

---------- Post added at 12:44 AM ---------- Previous post was at 12:41 AM ----------

We're you using that drill press vise with a drill press...or just to hold the parts.

I used the small vise to hold the part while i beat on it :) and a little drilling. No press only power drill.

I could use a drill press, cut off saw and band saw maybe? Gas welder? Tig machine would be nice!

Yah im a test engineer (i write test software) i don't really use these kinds of tools much. But i can be handy if i want to be. :thumbsup:

oh and just to poke at your grammar. its were not we're <-- that means we are. not that my grammar is any better. :)

Edit: you should see my PC collection! 4 at my desk. one for my wife, laptops for all and One PC in living room for home theater setup. So for my profession i do have equipment :) Bunch of junk really. hardly use my pc lately. You can do almost everything on a phone now.
 

Poboy kartman

Senior Moments Member
Messages
12,461
Reaction score
1
Location
White Settlement Texas
Actually...I'm usually pretty precise with my grammar..but you did catch me on that..we're on the same page now.

I asked about the drill press vise because although I have a drill press...my vice has never seen it, I use it for other stuff..they are handy little things.
 

chancer

&#596; &#613; &#592; u &#596; &#477; &#633;
Messages
9,358
Reaction score
8
Location
COMFORT, TEXAS
Excellent! Angle grinder is the most Versatile tool ever.

I would just weld a piece of that same metal on the back of the pedal At a 90° and to the "arm".
 

pRoFiT

Can't buy it?, build it!
Messages
1,135
Reaction score
32
Location
California
Excellent! Angle grinder is the most Versatile tool ever.

I would just weld a piece of that same metal on the back of the pedal At a 90° and to the "arm".

Yah i was thinking about it. So i cut up some of the scrap pieces to make a 90.

Also i think i found more use for the wheelchair parts i have. Using some of the bolts and bearings for the pedal mounts.
 

Attachments

  • IMAG0157.jpg
    IMAG0157.jpg
    162.5 KB · Views: 6
  • IMAG0159.jpg
    IMAG0159.jpg
    139.6 KB · Views: 8

pRoFiT

Can't buy it?, build it!
Messages
1,135
Reaction score
32
Location
California
Okay Gas pedal reinforced and mounted. Just need to drill hole for brake pedal. Didn't have my phone with me while i worked so i could only take final images. But there is a huge hole in side so bearings can rest on the outside while the pedal is against the inside of the bearing. Makes it smooth and tight.

now to come up with stop points so i don't speed! :)
 

Attachments

  • IMAG0164.jpg
    IMAG0164.jpg
    245.4 KB · Views: 6
  • IMAG0165.jpg
    IMAG0165.jpg
    277.7 KB · Views: 6
  • IMAG0166.jpg
    IMAG0166.jpg
    308.6 KB · Views: 6

chancer

&#596; &#613; &#592; u &#596; &#477; &#633;
Messages
9,358
Reaction score
8
Location
COMFORT, TEXAS
I use pedal return springs, to pull the pedal back towards the driver. They rest on a pedal stop in the fully returned position.
The brake and throttle themselves limit the pedal in the forward motion positions.
 

pRoFiT

Can't buy it?, build it!
Messages
1,135
Reaction score
32
Location
California
Now that i have pedals i need to work on the brakes. Not sure why i thought the lever needed to be at an angle, but oh well. It works.

And then there's the brake disc.... Was going to bolt it to home made hub.... Tacd it to hold in place and thought....screw it. Weld the whole thing. If it doesnt work later ill buy new one... Should hold together long enough before the kart falls apart. :thumbsup:
 

Attachments

  • IMAG0173.jpg
    IMAG0173.jpg
    181.1 KB · Views: 9
  • IMAG0172.jpg
    IMAG0172.jpg
    170.8 KB · Views: 7
  • IMAG0171.jpg
    IMAG0171.jpg
    124.9 KB · Views: 8
  • IMAG0169.jpg
    IMAG0169.jpg
    190 KB · Views: 5
  • IMAG0168.jpg
    IMAG0168.jpg
    145.2 KB · Views: 5

pRoFiT

Can't buy it?, build it!
Messages
1,135
Reaction score
32
Location
California
okay ive been working on this just no time to post anything. i'm taking pictures as i go. The brake rotor i had was too wobbly and bad. so i bought gold one! and waiting for brake pads and sight eye for master cylinder to arrive.

Mounted brake cylinder under side of seat. If pedal ever brakes i can reach down and still stop. Thinking about large bar underneath with pad for e brake?

anyways, ill post more with pics soon.
 

pRoFiT

Can't buy it?, build it!
Messages
1,135
Reaction score
32
Location
California
Lots of pictures and time have passed. So lets get to the updates.

Brake Master Cylinder had a broken glass sight and the two screws holding the lid where in really tight. So i had to drill out screws and retap a bigger size. hope they don't leak!

Also for like $3 on ebay i picked up 2 sight glass replacements and pressed one set into the master.
 

Attachments

  • IMAG0195.jpg
    IMAG0195.jpg
    198.9 KB · Views: 4
  • IMAG0196.jpg
    IMAG0196.jpg
    222.4 KB · Views: 4
  • IMAG0198.jpg
    IMAG0198.jpg
    198.7 KB · Views: 4
  • IMAG0245.jpg
    IMAG0245.jpg
    278.8 KB · Views: 4
  • IMAG0247.jpg
    IMAG0247.jpg
    218.4 KB · Views: 3

pRoFiT

Can't buy it?, build it!
Messages
1,135
Reaction score
32
Location
California
Then onto the Disc brake mount....ugh.

So i mounted the one i pulled of a wrecked motorcycle. but my welding was not up to par on this one! And the wobble was going to be really noticeable while driving. And would end up destroying the brakes probably.

So i found this one on BMI http://www.bmikarts.com/8-Brake-Rotor--Gold-_p_609.html 8" Gold Rotor $2.00. Score!

Purchased and installed!

Only issue was Bolts and disc brake hit....Back to store for some flat head bolts....Okay mounted and .... yes fits with clearance.

Next was brake fluid. Never done a bike brake before. only a car. On bike brakes you need to pump a couple times and hold while releasing pressure at disc hold pressure at disc and repeat! this take some time. Or get a vacuum pump and do it the right way ;)

Then the brakes where not engaging the disc...... several pumps and hitting the piston with a hammer to loosen them up (old brakes) they finally made contact with disc and i can now stop. Will need to test while rolling next!
 

Attachments

  • IMAG0275.jpg
    IMAG0275.jpg
    173.2 KB · Views: 3
  • IMAG0229.jpg
    IMAG0229.jpg
    182.9 KB · Views: 3
  • IMAG0227.jpg
    IMAG0227.jpg
    255.5 KB · Views: 2
  • IMAG0225.jpg
    IMAG0225.jpg
    212.9 KB · Views: 2
  • IMAG0224.jpg
    IMAG0224.jpg
    248.2 KB · Views: 3
  • IMAG0281.jpg
    IMAG0281.jpg
    199.8 KB · Views: 4
  • IMAG0282.jpg
    IMAG0282.jpg
    179.7 KB · Views: 5
  • IMAG0283.jpg
    IMAG0283.jpg
    275.4 KB · Views: 4
  • IMAG0285.jpg
    IMAG0285.jpg
    194.8 KB · Views: 4
Status
Not open for further replies.
Top