2016 - Junk build the hard way

Status
Not open for further replies.

Poboy kartman

Senior Moments Member
Messages
12,461
Reaction score
1
Location
White Settlement Texas
I would do that. Sounds at first like maybe it would not be strong.
But the axle bolt is just welded to the barrel. So it should be about the same.

However continually welding the same spot. Will/may overheat and make the spindle bolt more brittle.

AW SPINDLES....(I know , it sounds stupid...but hasn't it always?)
 

pRoFiT

Can't buy it?, build it!
Messages
1,135
Reaction score
32
Location
California
These worth getting at this price. Free shipping! Better then hf wheels.
 

Attachments

  • Screenshot_20161111-153304_1.jpg
    Screenshot_20161111-153304_1.jpg
    188.2 KB · Views: 2

pRoFiT

Can't buy it?, build it!
Messages
1,135
Reaction score
32
Location
California
It's From bmi karts. Free shipping on 200 or more orders...ugh.....they do have some 15 turfs that match my rear for 14.95 with rim. And I can pull the good high speed bearings from my hf wheels. But shipping...maybe I call bmi and see if I can get deal and better shipping......
 

chancer

ɔ ɥ ɐ u ɔ ǝ ɹ
Messages
9,358
Reaction score
8
Location
COMFORT, TEXAS
Used tires Cool.
Still seems like a good deal. BMI sells similar 6" wheels for someteen dollars.
So I don't think you can go wrong.
 

pRoFiT

Can't buy it?, build it!
Messages
1,135
Reaction score
32
Location
California
Okay worked on alignment issues today. And took some test drives with the fixes.

Ended up cutting down into the spindle axle (Bolt) and bending it to be straight with front axle? cross beams? front!

Then welded several beads up while giving a good wire brush after each weld. Don't want junk in there, it's the only thing keeping the cheap HF wheels on.

Grinder to the weld to remove excess, filed and sandpaper to make smooth again.
 

Attachments

  • IMAG0444.jpg
    IMAG0444.jpg
    174.4 KB · Views: 5
  • IMAG0445.jpg
    IMAG0445.jpg
    176 KB · Views: 4
  • IMAG0446.jpg
    IMAG0446.jpg
    184.2 KB · Views: 6
  • IMAG0448.jpg
    IMAG0448.jpg
    213.1 KB · Views: 6
  • IMAG0449.jpg
    IMAG0449.jpg
    190.3 KB · Views: 6
  • IMAG0458.jpg
    IMAG0458.jpg
    191.6 KB · Views: 6
  • IMAG0455.jpg
    IMAG0455.jpg
    200.1 KB · Views: 6
  • IMAG0454.jpg
    IMAG0454.jpg
    204.3 KB · Views: 6
  • IMAG0453.jpg
    IMAG0453.jpg
    219.8 KB · Views: 6
  • IMAG0450.jpg
    IMAG0450.jpg
    250.9 KB · Views: 6

pRoFiT

Can't buy it?, build it!
Messages
1,135
Reaction score
32
Location
California
Some more of the right side clean up.

After another 20 minutes of high speed driving around the block. All right turns for the most part. more wear on the left tire then right still.

Have to say much better wear down the center on the new HF tires i put on. :thumbsup:

Looking at tires from front of kart. so left and right look reversed :)
 

Attachments

  • IMAG0473.jpg
    IMAG0473.jpg
    201.9 KB · Views: 9
  • IMAG0466.jpg
    IMAG0466.jpg
    204.7 KB · Views: 4
  • IMAG0464.jpg
    IMAG0464.jpg
    196.6 KB · Views: 5
  • IMAG0462.jpg
    IMAG0462.jpg
    205.8 KB · Views: 4
  • IMAG0460.jpg
    IMAG0460.jpg
    193.4 KB · Views: 3
  • IMAG0474.jpg
    IMAG0474.jpg
    184.6 KB · Views: 5

chancer

ɔ ɥ ɐ u ɔ ǝ ɹ
Messages
9,358
Reaction score
8
Location
COMFORT, TEXAS
Cool man. :wai: Nice work. I like a 100% DIY first time build rather than a Craigs list Money pit.:thumbsup::thumbsup:
 

pRoFiT

Can't buy it?, build it!
Messages
1,135
Reaction score
32
Location
California
Glad it didnt snap in half!

I think I'm more glad then you :thumbsup: I don't have seatbelt or helmet yet!

Picked up chancers idea of a kill switch today. Going to wire that into the oil sense.

Maybe take it out for another spin around the block tomorrow before the tires fall apart. I have one good one left. Already planning on the replacements. Next paycheck. :rolleyes:


Oh yah I never put in the beer, I mean cup, holder....hmmm maybe tomorrow as well. :cheers2:
 

pRoFiT

Can't buy it?, build it!
Messages
1,135
Reaction score
32
Location
California
Okay kill switch time!
IMAG1372.jpg
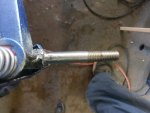
Get all parts ready to wire
IMAG1375.jpg
Get my little buddy out to keep me warm while i do it.
IMAG1374.jpg
So i think i will add a doorbell to my steering wheel. Makes a great location for a kill switch. or a rocket launcher? turbo boost?

IMAG1380.jpg
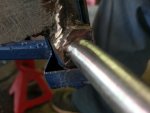
Started pulling a black and orange wire through before i realized i would have this orange wire coming out of my steering wheel. So i pulled that back and replaced with another black wire!
IMAG1382.jpg

There much better. Blends nicely.

IMAG1381.jpgIMAG1383.jpg

Nice and black and hidden. Much better.

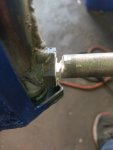
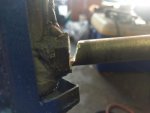
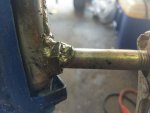
So i get all this wired and pulled through the kart frame down the steering through the side of the chassis and to the engine oil kill sense. Get everything in position and try to start and test the kill button. But nothing happens!!! it wont start. evens backfires on me????? so i disconnect the button and it fires right up???

Okay so pull out the DMM and measure this thing. with no button pressed i get about 150ohms! thats not right?
IMAG1384.jpg

Ah i see i purchased a doorbell switch with the light! thats not going to work. I could just go to 1800doorbell dot com and order one without a light but thats not me. :idea2: I rip the thing apart and yank out the light bulb inside.

IMAG1385.jpg IMAG1387.jpg

Ahh much better. Now i can plug it all back in and test it. Engine fired right up and the button killed it instantly. Thanks chancer for the doorbell idea! I'm going to go post my issues on your thread now :)

Looks like now i have completed all challenge requirements... just in time too. :wai:
 

chancer

ɔ ɥ ɐ u ɔ ǝ ɹ
Messages
9,358
Reaction score
8
Location
COMFORT, TEXAS
Post your Solutions!
Nobody wants to hear about your "Issues":lolgoku:

Just kidding already read it over there.
Thanks for the helpful contribution!:thumbsup:
 

pRoFiT

Can't buy it?, build it!
Messages
1,135
Reaction score
32
Location
California
You didn't need to run two wires . Run one to the sensor and connect the other one (ground) to a wad of copper brillo pad and stuff it into the end of the handle bars.


i only ran it down the handle. the second wire is attached to the steering bracket. i did just in case one wire was not enough and would have to run another wire through handle later.
 

pRoFiT

Can't buy it?, build it!
Messages
1,135
Reaction score
32
Location
California
Okay. Caved in this week and spent more money.


$14 each for tires from waly world. Carlisle 4.10-4 turf savers. Using the upgraded hf wheels.

They look like they will be good. Used tube also from hf wheels.

Ordered on sunday and they came in today. Free shipping in store pickup.

Now i can play a little safer.... I think i need to take vacation day this week if i can find a clear sky day....soooo much rain in california. Us californians dont know what to do in the rain.
 

Attachments

  • IMAG1439.jpg
    IMAG1439.jpg
    285.3 KB · Views: 4
  • IMAG1440.jpg
    IMAG1440.jpg
    362.9 KB · Views: 4
  • IMAG1442.jpg
    IMAG1442.jpg
    397.4 KB · Views: 5
  • IMAG1443.jpg
    IMAG1443.jpg
    327.6 KB · Views: 4
Status
Not open for further replies.
Top