2016 - ElDingo (Electric Dingo)

Status
Not open for further replies.

Functional Artist

Well-known member
Messages
4,406
Reaction score
1,686
Location
Toledo, Ohio
Nice, sunny Sunday morning, still no cable lugs. :mad2:

Well, let's finish/tidy up our wiring diagrams.

(pic 1) is a layout of drawings I drew up "to break it down" into seperate systems, to help me understand everything, so I can get El Dingo wired up.

(pic 2) is sub-notes to break things down even further.

(pic 3) is a copy of the factory wiring diagram that I used markers to correlate with my wiring harnesses colors.

(pic 4) is the final drawing. (after 30 or so revisions)

* note, I changed the cable designations because they were kinda confusing.

Like, (J1 - cable 1 - location 1) &/or (J2 -cable 1 - location 1)

See, confusing. (2 different cable 1's) & (2 different location 1's)

So now, all my cables are lettered. like (J1 - cable A - location 1)

It shows the layout of most everything associated with wiring up this kart. :2guns:

(except for the battery cables)

That's a whole another page in the book.

We'll get to those when the lugs get here.:thumbsup:

Speaking of pages in the book.

This build filled up a whole notebook, theres only (1) page left. :smiley_omg:
 

Attachments

  • SAM_1739.jpg
    SAM_1739.jpg
    335.2 KB · Views: 11
  • SAM_1746.jpg
    SAM_1746.jpg
    273.9 KB · Views: 8
  • SAM_1741.jpg
    SAM_1741.jpg
    222.4 KB · Views: 9
  • SAM_1744.jpg
    SAM_1744.jpg
    307.8 KB · Views: 9
  • SAM_1747.jpg
    SAM_1747.jpg
    294 KB · Views: 7

Functional Artist

Well-known member
Messages
4,406
Reaction score
1,686
Location
Toledo, Ohio
While goin' over the diagrams. Again!

I noticed/remembered that a couple of our battery cables take 3/8" lugs. :idea2:

(power cut-off switch to contactor) & (contactor to motor (+) terminal)

So, while were waiting for the lugs w/1/4" holes

lets get these made up.

First, we have to route the cable (devise a path), kinda keeping in mind where the other cables are going.

When I had it routed, I marked the spot w/a gold sharpie.

I then unrouted it & took it into the shop to cut, using our handy dandy cut-off tool.

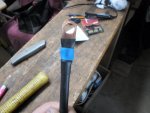
...stripped ~5/8" of the covering off,
...added (2) pieces of black shrink wrap
...(2) pieces of blue shrink wrap
...then, using our new crimper & a smack w/big hammer I attached the lug. (nice crimp, huh?) :2guns:

Then slid the shrink wrap into position & used an old hair dryer, to seal them up.

* I added the blue to indicate that these are (+) positive cables. :thumbsup:
 

Attachments

  • SAM_1759.jpg
    SAM_1759.jpg
    192.1 KB · Views: 12
  • SAM_1756.jpg
    SAM_1756.jpg
    219.6 KB · Views: 11
  • SAM_1752.jpg
    SAM_1752.jpg
    320 KB · Views: 5
  • SAM_1751.jpg
    SAM_1751.jpg
    239.1 KB · Views: 6
  • SAM_1749.jpg
    SAM_1749.jpg
    236.6 KB · Views: 5
  • SAM_1761.jpg
    SAM_1761.jpg
    236.6 KB · Views: 12

Functional Artist

Well-known member
Messages
4,406
Reaction score
1,686
Location
Toledo, Ohio
My lugs finally came in. :wai:

Let's get this show on the road! :thumbsup:

This set up takes (8) battery cables.

I made up (2) cables yesterday.

So, that's (2) down & (6) to go.

Well, I got (4) cables made up & then ran out of 4 gauge wire. :ack2:

Stay tuned! More to come. :cornut:
 

Attachments

  • SAM_1770.jpg
    SAM_1770.jpg
    261.2 KB · Views: 4
  • SAM_1779.jpg
    SAM_1779.jpg
    302.2 KB · Views: 5

chancer

ɔ ɥ ɐ u ɔ ǝ ɹ
Messages
9,358
Reaction score
8
Location
COMFORT, TEXAS
I was expecting a Video! :(
I cant believe you waited Days for the lugs and then did not have the wire!

lol keep on trucking
 

pRoFiT

Can't buy it?, build it!
Messages
1,135
Reaction score
32
Location
California
I want to build electric. But seeing that wiring...I'll stick to gas. Looking good so far. Can't wait to see video!
 

Functional Artist

Well-known member
Messages
4,406
Reaction score
1,686
Location
Toledo, Ohio
Battery cables are done! :thumbsup:

Measured, cut, stripped, lugged & installed.

During design & lay out, one of the goals was to keep everything as short as possible.

...and still, in the end, this thing has nearly 10 ft. of 4 AWG battery cables.

* I estimated & had purchased ~8 ft. of cables. (I figured that would be plenty)

Well, I noticed another mess up. (miscalculation) :ack2:

See the little blue plug in the middle of pic #1?

That's where the RS232 cable connects to, & then connects to a lap top computer for programing & calibration.

As you can see, the way this thing is set up, that port is really hard to get to, especially once everything is in place.

I noticed this after I had (2) cables installed.

I also noticed that he access hole is filling up quick. (pic 2)

I was thinking that if I have to, I can unbolt & lift the control box top to be able to connect the programming cable.

But, that may be a problem because of the cables going thru the access hole in the box.

I think I came up with a dual purpose solution. :2guns:

I cut the access hole straight down on both sides with a skill saw blade clamped in a pair of needle nose vice grips.

I didn't want to use power tools because of all of the wires.

Way too much work to mess up now! I'll do it by hand. :thumbsup:

I figured that this would enlarge the hole (easier access for cables) & should allow the top to be lifted enough to access the programming port.

Turned out pretty good. (pic 4)

(pic 5) is the control box with everything connected.

(pic 6) shows all the cables pouring out of our access hole.

* I installed protective mesh over battery cables where they go thru the access hole to help reduce chafing.

(pic 7) shows battery's all wired up. (actually cabled up) with our 500 Amp fuse attached.

(pic 8) shows El Dingo ready to rock!
 

Attachments

  • SAM_1793.jpg
    SAM_1793.jpg
    210.5 KB · Views: 7
  • SAM_1788.jpg
    SAM_1788.jpg
    172 KB · Views: 6
  • SAM_1785.jpg
    SAM_1785.jpg
    484.2 KB · Views: 6
  • SAM_1780.jpg
    SAM_1780.jpg
    168.5 KB · Views: 5
  • SAM_1782.jpg
    SAM_1782.jpg
    289.3 KB · Views: 9
  • SAM_1796.jpg
    SAM_1796.jpg
    246.1 KB · Views: 7
  • SAM_1795.jpg
    SAM_1795.jpg
    228.3 KB · Views: 8
  • SAM_1798.jpg
    SAM_1798.jpg
    356.7 KB · Views: 8

Functional Artist

Well-known member
Messages
4,406
Reaction score
1,686
Location
Toledo, Ohio
Yes, El Dingo was all ready to go yesterday evening but, dinner, my daughters soccer practice & darkness all colluded against me.

This evening is all mine. & El Dingos too. :2guns:

Today, while at work I was thinkin': :idea2:

Is there gonna be a difference in power?

...from the "simple" speed controller, from earlier tests, to the "proper" speed controller we have now?

...or just a smoother delivery of the power?

...it's still the same 36V set up.

My hypothesis is that:

we know this motor produces 72 RPM's per volt of input.

...& you can't get more than 36V out of 36V.

so, No increase in power.

maybe a quicker application of power but, top speed should not be affected.

Well, let's test that theory. :thumbsup:

I also added some finishing touches.

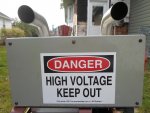
* High Voltage warning- 36V ain't no joke!

Just a milisecond touch & pow! (see pic 5)

Melted the stainless bolt & burnt out a big spot on the battery terminal. :ack2:

* DIYGK sticker "to proudly represent"!

...& the instant 2-3 HP increase i've heard about. :cheers2:

* Flashing LED warning light for safety & wired into fan circuit so it also reminds me that the fan is on.

Kool & Functional, Double bonus! :wai:

Oh, ya here's a video for yous guys.

https://www.youtube.com/watch?v=qiB5aqpFmuE
 

Attachments

  • SAM_1808.jpg
    SAM_1808.jpg
    386.4 KB · Views: 4
  • SAM_1809.jpg
    SAM_1809.jpg
    393 KB · Views: 4
  • SAM_1806.jpg
    SAM_1806.jpg
    222.6 KB · Views: 5
  • SAM_1802.jpg
    SAM_1802.jpg
    626.7 KB · Views: 7
  • SAM_1773.jpg
    SAM_1773.jpg
    184.8 KB · Views: 6
  • SAM_1776.jpg
    SAM_1776.jpg
    199 KB · Views: 4

Functional Artist

Well-known member
Messages
4,406
Reaction score
1,686
Location
Toledo, Ohio
GOOOOOOOOOOOOOOOOAAAAAAAAAAAAAAAAAALLLLLLLLLL! :wai:

OOOOOOOOOOOOOOOH! She's smooth!

That's what i'm talkin' about! :2guns:

Still at the factory settings.

I haven't done any adjustments. yet!

Nice smooth take off & great acceleration! :thumbsup:

I was kinda worried.

There was a lot more to this build than I had anticipated.

When I first planned this project it was supposed to be simple.

(used go kart, big electric motor, simple speed controller & batteries)

Everything went as planned until ...

Sid! Yes, it was Sid!

I blame it all on Sid & his idea of a "proper" speed controller.

Now, months later,

-I'm in the poor house & got too many soldering iron burns to count.

but, I learned a lot & I got one smooth kart!

So, A BIG SHOUT OUT to Sid!!! Thanks pal! :cheers2:

Here is a video of the first test ride.

https://www.youtube.com/watch?v=AV0BQPm5JFo
 

itsid

Moderator
Staff member
Messages
11,564
Reaction score
115
Location
Ruhrpott [Germany]
GOOOOOOOOOOOOOOOOAAAAAAAAAAAAAAAAAALLLLLLLLLL! :wai:

OOOOOOOOOOOOOOOH! She's smooth!

....

Nice smooth take off & great acceleration! :thumbsup:
I was kinda worried.
There was a lot more to this build than I had anticipated.
When I first planned this project it was supposed to be simple.
(used go kart, big electric motor, simple speed controller & batteries)

Everything went as planned until ...

Sid! Yes, it was Sid!

I blame it all on Sid & his idea of a "proper" speed controller.

.....

So, A BIG SHOUT OUT to Sid!!! Thanks pal! :cheers2:

you're very welcome Kevin,
glad this thing is now running as it should be.
:thumbsup:

'sid
 

chancer

ɔ ɥ ɐ u ɔ ǝ ɹ
Messages
9,358
Reaction score
8
Location
COMFORT, TEXAS
Nice Job:thumbsup:
I almost never follow or even read electric Kart threads.
But this one is pretty Cool.:auto:
Congrats on the build
 

Functional Artist

Well-known member
Messages
4,406
Reaction score
1,686
Location
Toledo, Ohio
Nice Job:thumbsup:
I almost never follow or even read electric Kart threads.
But this one is pretty Cool.:auto:
Congrats on the build

Thanks! I really appreciate it! :thumbsup:

I hope I have helped you expand your horizons

Stay tuned there's more to come. :2guns:

I got some new ideas bouncing around.

Workin' out some of the details inside my head before I put pen to paper.

---------- Post added 10-19-2016 at 12:09 AM ---------- Previous post was 10-18-2016 at 11:39 PM ----------

Over the weekend I did some more riding & even recorded some data.

Kinda sounds like an Indy car. :thumbsup:

I used the MM to check the battery voltage before & after the run.

I also used a GPS to check the speed.

I looks like 18 mph is the top speed for this configuration.

(this motor running @ 36V, overall weight, tire size, gear ratio etc.)

It has really good acceleration :2guns:

but, I thought she would be a little quicker.

I could theoretically increase the speed by 1/3 (18 mph to ~24 mph) just by adding another 12 volt battery. (36V to 48V)

But, no... she's packin' enough heat as it is.

Here's the video. :cool:

https://www.youtube.com/watch?v=8C2P2lEos5o&feature=em-upload_owner
 

3kakr4

New member
Messages
7
Reaction score
0
Location
Jersey, GA
That's awesome! If you don't mind, what's a rough estimate of the total cost for the electrical components?
 

Functional Artist

Well-known member
Messages
4,406
Reaction score
1,686
Location
Toledo, Ohio
Well...to summarize & conclude...

El Dingo ended up being (2) builds.

Build (1) Dingo with simple speed controller (Jan. 2016 - Aug. 9, 2016)

Build (2) Dingo with Kelly speed controller (Aug. 10, 2016 - Oct. 15, 2016)

I started doing research & designing a frame for an electric kart last winter.

I found a couple of electric karts on Youtube.

Most were kids size or WAY over the top (like over 50 mph or doing burnouts until they burnt the tires off)

I already did kids size so, let's try over the top. :2guns:

While doing research, I found out real quick that over the top can get expensive, real quick.:ack2:

I found a "big" electric motor (advertised as 8,000 watt/10HP) for under $400.00.

There was an available mounting bracket to mount the motor to a go kart & the ad said "Make a super fast go cart", "No expensive controller required", "let your battery voltage control your speed" & even had a diagram of a slide contactor illustrating the concept.

Yup, I was sold! I can do this!

So, I ordered the motor & bracket & began designing a frame for our new beast.

While waiting for the motor, I was looking for parts for our new project on CL, I came across an ad for a kart/frame that needs bearings, had no motor & no seat.

Picked it up, ($50.00) mainly for live axle & spindles/brackets.

Upon closer examination, it ended up being a Manco / Dingo (model 285-09) that was in fairly good condition.

It had been sitting out in the woods for a while but, wasn't wrecked, twisted, rusted out or broken & even came with the rear half of the factory roll cage.

I figured, if I just cleaned it up & rolled with it I could get to the "big" motor part faster.

While cleaning up the frame I was thinkin', if I convert this Dingo to electric, we can call it (Electric Dingo) El Dingo. :thumbsup:

I got her all cleaned up & rolling then turned to the electric drive train.

Everything seemed pretty straight forward & simple.

I mounted the electric motor to the bracket & mounted both to the stock ICE (internal combustion engine) mount.

Aligned the axle sprocket with the motor sprocket & mounted the 3 batteries next to the motor.

I could not find any type of slide contactor like the one described in the ad so I made one. (actually a V-glide ran backwards)

The concept seemed suspect, so I bench tested it on a small motor off a scooter first.

It seemed to work, so I tested it on the big motor.

It seemed to work fine on the bigger motor as well.

The results from bench testing & road testing turned out very different.

Conclusion of first (and only) test drive with simple speed controller, on the kart & under load was both successful & a failure.

Success: the kart moved it self, accelerated, cruised along & stopped as planned. :thumbsup:

Failure: It banged hard when accelerating because the motor speed would instantly jump up 864 rpm's at a time.(going from 12V to 24V & then 36V) :ack2:

It banged so hard on that on that (1) test drive it stretched the chain & bent the mounting bracket. :ack2: :ack2:

https://www.youtube.com/watch?v=_5EK9EOulsY

---------- Post added at 01:38 PM ---------- Previous post was at 01:14 PM ----------

I removed the entire drive train & started all over. :ack2:

Although the chassis was already complete, build (2) was much more complicated.

It started Aug. 6, 2016 with a thread in electrical projects (like over 40 posts)

http://www.diygokarts.com/vb/showthread.php?t=33805

Sid explained to me about speed controllers, found one to match up to the motor I had & helped me understand just about everything associated with making it work. :cheers2:

I had to move the motor to the left for better balance & additional air flow space to help keep the motor kool.

I built a control box to house & protect the electrical components & a control console for the forward controls.

I designed a wiring harness & soldered a million connections.

First test drive (Oct. 12, 2016) with Kelly controller was completely successful. :thumbsup:

She now cruises smoother than a baby's bottom. :wai:

https://www.youtube.com/watch?v=AV0BQPm5JFo

---------- Post added at 02:24 PM ---------- Previous post was at 01:38 PM ----------

Build 1

Dingo frame $50.00

Motenergy motor $379.95
Motor mount $56.95
shipping $73.42

Motor sprocket $20.55

Rear bearings $10.95 x 2 $21.90

Seat materials $30.00

36V solenoid $30.00

Batteries $69.00 x 3 $207.00

Cable lugs $17.30

Throttle cable, clips & pin $11.30

Total for build (1) ended up ~ $850.00

Gear ratio: (5.4 :1) motor sprocket 10 tooth / axle sprocket 54 tooth

I also reduced the rear tire size from 18 x 9.50 x 8" to 16 x 6.50 x 8" & from a very aggressive tread pattern to a smoother turf style to help reduce drag. (I figured it would lessen the drain on the batteries thus increasing drive time)


Build 2

Kelly speed controller $319.00
Heat sink $9.00

HD 36V solenoid $69.00

Battery cut-off switch $10.00

Fuses & resistors ~$20.00

more lugs & battery cables ~$20.00

Control box ventilation fan $10.00

Decal (high voltage) $5.00

Total of additions (build 2) ~$500.00 extra


Total 2016 El Dingo build ~$1,350.00

Oh, ya...

Paint job: I call it urban/industrial camoflage (red oxide & flat black):thumbsup:
 
Status
Not open for further replies.
Top