Sears tractor refurbish project

still kikn

Member
Messages
102
Reaction score
3
Location
Missouri
Anyone have any experience mounting 12 inch tires by hand? I've mounted plenty of tires on 4, 6, and 8 inch rims using pry-bars, screw-drivers and soap but never tried it with 12 inch rims.

I just came from the local tire shop and he's wanting almost double what I can buy these tires for on the internet. He also has a big sign on the wall saying that tire mounting labor fees are double for any new tires bought elsewhere....So.......
 

karl

Well-known member
Messages
2,447
Reaction score
706
Location
North east Ohio
Anyone have any experience mounting 12 inch tires by hand? I've mounted plenty of tires on 4, 6, and 8 inch rims using pry-bars, screw-drivers and soap but never tried it with 12 inch rims.

I just came from the local tire shop and he's wanting almost double what I can buy these tires for on the internet. He also has a big sign on the wall saying that tire mounting labor fees are double for any new tires bought elsewhere....So.......

Ive done them just fine, for others its impossible. Lots of pry bars, correct tongue angle required.

Well, you dont take your own burgers to mcdonalds, whad ya expect :p After working for a dealership, I understand the policy.
 

still kikn

Member
Messages
102
Reaction score
3
Location
Missouri
Thanks karl, I'll give it a try.
Well, you dont take your own burgers to mcdonalds, whad ya expect :p After working for a dealership, I understand the policy.

No, I get it, and if he wasn't asking twice as much as I could get them for on the internet I'd buy them from him. I don't begrudge the guy wanting to make a profit but twice the price is a little overboard in my opinion. so I'm gonna order them and see if I can mount them myself.
 

still kikn

Member
Messages
102
Reaction score
3
Location
Missouri
Real quick update, tires ordered, went with the ag tires on the rear and smooth ribs on the front. Crossed fingers that those 23 ags fit under the fenders. Steering wheel still not budging and used teh last of my PB Blaster so have to pick up another can. Fabricated a real simple rectangular plate that was missing on the tractor today and installed the new pump on the pressure washer. It's working right again so will clean the underside of the tractor tomorrow. But that's all I got done today. Picking up some lumber tomorrow Going to build a lean too on the front of my shop. Been wanting to put one on there for years and finally gonna get it done. Shop is like a freakn oven right now so the lean too will allow me to work outside and still have some shade and a little breeze when there is one. Can't handle the heat anymore. Probably won't get a whole lot done on the tractor for the next few days till I get that lean too up.
 

still kikn

Member
Messages
102
Reaction score
3
Location
Missouri
Been keeping busy with the tractor since finishing the lean too a couple days ago. The tires came in while I was in the midst of building the lean too but stopped long enough to mount one just to make sure they were gonna fit, they did and I think they look great on there. Mounted the other one yesterday and then took off the front wheels and spent about an hour apiece wire brushing them, then sanded primered and painted them white. This morning I mounted the new tires on them. All four tires were fairly easy to mount on the rims, even with my crude tools, basically big screw-drivers. Hardest part was breaking the bead on the old ones, but luckily I have a big vice that took care of that problem. ( : Lots to do before I put them on the tractor though,


Finally got the steering wheel off the tractor but it’s still attached to the shaft and shows no sign it’s ready to come off yet in spite of twice daily doses of PB Blaster. But now that it’s off the tractor I think my chances of freeing it up are much improved. I can get a better swing with the hammer now plus I’ve turned the whole thing upside and letting the PBB work from the opposite side now.

I was able to remove it from the tractor when after I pulled the engine which allowed me a much better view of things. I scraped off the grunge around the base of the shaft and to my delight I found a set screw hiding there. I was able to get it out surprisingly easy and ten seconds later I lifted the steering wheel and shaft up and out.

I had been debating whether or not to even remove the engine but sure glad I did since it allowed me access to the steering shaft set screw. The engine came out easily but I can verify that cast iron blocks are very heavy.

Last thing I did today was pull several idler pulleys and various brackets and will take the wire brush and sandpaper to them tomorrow. Getting down to the nitty gritty now, only a few more things to pull off and all that’ll be left is the bare frame and transmission/rear end, which I’m not taking out. Now if I can just get that steering wheel off.

I’m going to talk to a sign painter next week and see if she can duplicate the decals/stickers and if so much how much she’ll charge for that. If I can get the decals made or reproduced I’m going to paint it the original colors, but if not then I’m gonna have some fun with the paint job.

Almost forgot, when I removed the front tires I saw that the front axle had some deep grooves worn into it, one on each side where they rub the frame in tight turns. I pulled it off the tractor and cleaned it all up and filled the grooves with weld.No laughing at my welds please, a bit of hand shake these days. Not sure why it wore like that, seems like there'd be a stop of some kind to prevent hitting the frame but if it took 43 three years to wear them it should be at least 43 more before it becomes a problem.
 

Attachments

  • Sears 14-6-06-24-2020.jpg
    Sears 14-6-06-24-2020.jpg
    1.8 MB · Views: 9
  • Sears 14-6-06-26-2020 wheel prep.jpg
    Sears 14-6-06-26-2020 wheel prep.jpg
    959.6 KB · Views: 8
  • Sears 14-6-06-25-2020 bead breaker.jpg
    Sears 14-6-06-25-2020 bead breaker.jpg
    1.7 MB · Views: 9
  • Sears 14-6 06-27-2020 (1).jpg
    Sears 14-6 06-27-2020 (1).jpg
    1.1 MB · Views: 11
  • Sears 14-6 06-27-2020 pullys and brackets.jpg
    Sears 14-6 06-27-2020 pullys and brackets.jpg
    516.9 KB · Views: 8
  • Sears 14-6 06-27-2020 Front end c.jpg
    Sears 14-6 06-27-2020 Front end c.jpg
    629.5 KB · Views: 10
  • Sears 14-6 06-27-2020 Front end a.jpg
    Sears 14-6 06-27-2020 Front end a.jpg
    707.3 KB · Views: 9
  • Sears 14-6 06-27-2020 Front end.jpg
    Sears 14-6 06-27-2020 Front end.jpg
    855.4 KB · Views: 10

still kikn

Member
Messages
102
Reaction score
3
Location
Missouri
Well I got the brackets and pulleys primed and painted today but other than that didn't accomplish much. After getting the steering shaft off the tractor yesterday I thought it would be fairly easy to remove the steering wheel but after fighting it for half a day today it's still stuck tight.

I got very serious about removing it and tried everything I could think of but no luck at all. I went so far as to drill two holes on each side of the hub right alongside the shaft thinking it might at least relieve some of the pressure but that's not working either. Broke two drill bits in the process....

I can get a pretty healthy swing with the hammer now that it's off the tractor but it's being super stubborn. I soaked the whole thing down with PBB again before shutting up the shop tonight, sprayed it into the two holes I drilled too so maybe that will make a difference by tomorrow. I sure hope so, that things really starting to aggravate me.

I power washed the underside a couple days ago but crawled under it today to see how it looked and it needs done again. The wand on the washer is too long and I can't point it where it needs pointed so tomorrow I'm gonna try to lift the front end up and stick a couple braces under it to where it's standing almost straight up and down, that should let me reach those hard to reach areas that I missed before. I think I'll be able to lift it up beings the whole tractor is pretty much stripped down to nothing. No engine, no axle, no brackets, pulleys, cover plates, nothing but the frame all the way back to the transaxle so it's gotta be at least a hundred pounds lighter than it was.
 

still kikn

Member
Messages
102
Reaction score
3
Location
Missouri
Real quick update, steering wheel still froze to the shaft. Twisted off a bolt inside the transmission housing. Rained all day today. But otherwise had a real fun day... :roflol:
 

Kartorbust

Inmate #627
Messages
4,400
Reaction score
837
Location
Utica, NE
How exactly is the steering wheel attached to the shaft? Just thinking of ways it could be removed , in a way that does not break the wheel.
 

still kikn

Member
Messages
102
Reaction score
3
Location
Missouri
Nothing fancy. The hub slips down over the end of the shaft and rests on a shoulder. Shaft is keyed, hub was originally held in place by a 5/16 bolt which I twisted off long ago. i have drilled out the bolt and tried to remove it with an easy-out but it won't budge either, but it's not holding anything any longer. I've also drilled two holes through the hub, right next to the shaft. Been spraying twice daily with PBB for two weeks and I beat on it a few times every day. I can't use heat due to a rubber, or neoprene, covering over wheel and hub. The other end of shaft has a u joint welded to it. I may end up trying to grind off that weld but it looks like a very good/strong weld. Can't be any more difficult than what I've been doing though.
 

still kikn

Member
Messages
102
Reaction score
3
Location
Missouri
I got it off about an hour ago.:wai: Just continued with the beatings and it finally budged. Once it did, it came off with just a few more hits. What a relief to get that thing off. I drilled out the 5/16 center bolt that I had twisted off and retapped it for 3/8 so everythings ready to go back together when the time comes.

When I finish eating lunch I'm going back over and start working on the trans bolt that I twisted off a couple days ago. I think I probably removed about 75 bolts, maybe more, on this project so I guess twisting off two isn't too bad considering most of those bolts have been rusting in their respective holes for 43 years.... Anyway that's my story and I'm sticking to it.
 

still kikn

Member
Messages
102
Reaction score
3
Location
Missouri
Something like that give or take a day or two, seemed more like a couple months though. ( : Just glad it's finally off and I didn't destroy the wheel.

I got the trans bolt out without much trouble at all. I was able to heat it up and that made all the difference. No neoprene to contend with. Had to fix a leaking hose on my torch before starting though, turned on the oxygen and I could hear it hissing away. Easy fix though and was back in business in a few minutes.

Haven't been able to set up a meet with the sign lady yet to see if she can make decals for it so hopefully I'll be able to get with her in the next day or two. I need to find out if she can do it so I know what color paint to buy. Sears tractor yellow if she can make the decals and probably black if she can't. I'm almost thinking to forget about an accurate restore since I'm not too crazy about the original colors anyway but I think if I sell it I can get more if it's original. But then again, I may keep it. I'm kind of getting attached to it. Love the way it's put together, everything heavy duty and solid, no frills, easy to work on, the simplicity of the whole design impresses me. Decisions decisions...
 

still kikn

Member
Messages
102
Reaction score
3
Location
Missouri
Few pics from the last couple days.
 

Attachments

  • Sears 14-6-06-29-2020 frame prep 3.jpg
    Sears 14-6-06-29-2020 frame prep 3.jpg
    837.5 KB · Views: 8
  • Sears 14-6-06-29-2020 frame primed.jpg
    Sears 14-6-06-29-2020 frame primed.jpg
    601.7 KB · Views: 8
  • Sears 14-6-06-29-2020 frame prep.jpg
    Sears 14-6-06-29-2020 frame prep.jpg
    1 MB · Views: 8
  • Sears 14-6-07-01-2020 Steering wheel off.jpg
    Sears 14-6-07-01-2020 Steering wheel off.jpg
    1.6 MB · Views: 7

still kikn

Member
Messages
102
Reaction score
3
Location
Missouri
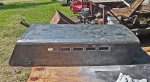
Spent most of yesterday taking the hood down to bare metal. Found three layers of paint on it which surprised me since nothing else had been repainted on the tractor, but the factory coat was white, then someone had painted it black, then later someone else had repainted it white again. The worst part was the decal removal. It ground off with the wire brush easy enuff but left a sticky residue which was a pain to get off, wire brush, then clean with paint thinner, wire brush again, then paint thinner, repeat and repeat.But finally got it all clean but waited till this morning to prime it.

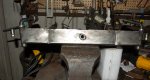
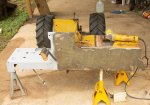
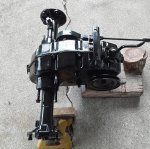
Painted the trans yesterday and it's ready to go back in except that I need to change the oil yet.

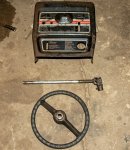
Trying to free up the throttle cable which is froze up, may end up having to replace that but may have one out in the junk yard that'll fit if I need it.

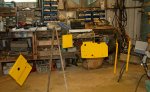
Accidentally knocked one of the rubber engine mounts off the work bench a couple days ago and I couldn't find it so thought it must have bounced under the bench into a jumbled mess of scrap metal that has been accumulating under there for years. Little bit of everything in that pile, short ends of pipe, channel iron, angle iron, box tubing, etc, anytime I cut something off it's where I toss what ever's left, my go to scrap pile when I needed a short piece of whatever. Comes in real handy when you live forty miles from the nearest steel yard.

Anyway, I'd been meaning to clean/organize it for a long time and loosing that part made me finally take the time to do it, and I did. But you guessed it, after all that, the part wasn't in there. My wife found it in one of the bolt bins that same afternoon. How it managed to end up in there is a mystery.

I have one more body part to prep and prime, the instrument panel, then I'll be ready to start painting. Can't get hold of the sign painter to find out if she can make the decals so still don't know what color it's gonna be yet. I think she must be on vacation or something. Hopefully she'll pick up her phone Monday.

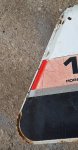
In the meantime I've been photoshopping the pics I took of all the decals, cleaning them up, enhancing the faded colors, taking measurements, etc, so that should make it easy for her to duplicate them, I think. I took off a vinyl trim strip on the hood and found some unfaded colors underneath it and using that for a color guide. Think they're pretty accurate.
 

Attachments

  • Sears 14-6-07-03-2020 hood prep resized.jpg
    Sears 14-6-07-03-2020 hood prep resized.jpg
    1.2 MB · Views: 7
  • Sears 14-6-06-03-2020-trans painted.jpg
    Sears 14-6-06-03-2020-trans painted.jpg
    1.7 MB · Views: 7
  • Sears 14-6-red and gray original colors resized.jpg
    Sears 14-6-red and gray original colors resized.jpg
    446.3 KB · Views: 7

still kikn

Member
Messages
102
Reaction score
3
Location
Missouri
Wetsanded and painted the underside of the frame today. Weather permitting I'll paint the sides and top of it tomorrow. I also painted the the battery compartment sides and bottom which I had taken off earlier and a couple other small pieces that needed to match the frame.

Took a little more paint than I had figured so I'll need to buy another can or two in order to paint the fenders and running boards. I'm using Rustoleum Tuscan yellow. It's the closest match I could find to the original color of the frame. It's not a perfect match but very close and I'm satisfied with it.
 

Attachments

  • Sears 14-6-07-07-2020 Parts painting.jpg
    Sears 14-6-07-07-2020 Parts painting.jpg
    731.8 KB · Views: 8
  • Sears 14-6-07-07-2020 under-side of frame painted-1.jpg
    Sears 14-6-07-07-2020 under-side of frame painted-1.jpg
    1.1 MB · Views: 9

still kikn

Member
Messages
102
Reaction score
3
Location
Missouri
Thanks Brian, it's coming right along. And I think the hard part is behind me now. I'm getting kind of anxious to start bolting all the parts back on. It'll be fun seeing it all come together.

I forgot to mention, I found someone who can make the decals for me but she said it'd be awhile before she could get to it. Hasn't given me a price yet either but I've heard that she's pretty reasonable. Fingers crossed on that...In the meantime I've been photoshopping the pics of the decals I took earlier. The photos show all the knicks, scratches, rust spots, etc. and I sure don't want any of that duplicated on the new ones so I'm trying to make them like new so she'll have something good to work from. It's slow and tedious work and I hate it but at least I get to sit in the A/C while doing it. ( :

I haven't been able to find a replacement fuel tank so far. I've been kicking around the idea that if I can get the hole plugged I might be able to drill a hole in the top of the tank, stick a rubber grommet in there and run a fuel line through the grommet and put a filter on the end that goes in the tank and running the other end to the carb. I've seen similar setups on chainsaws, weed-eaters, and such. I think that might work? I could just drill out the hole in the bottom and stick a grommet in there and put an inline filter between it and the carb but I'm worried about leaks having a grommet right in the bottom of the tank.
 

Brianator

Gettin' er done!
Messages
860
Reaction score
17
Location
Barrie, Ontario, Canada
If you take your time and size the hole perfectly I don't think you'll have an issue, the tank isn't very big and gasoline weighs just over 6lbs/gallon so really there won't be much force there. I personally wouldn't trust a drill bit to size it, I've accomplished similar feats in similar circumstances by starting off with a drill bit one size too small then finishing it off with a small, semi dull knife or scissors by slowly carving and testing until it takes SOME force to get the line through. Too much required force will tear the grommet. It's a slow and tedious process but you'll get the best seal with a custom fit, if you force a short appropriate sized piece of brake line in the hose first it won't get a chance to shrink/kink/collapse and allow a leak to develop around the circumference of it.
 
Top