Sears tractor refurbish project

landuse

Moderator
Staff member
Messages
18,626
Reaction score
220
Location
Pietermaritzburg, South Africa
Looking good!! :D

I haven't followed the whole thread completely, but is there no way to buy a spare tank? Or try and get a similar second hand one at a lawnmower place that might have scrapped mowers/tractors?
 

still kikn

Member
Messages
102
Reaction score
1
Location
Missouri
Doubtful that I'll be able to find an original, which is what I want. There's probably some out there collecting dust but finding one might be a challenge. I haven't really spent much time looking yet though. I haven't checked with any dealers for scrap parts either but as I think about it just now, I think they must get rid of their junkers and clunkers about as fast as they get them cause I don't recall seeing any lawn mower bone-yards around here.
 

Brianator

Gettin' er done!
Messages
860
Reaction score
12
Location
Barrie, Ontario, Canada
I've been having the same struggle with my old tractor, I've found ones identical except they're 1" wider than the tank straps... seems to be an oddball size (that's my luck). Been looking for 2 years...
 

still kikn

Member
Messages
102
Reaction score
1
Location
Missouri
If I haven't found one by the time I get it back together I'll stick something in there temporarily.
I've got a few old tanks around here and one of those will have to do until I find the right one or fix the one I broke.

Got the topside of the frame painted early this morning before the heat got too bad. Think I have enough paint left to do either the fenders or the running boards but not enuff for all so guess it's time to head into town and pick up another can or two.
 

still kikn

Member
Messages
102
Reaction score
1
Location
Missouri
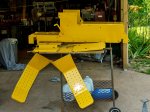
Painted the fenders a couple days ago and managed to get a pretty nasty run. It was definitely too hot to be spray painting but I got overanxious and thought I could get away with it. I didn't.:mad2: So after letting it sit for a couple days I sanded out the the sag and was even able to do it without ruining the paint job.

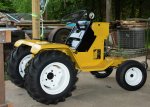
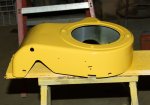
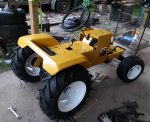
Wised up and waited til it cooled down this evening and gave it, the frame and all other yellow parts a second coat. I've been arguing with myself for a week whether or not to give the frame a second coat because i was so happy with the way the first one turned out I didn't want to screw it up.

But the run in the fender gave me no choice but to second coat it and after it turned out so well I finally got the nerve to go ahead and give the frame a second coat too and it turned out even better than the first so I'm all smiles tonight.

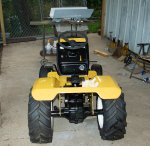
I got one coat of black on the grill and instrument panel and they turned out alright, sort of, but not totally happy with them. Hopefully the second coat on them will turn out as well as the yellow did. I'll wait for a cooler day and keep my fingers crossed.

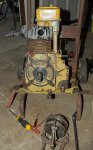
Taking a day off tomorrow to let the frame dry and then I think I'll start putting it back together. When I have the majority of it back together I'll get the engine and hood ready for paint. Saving them for last because they'll be the last things I put on and I think I better get on with putting the rest back together before I forget where everything goes.
 

still kikn

Member
Messages
102
Reaction score
1
Location
Missouri
Began putting her back together this morning. Stuck the tranny and rear end back on first, then installed the front axle , put wheels on all around, installed a few pulley's and brackets. Going back over after it cools down this evening and temporarily install the steering shaft and steering wheel so I can steer it without kicking the wheels when I need to move it around. Think I'll put a little anti seize on the shaft first though. ;)

Few pics from the last few days ending with state of reassembly as of a couple hours ago.

It's a Roller!
 

Attachments

  • Sears 14-6 07-08-2020 frame etc.jpg
    Sears 14-6 07-08-2020 frame etc.jpg
    525.1 KB · Views: 6
  • Sears 14-6 07-08-2020 misc parts ready for installation.jpg
    Sears 14-6 07-08-2020 misc parts ready for installation.jpg
    476.9 KB · Views: 7
  • Sears 14-6 07-12-2020- trans installed.jpg
    Sears 14-6 07-12-2020- trans installed.jpg
    556.5 KB · Views: 8
  • Sears 14-6 07-12-2020- rolling again.jpg
    Sears 14-6 07-12-2020- rolling again.jpg
    655.9 KB · Views: 9

still kikn

Member
Messages
102
Reaction score
1
Location
Missouri
Quick update. Little progress since last post. Temps and humidity during the daylight hours have both been too high for painting so all I've got painted this past week are a few small parts that I've stripped off the engine.

I was able to repair the cracked exhaust pipe and grind down the sloppy welds, both mine and the previous ones and it looks much better now so looks like I won't need to replace that after all.

Trying to figure out the best, easiest, way to strip the rust off the cooling fins on the engine. Not going to paint them but they're heavily rusted and want to clean them up.

The lower part of the block was never painted and it's also badly rusted. It'll be fairly easy to clean up but I'm debating whether I should paint it or not. I'm wondering why it didn't come painted from the factory, wouldn't think a coat of paint down there would effect cooling but not sure. Hate to clean it all up only to let it rust up again if left unpainted.

That's about all I've got to report, just wanted to post a short update for anyone following this to let them know I was still pecking away at it.
 

Attachments

  • Sears 14-6 07-17-2020- engine prep.jpg
    Sears 14-6 07-17-2020- engine prep.jpg
    729.6 KB · Views: 12
  • Sears 14-6 07-17-2020- engine tin.jpg
    Sears 14-6 07-17-2020- engine tin.jpg
    308.9 KB · Views: 7

Brianator

Gettin' er done!
Messages
860
Reaction score
12
Location
Barrie, Ontario, Canada
Oh ya man I'm following this religiously, I'm may be this builds biggest fan! Lol.

Because the block is steel I'd sandblast with 60/40 and paint it using a very light coat of header primer followed up with a few very light coats of black header paint, it won't affect cooling as long as you don't put it on really heavy. Look up emissivity and you'll understand, once shut down it will actually cool off faster but while running and the air blowing across it, it won't much if any difference as to an untreated surface as far as cooling goes.

That old girl is looking good man!
 

still kikn

Member
Messages
102
Reaction score
1
Location
Missouri
Thanks Brian, I'm not sure I understand the emissivity thing. Lot of information on it but kind of sounds like painting still might have a very small negative effect on allowing heat transfer from inside the engine to the outside air since no matter how thin the paint, it is in fact another layer that the heat must pass through to get out. But then again, the heavy layer of rust that exists now is also a barrier and probably just as restrictive if not more so than a thin layer of paint would be. I don't have access to a sandblaster but I'll clean it up with a wire cup brush and then rough up the surface with some 40 grit sandpaper and give it a light coat of black heat resistant paint.
 

Brianator

Gettin' er done!
Messages
860
Reaction score
12
Location
Barrie, Ontario, Canada
Emissivity is the transfer of heat, with a thin layer of black paint that aids in transferring the heat more effectively it will basically balance out the fact there's a thin layer but will look nice! I just didn't want to see you not paint it thinking it will hold in too much heat. I do highly suggest a dusting of header primer or self etching primer for best adhesion, nothing is worse than new paint peeling.... it can be light enough to be shadowy and a little see through it doesnt need a whole lot to help.
 

still kikn

Member
Messages
102
Reaction score
1
Location
Missouri
Started cleaning the cooling fins but that's a slow tedious and monotonous process so took a break from that for awhile and installed the fenders and battery/fuel tank tray. I'll get back on the fins tomorrow.

Just before quitting for the day I gathered up all the wiring and have it sitting here in my lap, trying to figure out how it all goes back in. I need to get it back in there before I completely close off all access to area behind the instrument panel and under the battery compartment.

Looked all the wiring over pretty close and found several frayed spots in the insulation where they'd been rubbing against something or other some time in the past so will need to to repair or replace some of them it looks like.
 

Attachments

  • Sears 14-6 07-17-2020 tractor assembly progress.jpg
    Sears 14-6 07-17-2020 tractor assembly progress.jpg
    397 KB · Views: 8

still kikn

Member
Messages
102
Reaction score
1
Location
Missouri
Worked on engine prep all day today, what a pain trying to get inside the cooling fins. I tried about every cleaning tool in the shop and nothing worked very well but was slowly gaining ground. Late in the day I finally hit upon an idea that seems to be work better than anything else I'd tried. I cut a slim strip of board, about an inch wide and after several trial runs with different thickness I ended up with a 3/16th thick strip of wood that I wrapped sandpaper around and simply dragged it back and forth between the strips. It's still a very slow process but it does knock the rust off eventually.

The blower fins on the flywheel turned out to be almost as tough to clean as the cooling fins but I'm gaining ground on them too. I should be able to finish up with engine prep tomorrow sometime. I'll powerwash it then and while it's drying I'll run into town and pick up some heat resistant primer.

I wasn't planning on painting the cooling fins since I've always heard that would interfer with heat transfer and have the potential to make the engine overheat. But as hard as it is to get the rust off of them I'm reconsidering that decision. Did a bit of research on it on the internet but lot's of conflicting ideas on it. If anyone here has any real world experience with painting vs not painting the cooling fins I'd appreciate hearing about it. Thanks.

As I was cleaning the flywheel I noticed that two of the fins were broke. I'm not sure how sensitive this engine would be to vibration so don't know if an out of balance flywheel could cause trouble down the road. I think they've probably been broke for quite awhile so keeping my fingers crossed that it's not critical on this engine.

On a positive note, I pulled the drive pulleys off to make it easier to clean behind them and I didn't need a hammer! Nice when things go smooth for a change.
 

Attachments

  • Sears 14-6 07-18-2020- engine prep-a.jpg
    Sears 14-6 07-18-2020- engine prep-a.jpg
    1.4 MB · Views: 3
  • Sears 14-6 07-18-2020- engine prep.jpg
    Sears 14-6 07-18-2020- engine prep.jpg
    965.5 KB · Views: 4
  • Sears 14-6 07-18-2020- broken fins on flywheel.jpg
    Sears 14-6 07-18-2020- broken fins on flywheel.jpg
    1.2 MB · Views: 3

Brianator

Gettin' er done!
Messages
860
Reaction score
12
Location
Barrie, Ontario, Canada
Lookie at what I got.. a 1972 Bolens G10 with a 10hp Tecumseh (will probably be replaced with the 16hp B&S I have)
 

Attachments

  • 20200719_111819.jpg
    20200719_111819.jpg
    4.5 MB · Views: 8
  • 20200719_111841.jpg
    20200719_111841.jpg
    5.6 MB · Views: 8
  • 20200719_111906.jpg
    20200719_111906.jpg
    5.4 MB · Views: 5

still kikn

Member
Messages
102
Reaction score
1
Location
Missouri
:thumbsup: 
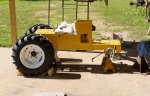
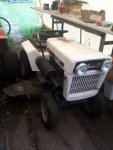
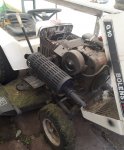
Nice! From the grass clippings looks like it's been used lately and seems to be in pretty decent shape.

Step one; spray some PB Blaster on that steering wheel shaft!:roflol:
 

Brianator

Gettin' er done!
Messages
860
Reaction score
12
Location
Barrie, Ontario, Canada
Lol. I just may for good measure after what you went through! I have something better than PB though, it's called "Flow Torch" by Pathfinder Products and is fairly tough to find but wow is it good!

Yup he had used it a few weeks ago to mow long grass on his sister's farm and I cut a small patch I couldn't get to the other day. She has front and rear PTOs even!
 

still kikn

Member
Messages
102
Reaction score
1
Location
Missouri
Had a nice break in the weather today after a night of much needed rain. With the cooler weather I was able to get a couple coats of paint on the underside of the hood and also painted the yellow parts of the engine. Humidity still pretty high though and slowing the drying process but hopefully I'll be able to paint the top-side of the hood and the black parts of the engine tomorrow.

Both the choke and the throttle cable were froze up when I got the tractor and I've had them soaking in PBB since I took them off and was able to get both of them in working order today.

Installed the instrument panel last night and started installing switches and controls but it eventually dawned on me that I'd have to take them all back off to put on the decals which haven't arrived yet so will wait for the decals before installing any more switches.
 

Attachments

  • Sears 14-6 07-20-2020 tractor assembly progress(2).jpg
    Sears 14-6 07-20-2020 tractor assembly progress(2).jpg
    1 MB · Views: 10
  • Sears 14-6 07-20-2020 tractor assembly progress(3).jpg
    Sears 14-6 07-20-2020 tractor assembly progress(3).jpg
    857.1 KB · Views: 11
  • Sears 14-6 07-20-2020 tractor assembly progress.jpg
    Sears 14-6 07-20-2020 tractor assembly progress.jpg
    1.2 MB · Views: 11
Top