Sears tractor refurbish project

still kikn

Member
Messages
102
Reaction score
2
Location
Missouri
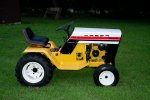
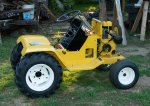
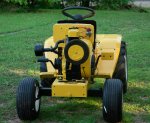
Got the engine primed painted and put back together over the past few days. Put it back in the tractor yesterday and hooked up the throttle linkage, got some of the wiring done.

The decals finally came in but when I was about to stick them on the dash panel I found that I had managed to get overspray on it when I primed the engine the other day. Pretty discouraging discovery. At least it happened before I had the decals on. Anyway, I sanded off the primer specks and repainted it and installed the decals on it this morning.

I expected that would be easy-peasy but I was pulling my hair out by the time I finished. I found it impossible to keep air bubbles out of it no matter what or how hard I tried. I tried poking a pin in them but all that accomplished was to make more but smaller bubbles. I was so frustrated by the time I finished I just quit for the day. After cooling down awhile I went back over and I guess it isn't the complete disaster I thought it was. It won't stand a close inspection but from 10 ft. it looks fine....Oh well, it is what it is and nothing I can do about it now :horse:

I'm waiting on the grommet and shut off valve I ordered for the fuel tank and I'm just about out of work until it gets here. There are some braces that hold the firewall and dash in place and once I put them in I won't be able to put the tank in without taking them back out so I'll just wait and hope the parts get here soon.
 

Attachments

  • Sears 14-6 07-24-2020 tractor assembly progress(1).jpg
    Sears 14-6 07-24-2020 tractor assembly progress(1).jpg
    2.6 MB · Views: 9
  • Sears 14-6 07-24-2020 tractor assembly progress(2).jpg
    Sears 14-6 07-24-2020 tractor assembly progress(2).jpg
    2.4 MB · Views: 11
  • Sears 14-6 07-24-2020 tractor assembly progress(3).jpg
    Sears 14-6 07-24-2020 tractor assembly progress(3).jpg
    2.6 MB · Views: 11

Brianator

Gettin' er done!
Messages
860
Reaction score
12
Location
Barrie, Ontario, Canada
It's looking soo good! Man I wish I could gawk at it in person! I don't know what it is but ever since I got that '69 MTD it's like I got bit by the "old tractor bug"! Lol.
 

still kikn

Member
Messages
102
Reaction score
2
Location
Missouri
Thanks Brian, I appreciate the kind words. I made a few mistakes but for the most part I'm pretty happy with the way it's looking so far. When I screw something up I go look at some of the pics I took before I started the restore and that usually makes me feel better. I put a nasty scratch on the frame when I was installing the engine and I was about ready to cry. My wife says I'm get too worked up over little things but when you work hard to make everything just right, even a little scratch in the paint hurts.
 

Brianator

Gettin' er done!
Messages
860
Reaction score
12
Location
Barrie, Ontario, Canada
when you work hard to make everything just right, even a little scratch in the paint hurts.

I couldn't agree more, I darn near lose sleep over meaningless stuff like that! Lol. I've been there and find a good way to touch up things like that is to cut all but the very bottom off a can, spray some paint in and use a fine brush to touch it up. If you're good and use the perfect amount of paint it will actually fill the scratch and level out!

I'm very excited to see it complete, it's a very nice GT!

#oldtractorsmatter
 

Budget GoKart

Aka a kenbar
Messages
2,195
Reaction score
118
Location
roachdale, indiana
I dont know the year on mine but ive got a heavily modded sears craftsman with a 10hp tec and ill get pics under the hood is sweet. Just needs a but of a cleanup and a different motor or coil for the motor
 

still kikn

Member
Messages
102
Reaction score
2
Location
Missouri
I saw that on the Quick bits thread. Looks like a dandy. A beer holder and a suicide spinner! I'm guessing the previous owner really enjoyed mowing his lawn. :wai:

Finished up the wiring this morning then with very little left to do until I get the fuel tank repaired I thought it'd be a good time to make sure I hadn't messed anything up with the wiring or carb in the process so stuck a temporary tank in there with a pint of gas and fired it up. It actually took more cranking to start this time than it did after it had sat for ten years. Not sure what that was all about, started to think I had messed up something on the carb or wiring but just about then it fired up and ran fine. I ran it for about ten minutes, tested out the throttle/governor and choke cable linkage. Everything seems ok although I feel like the governor might be holding it down a bit more than it should, not sure though, I'll worry about that later when I can actually drive it around some.
 

still kikn

Member
Messages
102
Reaction score
2
Location
Missouri
Essential upgrades.


Essential indeed, Spinner to allow one handed steering leaveing the other hand free for the important stuff.:cheers2:


The grommet and fuel fittings finally came yesterday. Inserted the grommet in the hole I made in the tank two weeks ago. Seems to be a perfect fit and so far no leaks. Gonna let it set for awhile with a full tank of gas before actually installing it in the tractor. Last thing I need is gas leaking out all over the fresh paint. Looks like it's gonna be fine though.

Tomorrow morning if there are no leaks I'll install the tank. I'm replacing the fuel line and shut-off valve while I'm at it. Last week I was looking at some pics of this model and realized the fuel line comes out of the tank, runs up into the battery compartment, out a plastic grommet-ed hole in the firewall and then through the shroud that covers the flywheel side of the engine, so I'm going to have to take the shroud back off in order to feed the line through it. I wondered what those holes were for, now I know. Once that's done I'll be very close to completion. Just have to tighten up the bolts that hold the firewall to the battery compartment, install the grill, headlights, a couple braces. Then the hood goes on and it'll be done. I'll post some pics of it as soon as I'm finished, probably tomorrow or the next day.

Forgot to mention, I found a good seat that very nearly matches what this machine came out with. I had to modify the mounting plate a bit to make it work but looks much more original than the J Deere seat that was on there and the upholstery on this one isn't all cracked and tore up.
 

still kikn

Member
Messages
102
Reaction score
2
Location
Missouri
Tank doesn't leak so I put the remaining parts on this morning. Still a couple loose ends to tie down but I'll finish up the little bit that's left to do in the morning. I managed to put a few scratches in the new paint while putting it back together so I have a little touch up work to do too. Otherwise it's basically done.

I made a few mistakes along the way but most of them aren't noticeable unless you're looking for them and none of them will have any effect on the tractor operation.

The mower deck is still sitting there untouched but I've had enough refurbishing for awhile so it's gonna have to sit there awhile longer, maybe a very long awhile, since I don't intend to use it for mowing anyway.

I have a garden trailer that I use all the time for hauling whatever it is I'm moving around at the time so I'll probably just leave that hooked up to this tractor full time and use it just for that.

Thanks for the advice and words of encouragement along the way, it was all much appreciated.
 

Attachments

  • Sears 14-6 08-03-2020 tractor assembly progress(1) resized.jpg
    Sears 14-6 08-03-2020 tractor assembly progress(1) resized.jpg
    881.4 KB · Views: 9
  • Sears 14-6 08-03-2020 tractor assembly progress(2)resized.jpg
    Sears 14-6 08-03-2020 tractor assembly progress(2)resized.jpg
    2.2 MB · Views: 12
  • Sears 14-6 08-03-2020 tractor assembly progress(3) resized.jpg
    Sears 14-6 08-03-2020 tractor assembly progress(3) resized.jpg
    2.3 MB · Views: 8

Kartorbust

Well-known member
Messages
3,901
Reaction score
194
Location
Utica, NE
Looks like how it did coming off the Sears sales floor. Looks too nice to be used as a tractor, it has become a show piece!
 

JPonLKN

New member
Messages
5
Reaction score
0
Obviously a little late to the show, and not sure if you still have the nipple, but if you do, and the grommet ever leaks on the tank, you could always drain the tank, fill it with water to get fumes out, use a simple soldering iron with a sharp knife type tip and a zip tie, and plastic weld the nipple back on the tank. Takes a little practice, but for something like that, wouldn't be hard to make it work. All you are doing is melting the plastic on the nipple and on the tank where the nipple attaches, and cut them together, then use the zip tie as filler material over the top, cutting it in on the plastic. Same principal as regular welding, melt the two parts along a shared interface, and add some filler for strength. There are youtube videos on how to do it, but makes for easy repairs of poly and other plastics when replacements are readily available. At the end of the day, it ends up being all plastic, so no worries about rubber deteriorating, sealant debris getting into the fuel.
 

JPonLKN

New member
Messages
5
Reaction score
0
Beautiful job on the tractor by the way...I can't believe you got through it that quickly. Makes me want to dig into my 73 Gilson and make it pretty again. Bought it as a mulch mule to move mulch to all the mulch beds in the yard. Works great as it is...It has a loader on it, but it is about the same size, but a lot uglier. One day, when some of the other projects get thinned down a bit, I'll roll it in the garage and break it down, clean it up, paint it and make it pretty. Everything is so ridiculously heavy though.
 

Attachments

  • 20190201_161925.jpg
    20190201_161925.jpg
    167.6 KB · Views: 5

Karts of Kaos

the many mowers guy
Messages
1,169
Reaction score
182
Location
Wisconsin
Tank doesn't leak so I put the remaining parts on this morning. Still a couple loose ends to tie down but I'll finish up the little bit that's left to do in the morning. I managed to put a few scratches in the new paint while putting it back together so I have a little touch up work to do too. Otherwise it's basically done.

I made a few mistakes along the way but most of them aren't noticeable unless you're looking for them and none of them will have any effect on the tractor operation.

The mower deck is still sitting there untouched but I've had enough refurbishing for awhile so it's gonna have to sit there awhile longer, maybe a very long awhile, since I don't intend to use it for mowing anyway.

I have a garden trailer that I use all the time for hauling whatever it is I'm moving around at the time so I'll probably just leave that hooked up to this tractor full time and use it just for that.

Thanks for the advice and words of encouragement along the way, it was all much appreciated.
man, this thing looks brand new!
 

still kikn

Member
Messages
102
Reaction score
2
Location
Missouri
Beautiful job on the tractor by the way...I can't believe you got through it that quickly. Makes me want to dig into my 73 Gilson and make it pretty again. Bought it as a mulch mule to move mulch to all the mulch beds in the yard. Works great as it is...It has a loader on it, but it is about the same size, but a lot uglier. One day, when some of the other projects get thinned down a bit, I'll roll it in the garage and break it down, clean it up, paint it and make it pretty. Everything is so ridiculously heavy though.
Thanks JPonLKN. Your Gilson looks like it's a real workhorse. That front loader would sure come in handy around here. Often thought of getting one for my Massey but something else always got in the way.
 

still kikn

Member
Messages
102
Reaction score
2
Location
Missouri
man, this thing looks brand new!
Thanks! Haven't done much with it since I got it finished. Just back it out of the shop and drive it around every week or two to keep everything loosened up. There's usually an old tractor show going on about this time of year but Covid worries canceled that, otherwise I'd be taking it up there. Maybe next year...
 

still kikn

Member
Messages
102
Reaction score
2
Location
Missouri
Obviously a little late to the show, and not sure if you still have the nipple, but if you do, and the grommet ever leaks on the tank, you could always drain the tank, fill it with water to get fumes out, use a simple soldering iron with a sharp knife type tip and a zip tie, and plastic weld the nipple back on the tank. Takes a little practice, but for something like that, wouldn't be hard to make it work. All you are doing is melting the plastic on the nipple and on the tank where the nipple attaches, and cut them together, then use the zip tie as filler material over the top, cutting it in on the plastic. Same principal as regular welding, melt the two parts along a shared interface, and add some filler for strength. There are youtube videos on how to do it, but makes for easy repairs of poly and other plastics when replacements are readily available. At the end of the day, it ends up being all plastic, so no worries about rubber deteriorating, sealant debris getting into the fuel.
I'd heard of plastic welding but never tried it. Had thought it took some kind of special tools or something. But too late for now anyway, I cut out a pretty large hole for the grommet to sit in so don't think I'd be able to fill all that back in. But thanks for the idea, wish I'd looked into that before I cut out the grommet hole. But the good news is the grommet hasn't leaked a drop so far.
 

SnapBehhe

New member
Messages
1
Reaction score
0
When dealing with vintage cast iron engines, they often have a story to tell. You might consider diving into forums and online communities specializing in antique tractors and engines. Enthusiasts there can provide valuable insights and help you identify the engine's make and model. As for the possibilities, the sky's the limit. These engines can be used for various projects, from restoring vintage tractors to repurposing them for unique DIY endeavors. You could also explore www.machinerydealer.co.uk for potential resources, parts, or fellow enthusiasts who share your passion for such engines.
 
Last edited:
Top