Nice work Tony. That shaft looks as good as new
You are using an out of date browser. It may not display this or other websites correctly.
You should upgrade or use an alternative browser.
You should upgrade or use an alternative browser.
It's The Little Things That Make The Biggest Difference
- Thread starter OzFab
- Start date
- Status
- Not open for further replies.
OzFab
New member
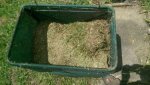
I made an interesting discovery about the riding mower catcher the other day; while mowing a friends yard in 40° (104°F) heat, as usual, the chute kept clogging; not wanting to mess around in the heat, I simply removed the catcher & kept going...
For the rest of the time, the chute didn't clog at all & cuttings were being thrown up to 15'...
 the chute is not the issue, it's the catcher...
I used shade cloth because it's strong & I assumed it would catch the cuttings yet, still breathe enough to be effective... obviously, I assumed wrong!
Now I need to find a way to let the bag breathe enough to not clog the chute but not allow the cuttings out...
I started by making larger holes in the shadecloth, near the front of the catcher, with a soldering iron; now I pray it doesn't fray to pieces; I'm also thinking about cutting vents in the top of the mounting plate; since the cuttings are thown to the back of the catcher, very little (in anything) should escape through the vents except air...
For the rest of the time, the chute didn't clog at all & cuttings were being thrown up to 15'...
the chute is not the issue, it's the catcher...I used shade cloth because it's strong & I assumed it would catch the cuttings yet, still breathe enough to be effective... obviously, I assumed wrong!
Now I need to find a way to let the bag breathe enough to not clog the chute but not allow the cuttings out...
I started by making larger holes in the shadecloth, near the front of the catcher, with a soldering iron; now I pray it doesn't fray to pieces; I'm also thinking about cutting vents in the top of the mounting plate; since the cuttings are thown to the back of the catcher, very little (in anything) should escape through the vents except air...
OzFab
New member
Fibreglassing
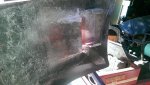
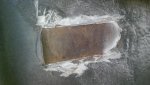
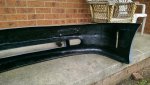
A friend of mine bought a car some time ago & is slowly fixing it; it came with a fibreglass body kit &, a few weeks ago, she asked me where she could find a replacement used front bumper; after many phone calls & a lengthy discussion about none being available, I said I would repair the existing bumper for her...
The bumper has, obviously, been damaged previously & repaired poorly, so bad that I peeled the repair patches off with little effort; also, all the metal mountings were rusted & poorly mounted so, that seemed like a good place to start...
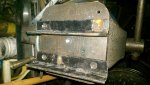
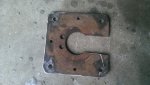
After taking countless measurements & pics, I set about making the new steel mounts... one of which was missing...
A friend of mine bought a car some time ago & is slowly fixing it; it came with a fibreglass body kit &, a few weeks ago, she asked me where she could find a replacement used front bumper; after many phone calls & a lengthy discussion about none being available, I said I would repair the existing bumper for her...
The bumper has, obviously, been damaged previously & repaired poorly, so bad that I peeled the repair patches off with little effort; also, all the metal mountings were rusted & poorly mounted so, that seemed like a good place to start...
After taking countless measurements & pics, I set about making the new steel mounts... one of which was missing...
Attachments
-
![IMAG0825[1].jpg](/community/data/attachments/59/59024-305b6b7a133ae54f20ff85a3fb7aeeb0.jpg) IMAG0825[1].jpg281.4 KB · Views: 3
IMAG0825[1].jpg281.4 KB · Views: 3 -
 IMAG0822.jpg271.4 KB · Views: 2
 -
 IMAG0821.jpg244.5 KB · Views: 2
 -
 IMAG0820.jpg256.4 KB · Views: 2
 -
 IMAG0819.jpg282.1 KB · Views: 2
OzFab
New member
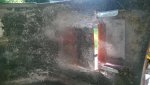
It seems I solved the issue with the ride on catcher, I just finished mowing my neighbours yard, which is usually an issue when it comes to the catcher but, this time, it didn't drop a single blade 
Time stamps on the first & last pics are 2:17pm & 2:39pm respectively...
Time stamps on the first & last pics are 2:17pm & 2:39pm respectively...
Attachments
-
 IMAG0846.jpg491 KB · Views: 6
 -
 IMAG0842.jpg182 KB · Views: 6
 -
 IMAG0841.jpg354.8 KB · Views: 5
 -
 IMAG0840.jpg519.1 KB · Views: 7
Nice job. All the hard work paid off
Poboy kartman
Senior Moments Member
Congrats Tony!
Been talking to the marketing department, and with a few modifications, we should be able to offer it for sale at 'The Poboy Store'.
First, the collector needs to be in the shape of a catchers mitt. It needs the "power assist" of a 212 Predator.
It has to disassemble in 5 minutes without tools....(it's ok if it does it by itself during use).
You'll have to double production....(we'll need at least one a year)...
Looking forward to doing business in the future on the new DR Poboy PhsycoRake....
machinist@large
Active member
Congrats Tony!
Been talking to the marketing department, and with a few modifications, we should be able to offer it for sale at 'The Poboy Store'.
First, the collector needs to be in the shape of a catchers mitt. It needs the "power assist" of a 212 Predator.
It has to disassemble in 5 minutes without tools....(it's ok if it does it by itself during use).
You'll have to double production....(we'll need at least one a year)...
Looking forward to doing business in the future on the new DR Poboy PhsycoRake....
The person trade marking the PhsycoRake need's serious psychotherapy.......

On the other hand, congrats Tony!!!!!!

OzFab
New member
More fibreglass...
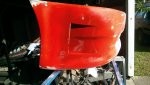
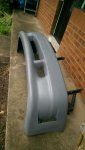
I noticed that, where the side mounts were located, there was a bulge in the fibreglass; one way to repair this was to fill them with body filler, which I didn't really want to do so, I devised an idea that draws away from the bulge & increases the look of the bumper; the owner loves it...
As you can see, the side mounts have also been replaced & mounted...
Attachments
-
 IMAG0851.jpg321.6 KB · Views: 4
 -
 IMAG0850.jpg371 KB · Views: 5
 -
 IMAG0849.jpg175.3 KB · Views: 4
 -
 IMAG0848.jpg255.9 KB · Views: 5
 -
 IMAG0824.jpg314.3 KB · Views: 4
 -
 IMAG0826.jpg478.3 KB · Views: 4
OzFab
New member
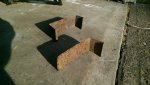
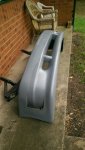
Bumper is done (it was done before christmas); owner is extremely happy with the result...
Attachments
-
 IMAG0856.jpg362.8 KB · Views: 4
 -
 IMAG0855.jpg347.3 KB · Views: 2
 -
 IMAG0854.jpg236.3 KB · Views: 1
 -
 IMAG0853.jpg280.1 KB · Views: 3
OzFab
New member
Remember this? I had a light bulb moment & fitted the PVC sleeves to the AusEx... just to see what it would do...
See for yourself...
https://www.youtube.com/watch?v=1CeLNaY3B6U&feature=youtu.be
See for yourself...
https://www.youtube.com/watch?v=1CeLNaY3B6U&feature=youtu.be
Desertduler
Active member
- Messages
- 1,736
- Reaction score
- 6
Hey, I can do that here at my home with my kart without PVC sleeves because my road is iced up! (Winter)
2SlickNick
American Minibikes @ FB
Nice, looks like fun.
OzFab
New member
Hey, I can do that here at my home with my kart without PVC sleeves because my road is iced up! (Winter)
 It feels like winter here atm... crazy weather...
Nice, looks like fun.
My buddy (who's driving) thought it was great fun; I still need some practice; I couldn't manage to keep the RPM up because the clutch would lock...
OzFab
New member
FML. Looks like the riding mower has dropped a conrod...
2SlickNick
American Minibikes @ FB
Ugh... It's The little things that make all the difference.
I.e. Connecting rod.
I.e. Connecting rod.
****!!
OzFab
New member
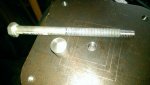
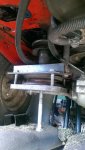
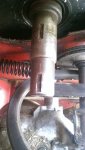
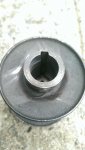
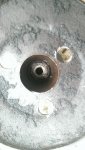
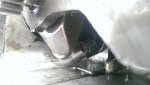
Friday I started the task of removing the engine; I first removed the catcher attachments, cutting deck & rear body section to provide clearance to work; then I set about removing the engine itself, only to realise the pulley attachment needs to be removed from the engine before the engine can be removed from the frame...
Plan A: Borrow a gear puller. I found my buddy Pete has one but, it's only 4"; gave it a try but, too small to grab the lower pulley; FAIL!
Plan B: Make a Puller. I had a 6" square x10mm plate sitting around so, I drilled & tapped 5 holes, one M8 in each corner & an M12 in the centre; I also machined a tip for the centre bolt; then I used two lengths of angle above the lower pulley to secure it; all that achieved was bending the top sheave of the pulley; FAIL!
Plan C: Amongst all my clutter, I found an old sprocket, large enough to make a plate to match the puller plate; some drilling & cutting later, give it a try & all I achieved this time was crushing the entire top sheave; FAIL!
Plan D: Ok, this is getting frustrating, let's just drill & tap 3 holes around a 25mm radius & run bolts through the centre of the pulley; nothing damaged but, still didn't remove the pulleys; FAIL!
It was at this time that I searched the internet for ideas & they all had the same theme, use a bolt that goes to the base of the bolt hole in the shaft, not the end of the shaft; I then re-examined the bolt I removed from the shaft; it only has a 3/4" spring washer
AHA! I do need a longer bolt but, where do I find one on Sunday afternoon?
As I was busy most of Monday, I was unable to source a bolt long enough to do the job so...
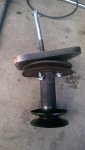
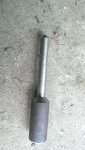
Plan E: After measuring the depth of the shaft hole, I used some 3/4" round bar, cut a divot in one end & machined the other end down to 9mm, 60mm long; that then became my centre pin above the centre bolt of the puller; insert pin, bolt puller on, hit it with the impact gun & SUCCESS!
Plan A: Borrow a gear puller. I found my buddy Pete has one but, it's only 4"; gave it a try but, too small to grab the lower pulley; FAIL!
Plan B: Make a Puller. I had a 6" square x10mm plate sitting around so, I drilled & tapped 5 holes, one M8 in each corner & an M12 in the centre; I also machined a tip for the centre bolt; then I used two lengths of angle above the lower pulley to secure it; all that achieved was bending the top sheave of the pulley; FAIL!
Plan C: Amongst all my clutter, I found an old sprocket, large enough to make a plate to match the puller plate; some drilling & cutting later, give it a try & all I achieved this time was crushing the entire top sheave; FAIL!
Plan D: Ok, this is getting frustrating, let's just drill & tap 3 holes around a 25mm radius & run bolts through the centre of the pulley; nothing damaged but, still didn't remove the pulleys; FAIL!
It was at this time that I searched the internet for ideas & they all had the same theme, use a bolt that goes to the base of the bolt hole in the shaft, not the end of the shaft; I then re-examined the bolt I removed from the shaft; it only has a 3/4" spring washer
AHA! I do need a longer bolt but, where do I find one on Sunday afternoon?As I was busy most of Monday, I was unable to source a bolt long enough to do the job so...
Plan E: After measuring the depth of the shaft hole, I used some 3/4" round bar, cut a divot in one end & machined the other end down to 9mm, 60mm long; that then became my centre pin above the centre bolt of the puller; insert pin, bolt puller on, hit it with the impact gun & SUCCESS!
Attachments
-
 IMAG0915.jpg279.5 KB · Views: 1
 -
 IMAG0916.jpg327.8 KB · Views: 1
 -
 IMAG0917.jpg276.8 KB · Views: 1
 -
 IMAG0921.jpg296.7 KB · Views: 1
 -
 IMAG0922.jpg333.3 KB · Views: 1
 -
 IMAG0926.jpg286.1 KB · Views: 2
 -
 IMAG0925.jpg178.7 KB · Views: 3
 -
 IMAG0924.jpg274 KB · Views: 2
 -
 IMAG0923.jpg394.7 KB · Views: 1
machinist@large
Active member
Been there, done that. I hate those stamped steel pullies with a real passion for just that reason!!!!!! 
OzFab
New member
So, it turns out the pulley assembly has a washer intergrated into it, which is why my first 4 attempts to remove it failed... Live & learn...
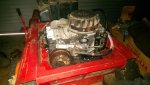
What I'm doing, for the short term, is replacing the stock engine with an 11hp engine I acquired a few years back; so far, everything looks like it should work...
The only major issue I've encountered so far is the original 8hp engine has a 1/4" keyway in the shaft, whereas, the replacement 11hp engine has only 2 small woodruff cutouts... which calls for a very unique key... as long as everything is assembled correctly, I can't see why it would fail...
As of now, the replacement engine is in & running; just need to button up a few things (ei: reassemble the entire mower) & It'll be good to go...
Attachments
-
 IMAG0932.jpg234.2 KB · Views: 2
 -
 IMAG0930.jpg182 KB · Views: 3
 -
 IMAG0929.jpg229.4 KB · Views: 1
 -
 IMAG0928.jpg152.3 KB · Views: 1
 -
 IMAG0927.jpg214 KB · Views: 1
OzFab
New member
Replacement engine in & running well, still needs a bit of carb tweaking...
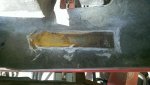
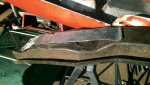
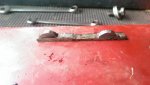
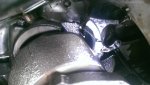
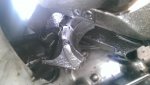
As for the old engine, found time to open it up & investigate...
In all my years, I've never seen a rod let go like this...
As for the old engine, found time to open it up & investigate...
In all my years, I've never seen a rod let go like this...
Attachments
-
 IMAG0933.jpg207.5 KB · Views: 13
 -
 IMAG0934.jpg166.4 KB · Views: 11
 -
 IMAG0935.jpg157 KB · Views: 11
- Status
- Not open for further replies.