Slingshot

Functional Artist

Well-known member
Messages
4,406
Reaction score
1,686
Location
Toledo, Ohio
I got the fender extensions cut :thumbsup:

Also, went ahead & cut more of the "center headlight area" out :huh: (seemed like a good idea, we'll just have ta see) :stir:
...& cut a "moustache" I guess ya would call it, for the lower front area :cheers2:
...& then, started assembling the pieces :2guns:

Glued 'em all together with some wood glue
...clamped 'em together with some clamps
...& weighted 'em down with a couple of SLA's (look Epsilon Z, I found another use for SLA's :devil2:)
SAM_3050.JPGSAM_3062.JPG
 

Attachments

  • SAM_3045.JPG
    SAM_3045.JPG
    3 MB · Views: 0
  • SAM_3047.JPG
    SAM_3047.JPG
    3 MB · Views: 0
  • SAM_3048.JPG
    SAM_3048.JPG
    3.1 MB · Views: 0
  • SAM_3049.JPG
    SAM_3049.JPG
    3 MB · Views: 0
  • SAM_3052.JPG
    SAM_3052.JPG
    3.1 MB · Views: 0
  • SAM_3057.JPG
    SAM_3057.JPG
    3.1 MB · Views: 0
  • SAM_3059.JPG
    SAM_3059.JPG
    3.1 MB · Views: 0
  • SAM_3060.JPG
    SAM_3060.JPG
    3 MB · Views: 0

Functional Artist

Well-known member
Messages
4,406
Reaction score
1,686
Location
Toledo, Ohio
Hey why ya makin the hood outta wood? :unsure:

Well, I'm glad you asked :thumbsup:

It's not gonna be made outta wood
...them are gonna be the "molds" for the hood ;)

I watched a video (he...he) 😎 
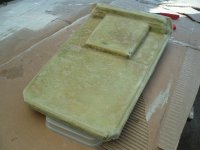
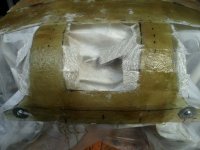
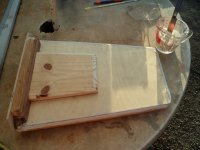
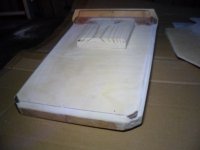
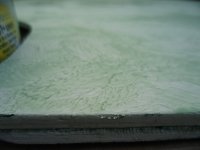
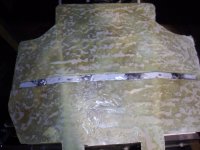
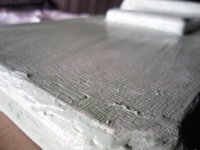
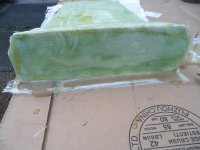
on how to make a "fiberglass hood"
...& said "I can do that" :2guns:

From what I understand, most folks usually use the actual car's hood (or other automotive panel) as the "mold"
...but, mine is gonna be "totally custom"
...so, I gotta make the "mold" :cheers2:


* That's what I love about these (my) projects :sifone:
...so, far I got to design a unique kart
...work with steel (pipe & flat stock)
...design & build a "custom" chain drive steering rack
...did some wiring & installation of electrical components
...designed, made & installed a brake system
...worked with some plastic
...now, working with wood
...next, is working with fiberglass
...then, comes the seat/upholstery
...& then, painting isn't too far off either :sifone:

Oh, yea I get ta show 'er off & drive 'er around too :bannana:
 

Functional Artist

Well-known member
Messages
4,406
Reaction score
1,686
Location
Toledo, Ohio
After all of the pieces of the "molds" for the hood dried or set, I mixed up some plaster (yup, regular old household plaster for patchin' walls)
...& used it to fill in, most of the voids & imperfections (as recommended in the video) :thumbsup:

After that dried/set, I sanded all of the plaster nice-n-smooth :cheers2:
...then, sealed 'er all up, with a heavy coat of white spray paint :2guns:
SAM_3081.JPG
 

Attachments

  • SAM_3063.JPG
    SAM_3063.JPG
    3.1 MB · Views: 0
  • SAM_3064.JPG
    SAM_3064.JPG
    3.1 MB · Views: 0
  • SAM_3065.JPG
    SAM_3065.JPG
    3.1 MB · Views: 0
  • SAM_3067.JPG
    SAM_3067.JPG
    3 MB · Views: 0
  • SAM_3068.JPG
    SAM_3068.JPG
    3 MB · Views: 0
  • SAM_3069.JPG
    SAM_3069.JPG
    2.9 MB · Views: 0
  • SAM_3082.JPG
    SAM_3082.JPG
    3 MB · Views: 0
  • SAM_3083.JPG
    SAM_3083.JPG
    3.1 MB · Views: 0
  • SAM_3084.JPG
    SAM_3084.JPG
    3 MB · Views: 0

Functional Artist

Well-known member
Messages
4,406
Reaction score
1,686
Location
Toledo, Ohio
I stacked up the (2) "molds"
...& sat 'em on the kart, for a "test fit" :thumbsup:

The front "should" curve down
...& attach to the front bumper ;)

When it does , the front edge of the fenders (& top edge of the headlight cut-out) "should" also, curve down
...& "cap off" the headlights :2guns:
SAM_3094 (1).JPG
 

Functional Artist

Well-known member
Messages
4,406
Reaction score
1,686
Location
Toledo, Ohio
I waxed the :censored: 
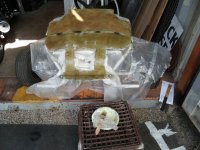
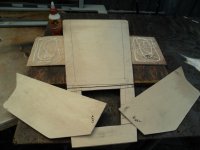
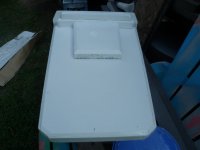
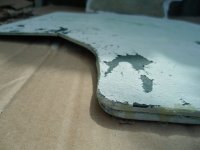
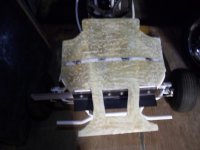
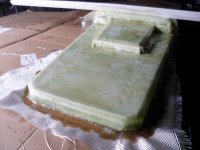
out of the "molds" (Yup, I used regular old car polishing wax, as recommended in the video)
...then, I waxed 'em again, just to be sure (I used more of like a dabbing procedure, this time) ;)

For my "first time" I figured I'd try the easy/flat piece :thumbsup:
...so, I layed the "mold" on the work bench
...painted a layer of the resin on
...layed a piece fiberglass cloth over/on top of the "goop"
...& then, painted" another layer of the resin on (makin' sure to "soak thru" the cloth)

I let it "harden" up for about an hour
...then, gently "popped" the "new" fiberglass "panel", off of the "mold"

* Yup, there needs to be, more "layers" of cloth & resin ;)
...but, I want to keep 'er "pliable" (for a minute)
...so, I can get 'er ta "curve" down in the front, nicely :2guns:
...then, once that's established (the curved area) I'll add a couple of more "layers" ta help strengthen 'er up. :cheers2:

Well, here is our "base" panel (seemed to "turn out" about as expected)
...next up, some trimmin' & shapin' :2guns:
SAM_3103 (1).JPG
 

Attachments

  • SAM_3098 (1).JPG
    SAM_3098 (1).JPG
    3.1 MB · Views: 0
  • SAM_3099 (1).JPG
    SAM_3099 (1).JPG
    2.9 MB · Views: 0
  • SAM_3100 (1).JPG
    SAM_3100 (1).JPG
    3 MB · Views: 0
  • SAM_3101 (1).JPG
    SAM_3101 (1).JPG
    3.1 MB · Views: 0
  • SAM_3102 (1).JPG
    SAM_3102 (1).JPG
    3.1 MB · Views: 0
  • SAM_3104.JPG
    SAM_3104.JPG
    3 MB · Views: 0
  • SAM_3105.JPG
    SAM_3105.JPG
    3 MB · Views: 0
  • SAM_3106.JPG
    SAM_3106.JPG
    3.1 MB · Views: 0

madprofessor

"Loose Cannon Creations"
Messages
2,899
Reaction score
888
Location
Jacksonville, Florida
Noticed there's no anti-itch advice on here for you. Guys on car shop shows on TV put a lot of store in baby powdering yourself all over. They have the best gear, including plastic 1-piece long sleeve/glove, and the right kind of bunny suit. Tape tight around suit ankles and wrist. Use a respirator, not for the itch, for your continued good health.
As I'm a veteran of the HVACR field you'd think I know all there is about insulation fiberglass and its god-awful itch, but I don't. No matter what I still itch, being in the same room with it gets me itching. Experience has only taught me not to put the itchy clothes in the same basket with other clothes, wash completely separate from other clothes for at least 3 wash days before mixing with the others.
 

madprofessor

"Loose Cannon Creations"
Messages
2,899
Reaction score
888
Location
Jacksonville, Florida
Saw on a car shop show some fiberglass I've never seen in person. He had a gallon size can of chopped strands and goopy stuff, just shoved his gloved hand in it and started packing it onto the wooden "structure" he'd built. It was a big woofer speaker box for a truck, where the wooden structure remains, and the 'glass refined the flow of the shape and reinforced around the speaker. Ground smoother and then body-worked with putty after it cured. You're doing a popout mold, but it's a thought for other things, you are trying to learn working with that media.
 

Functional Artist

Well-known member
Messages
4,406
Reaction score
1,686
Location
Toledo, Ohio
Noticed there's no anti-itch advice on here for you. Guys on car shop shows on TV put a lot of store in baby powdering yourself all over. They have the best gear, including plastic 1-piece long sleeve/glove, and the right kind of bunny suit. Tape tight around suit ankles and wrist. Use a respirator, not for the itch, for your continued good health.
As I'm a veteran of the HVACR field you'd think I know all there is about insulation fiberglass and its god-awful itch, but I don't. No matter what I still itch, being in the same room with it gets me itching. Experience has only taught me not to put the itchy clothes in the same basket with other clothes, wash completely separate from other clothes for at least 3 wash days before mixing with the others.
I appreciate it pal :thumbsup:

I'm wearing gloves & respirator while workin' with this stuff :cheers2:
...but, I'm also workin' outside, with a nice breeze
...& tryin' ta stay "up wind" of this stuff ;)

I got the "base panel" trimmed (sheet metal cutters work great)
...& set 'er on the kart for a "test fit"

Yup, that's the kinda "curve" that I had in mind :sifone:
SAM_3111.JPG
 

Attachments

  • SAM_3108.JPG
    SAM_3108.JPG
    3 MB · Views: 1
  • SAM_3109.JPG
    SAM_3109.JPG
    3 MB · Views: 1
  • SAM_3110.JPG
    SAM_3110.JPG
    3 MB · Views: 1

madprofessor

"Loose Cannon Creations"
Messages
2,899
Reaction score
888
Location
Jacksonville, Florida
Wow. Now I see what you meant about keeping it pliable, that's a drastic amount of flexing the cured 'glass. You could really benefit from a couple of pieces of board cut in that curve shape for use as bucks to hold that shape while you lay on/pack on more 'glass on the underside.
 

Functional Artist

Well-known member
Messages
4,406
Reaction score
1,686
Location
Toledo, Ohio
Wow. Now I see what you meant about keeping it pliable, that's a drastic amount of flexing the cured 'glass. You could really benefit from a couple of pieces of board cut in that curve shape for use as bucks to hold that shape while you lay on/pack on more 'glass on the underside.
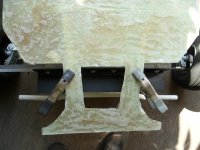
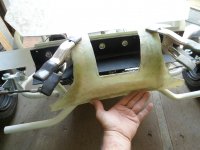
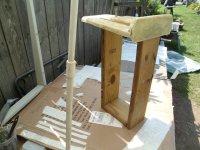
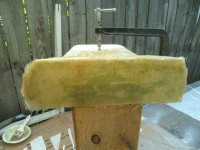
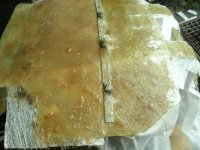
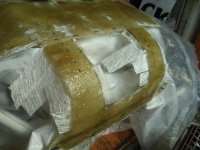
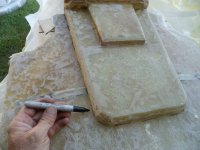
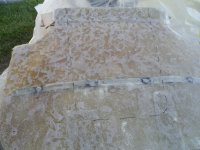
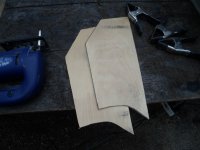
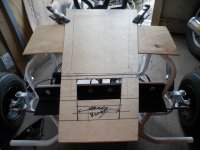
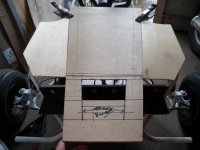
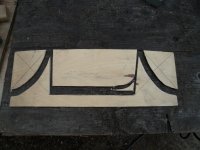
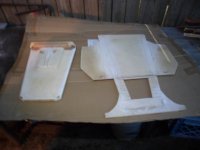
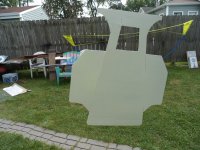
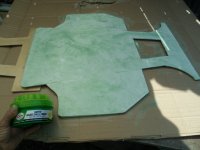
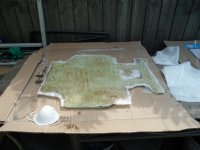
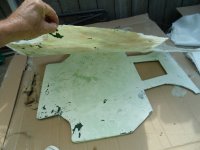
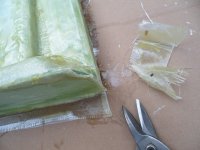
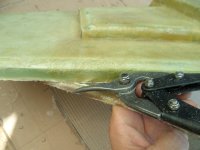
The concept I'm workin' is that this "is" the base ;)
...& then, the subsequent layers, are to be put on top :thumbsup:

Would there be a reason for puttin' 'em (more layers) on the "back side"? 🤔
Wouldn't adding to the "back side", totally change the "inner" dimensions? :huh:

As it is, it's kinda "form fitted" to the kart :cool:
...& the "upper level" (shaker) is to be "worked in"
...or "glued down" as part of them, subsequent layers
(which should also, help 'er hold 'er shape) :cheers2:
 

Functional Artist

Well-known member
Messages
4,406
Reaction score
1,686
Location
Toledo, Ohio
Ooh yea, I almost forgot, the "hold down bracket" :sifone:

I made a hold down bracket ta, well, hold down the hood :giggle:

It is also, ta be "worked in" or hidden in the subsequent layers :thumbsup:
SAM_3124.JPG
 

Attachments

  • SAM_3133.JPG
    SAM_3133.JPG
    3.1 MB · Views: 0
  • SAM_3126.JPG
    SAM_3126.JPG
    3.1 MB · Views: 0
  • SAM_3122.JPG
    SAM_3122.JPG
    2.8 MB · Views: 0
  • SAM_3123.JPG
    SAM_3123.JPG
    2.9 MB · Views: 0

madprofessor

"Loose Cannon Creations"
Messages
2,899
Reaction score
888
Location
Jacksonville, Florida
Okay, I did it again. As I've gotten older, I see and do everything backwards, have no spatial grasp anymore. Can't ever put a pipe wrench or Channellocks on or turn a bolt the right way first time, etc. If that's the base, then it already is the backside. Subsequent 'glass goes on top of it, understood now. Thought I was looking at what would in the end be smooth and painted.
If layering over that, how do you plan to in the end get a smooth top surface without cloth marks or ripples etc.? Tons of Bondo?
 

madprofessor

"Loose Cannon Creations"
Messages
2,899
Reaction score
888
Location
Jacksonville, Florida

Functional Artist

Well-known member
Messages
4,406
Reaction score
1,686
Location
Toledo, Ohio
Is this link below the right kind of stuff for the kind of thing you're doing, and with the cloth is it the right price? Or way out of the ballpark?
I'm considering doing a small project myself now, and like you I'm not well experienced with fiberglass.
TRUE COMPOSITES: Polyester Resin with 1708 x 38" x 5 Yards Fiberglass, MEKP Hardener, Laminating Repair Kits-Great for Boats, Car Exterior, Canoe, Surfboard, Non-Tacky Finish (1 Gallon kit, 2oz MEK-P): Amazon.com: Industrial & Scientific
Yup, that seems about right :thumbsup:
I got my stuff @ WalMart :cheers2:
...the resin came in quart containers
...& the cloth came in smaller packages too

Cost seems about right, I've got almost $75.00 in ta this "hood" (so far) :innocent:

* How do end up going off on these "tangents"? :unsure:

Ya know, I'm just movin' along, buildin' a kart & suddenly I look up & I'm "knee deep" in "something else"
...& I spent $75.00 too WTF :mad2:
...oops, I mean :censored:

But, But, But
...the "upper section" turned out "pretty kool" :bannana: I must say! :sifone:
SAM_3192 (1).JPG
 

Functional Artist

Well-known member
Messages
4,406
Reaction score
1,686
Location
Toledo, Ohio
Hey, that's kool!
...how'd ya make it?

Well, I'm glad you asked :innocent:

Since this piece has some "seriously sharp" body lines (next time I'd definitely have 'em be more mellow)
...I really, really, really layed the wax on
...& I mean like SUPER HEAVY :smiley_omg:

* This is to form a "barrier" to help keep the resin from stickin' to the "mold"
...so the "new piece" will actually "pop off", of the "mold", when your done :thumbsup:

** Also, I should mention that these "forms" that I made are technically "plugs" & not really "molds" ;)

Since were puttin' the material "on top" of the "form"
...the "form" is considered a "plug"

If we were puttin' the material "inside" of the "form"
...the "form" would be considered a "mold" (see what ya can learn from watchin' videos:))

So, I put a layer of resin on
...then, started addin' the precut pieces (video said, it helps ta "wrap around corners" if ya cut the fiberglass mat, in pieces/before startin")

After lettin' 'er harden up, I attacket 'er with the grinder/sander (loaded with #36 grit)
...gently, of course :cheers2:
...but, I had ta "rough 'er up" (technical term)

I mostly removed any unwanted build up, runs, drips etc.
...ta get that stuff "outta the way"
...& ta help the next layer stick

Then, I went ahead & added, another layer
...& the, after that layer "hardened", I did some more "body work" :cool:

I was just about ta add another layer
...when my buddy said "if ya make that thing much stiffer, your never gonna get it off" :ack2:

Then, I replied "your crushin' me with these negative vibes"
...but, I appreciate the "reality check" :unsure:

So, I went ahead & "popped it off"
...which wasn't easy at all :huh:

I'm so glad he "spoke up"
...'cause I probably wouldn't of gotten 'er off (at least not in (1) piece) if it was "stiffer" :furious2:
...& here is what it looks from the "inside" :bannana:

Notice there's not much "mold/plug" debris
...& I gotta do a bit more "body work"
...but,...not bad, for a beginner :sifone:
SAM_3195 (1).JPG
 

Attachments

  • SAM_3114.JPG
    SAM_3114.JPG
    3 MB · Views: 0
  • SAM_3116.JPG
    SAM_3116.JPG
    3 MB · Views: 0
  • SAM_3117.JPG
    SAM_3117.JPG
    3.2 MB · Views: 0
  • SAM_3118.JPG
    SAM_3118.JPG
    2.9 MB · Views: 0
  • SAM_3119.JPG
    SAM_3119.JPG
    3.1 MB · Views: 0
  • SAM_3120.JPG
    SAM_3120.JPG
    3 MB · Views: 0
  • SAM_3139.JPG
    SAM_3139.JPG
    3.1 MB · Views: 0
  • SAM_3141.JPG
    SAM_3141.JPG
    3.1 MB · Views: 0
  • SAM_3185.JPG
    SAM_3185.JPG
    3.1 MB · Views: 0

Functional Artist

Well-known member
Messages
4,406
Reaction score
1,686
Location
Toledo, Ohio
I added a couple more "layers" of fiberglass to the "upper level"
...ta strengthen 'er up
...ta help 'er hold 'er shape ;)

While that was "settin'"
...I cut & welded on a "bracket" ta mount the lower front of the "base", to the kart :thumbsup:

* Are we just gonna "bolt" 'er down?

Hmmm...
...I'm thinkin'...:idea2:...gimme a minute :unsure:

How about some kind of an "upper front bumper/hold down"?
Hmmm...

Well, this is kinda how its gonna look :sifone:

I love how the fenders "kick down"
...kinda reminds me of the wings on a plane :2guns:
SAM_3224.JPG
 

Attachments

  • SAM_3187.JPG
    SAM_3187.JPG
    3.1 MB · Views: 1
  • SAM_3188.JPG
    SAM_3188.JPG
    3.1 MB · Views: 1
  • SAM_3197.JPG
    SAM_3197.JPG
    3.1 MB · Views: 1
  • SAM_3202.JPG
    SAM_3202.JPG
    3.1 MB · Views: 1
  • SAM_3217.JPG
    SAM_3217.JPG
    3.1 MB · Views: 1
  • SAM_3218.JPG
    SAM_3218.JPG
    3.1 MB · Views: 1
  • SAM_3223.JPG
    SAM_3223.JPG
    3 MB · Views: 1

Functional Artist

Well-known member
Messages
4,406
Reaction score
1,686
Location
Toledo, Ohio
I got it! :thumbsup:
I'll just "notch out" a piece of pipe :2guns:
Yea, I think that'll do it ;)
SAM_3254.JPG
 

Attachments

  • SAM_3231.JPG
    SAM_3231.JPG
    3 MB · Views: 0
  • SAM_3234.JPG
    SAM_3234.JPG
    3 MB · Views: 0
  • SAM_3243.JPG
    SAM_3243.JPG
    3 MB · Views: 0
  • SAM_3244.JPG
    SAM_3244.JPG
    3 MB · Views: 0
  • SAM_3245.JPG
    SAM_3245.JPG
    3 MB · Views: 0
  • SAM_3252.JPG
    SAM_3252.JPG
    3 MB · Views: 0
  • SAM_3253.JPG
    SAM_3253.JPG
    3.1 MB · Views: 0
  • SAM_3255.JPG
    SAM_3255.JPG
    3 MB · Views: 0

Functional Artist

Well-known member
Messages
4,406
Reaction score
1,686
Location
Toledo, Ohio
The "base" started off with (1) "layer" (resin, cloth & resin on top)
...then, I sat 'er on the kart & added the "hold down bracket"
* I needed it on the kart, ta hold it's shape
...so, I tucked a piece of plastic, in between the hood & the kart, ta help protect everything :cool:

Next, was, another "layer" (resin, cloth & resin)
* I put a piece, above the bracket & a piece below, ta help hide it. ;)

After that second "layer" hardened, I did some measurin' & markin'
* This way I have some guidance/help "centering the "upper level") :thumbsup:

The third "layer" was a full size piece (covering the entire hood)

Then, while that was still "wet", I went ahead & mounted/glued the "upper level" on :2guns:
...& BOOM! the (2) became (1) :cheers2:
SAM_3266.JPG
 

Attachments

  • SAM_3256.JPG
    SAM_3256.JPG
    3 MB · Views: 0
  • SAM_3257.JPG
    SAM_3257.JPG
    3 MB · Views: 0
  • SAM_3258.JPG
    SAM_3258.JPG
    3 MB · Views: 0
  • SAM_3259.JPG
    SAM_3259.JPG
    3 MB · Views: 0
  • SAM_3260.JPG
    SAM_3260.JPG
    3.1 MB · Views: 0
  • SAM_3261.JPG
    SAM_3261.JPG
    3.1 MB · Views: 0
  • SAM_3262.JPG
    SAM_3262.JPG
    3.2 MB · Views: 0
  • SAM_3263.JPG
    SAM_3263.JPG
    3 MB · Views: 0
Top