Off Road Kart Build

Status
Not open for further replies.

SoBored

New member
Messages
38
Reaction score
0
Location
Ontario, Canada
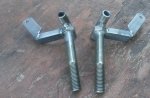
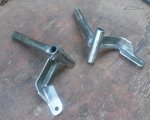
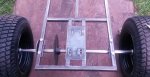
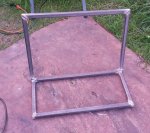
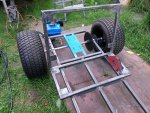
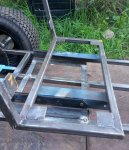
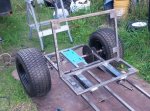
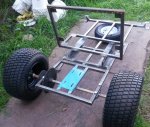
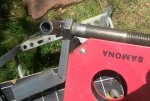
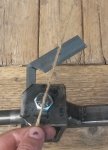
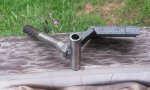
More progress today, then it started to rain so I packed everything away. Now it's stopped so once it dries a bit I'll get back at it. The prototype was a train wreck but this should work. I'm going to weld the arm to the bolt head instead of the spindle tube which buys me a lot of room.

I must have figured out the miter wrong so I don't need them as long as I thought. Any ideas on how long a spindle arm should be?
 

Attachments

  • 2016_08_21_spindle02.jpg
    2016_08_21_spindle02.jpg
    106.8 KB · Views: 8
  • 2016_08_21_spindle03.jpg
    2016_08_21_spindle03.jpg
    157.6 KB · Views: 13
  • 2016_08_21_spindle04.jpg
    2016_08_21_spindle04.jpg
    125.1 KB · Views: 10
  • 2016_08_21_spindle05.jpg
    2016_08_21_spindle05.jpg
    162.8 KB · Views: 15

chancer

ɔ ɥ ɐ u ɔ ǝ ɹ
Messages
9,358
Reaction score
82
Location
COMFORT, TEXAS
Kart fab said twice (and he heard from GoPowerSports) That the arm should be half the length of the Spindle Bolt. ???
But the bolt can be longer than you need depending on the wheel you use, or even have extra threads sticking past the nut. So I don't believe that makes any sense. I just usually go about 3 inches.

---------- Post added at 10:46 AM ---------- Previous post was at 10:43 AM ----------

http://www.diygokarts.com/vb/showthread.php?t=29771
 

SoBored

New member
Messages
38
Reaction score
0
Location
Ontario, Canada
Perfect! Mine are 3.5" center to center. Pretty happy with the way they came out. I really want to start working on a second kart!

Now I have to figure out how I'm going to mount the steering column support. Had my boy and me out there trying different column angles, distances and pedal placements.
 

Attachments

  • 2016_08_21_spindle06.jpg
    2016_08_21_spindle06.jpg
    225.2 KB · Views: 18
  • 2016_08_21_spindle07.jpg
    2016_08_21_spindle07.jpg
    211 KB · Views: 17

SoBored

New member
Messages
38
Reaction score
0
Location
Ontario, Canada
I had my local steel supplier plasma cut me out some engine mounting plates. I ordered a spare for my next build. :D

I welded some 1" angle iron in place and then realized that the angle partially covered the mounting holes so I notched one support, moved the plate to the left and welded it on.

Tomorrow I will get my floor pan and some 1/4" rod for the brake rod.
 

Attachments

  • 2016_08_24_e_mount02.jpg
    2016_08_24_e_mount02.jpg
    188.9 KB · Views: 15
  • 2016_08_24_e_mount01.jpg
    2016_08_24_e_mount01.jpg
    126 KB · Views: 11

chancer

ɔ ɥ ɐ u ɔ ǝ ɹ
Messages
9,358
Reaction score
82
Location
COMFORT, TEXAS
I find it easier to make a wider engine plate, So it is easier to get to the Bolts.
Just a tip to remember for your next build.
 

SoBored

New member
Messages
38
Reaction score
0
Location
Ontario, Canada
You got room for the bolt heads or nuts under that plate?

I'm almost certain I do.

Worked on the seat frame tonight and I shouldn't have because I was rushing. Tacked it together and should have stopped and fixed the top part which is too wide but started welding it up anyway.
 

Attachments

  • 2016_08_29_seat_frame01.jpg
    2016_08_29_seat_frame01.jpg
    159.6 KB · Views: 9

SoBored

New member
Messages
38
Reaction score
0
Location
Ontario, Canada
Almost finished the seat frame up. I welded in some angle iron for the seat adjusters. Painted the engine plate up and I've been running my engine to break it in.
 

Attachments

  • 2016_09_04_seat_frame01.jpg
    2016_09_04_seat_frame01.jpg
    493.4 KB · Views: 7

Jfive

New member
Messages
645
Reaction score
1
Location
Great falls Montana
I'd set it back how ever thick you want the back rest to be and maybe lean it back or maybe it just looks like it's 90 degrees to the bottom.
 

SoBored

New member
Messages
38
Reaction score
0
Location
Ontario, Canada
I'd set it back how ever thick you want the back rest to be and maybe lean it back or maybe it just looks like it's 90 degrees to the bottom.

It's 115 degrees like the one kartfab built. Well, it was until it warped when I welded it. I haven't measured the outcome yet. :)

Did you purchase the Alligator Vinyl for the seat yet?:thumbsup:

No sir but I keep checking the traps. People say there isn't alligators up here in Canada but I mean to prove them wrong.

I was going to buy a seat slider and a few other items from BMI karts but the shipping was going to be $87 dollars so I was thinking of making my own. A seat slider at the local tractor supply is $28 bucks. Man this thing blew up the budget.
 

SoBored

New member
Messages
38
Reaction score
0
Location
Ontario, Canada
Finally got some spare time to make a little progress on the seat frame. The frame is adjustable so I can undo 4 bolts and move it rearward 3.5". More welding to do, then I can wire wheel it, drill the bolt holes and get it painted.

Once this is sorted out I can place the pedals and then I can do the floor pan and get more paint on the frame.
 

Attachments

  • 2016_09_14_seat_frame01.jpg
    2016_09_14_seat_frame01.jpg
    199.2 KB · Views: 9
  • 2016_09_14_seat_frame02.jpg
    2016_09_14_seat_frame02.jpg
    292 KB · Views: 10
  • 2016_09_14_seat_frame03.jpg
    2016_09_14_seat_frame03.jpg
    179.1 KB · Views: 13
Status
Not open for further replies.
Top