Off Road Kart Build

Status
Not open for further replies.

SoBored

New member
Messages
38
Reaction score
0
Location
Ontario, Canada
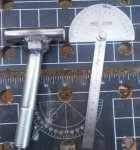
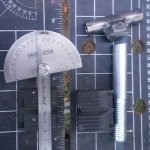
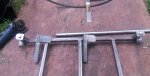
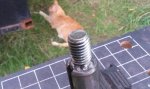
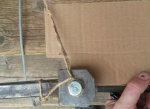
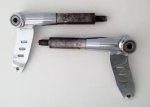
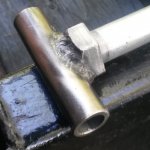
Got my two spindle tubes cut and fitted and ground a groove in my 5/8" bolt and got it welded on 1 of the spindles. The weld went pretty well and I'm relieved as this is one of the more critical welds on a kart.
 

Attachments

  • 2016_08_06_spindle01.jpg
    2016_08_06_spindle01.jpg
    128.1 KB · Views: 14

SoBored

New member
Messages
38
Reaction score
0
Location
Ontario, Canada
Worked on the second spindle and mocked up the rear axle for pillow block position and center punched the frame for the pillow block holes. Need to buy bolts and find my drill tomorrow.
 

Attachments

  • 2016_08_07_spindles01.jpg
    2016_08_07_spindles01.jpg
    147.8 KB · Views: 16
  • 2016_08_07_axlemock01.jpg
    2016_08_07_axlemock01.jpg
    300.7 KB · Views: 18

SoBored

New member
Messages
38
Reaction score
0
Location
Ontario, Canada
Thanks chancer.

It's finally getting interesting enough for my oldest boy to get involved. Temporarily mounted the pillow block, axle and tires just to get a feel for how it's looking. Front bumper, floor pan and steering hoop are going to be up soon.

I'm going to start designing the spindle arms, can some one tell me how many degrees of turn the front wheels should have ideally? Thanks.
 

Attachments

  • 2016_08_08_bill02.jpg
    2016_08_08_bill02.jpg
    296.6 KB · Views: 9
  • 2016_08_08_bill03.jpg
    2016_08_08_bill03.jpg
    317.9 KB · Views: 25
  • 2016_08_08_tires01.jpg
    2016_08_08_tires01.jpg
    371.3 KB · Views: 12

chancer

ɔ ɥ ɐ u ɔ ǝ ɹ
Messages
9,358
Reaction score
82
Location
COMFORT, TEXAS
First I see 1 problem.
You do have Camber on the front end. But... the Axle bolt should be welded at the opposing angle. So the tires are Straight up and down. Then when you turn the wheels the Camber comes into play.

and I do not know the answer to your last question. I always end up with as much as I can get before my steering arms hit the spindle C mounts. lol.
 

MrC.

Member
Messages
238
Reaction score
0
Location
florida
That would been more useful to him YESTERDAY. ...
j/k
chancer is right though.

MrC.
 

SoBored

New member
Messages
38
Reaction score
0
Location
Ontario, Canada
Dammit. Yeah you gave good advice chancer. I think the problem is when you look up diagrams of camber on the internet, they always exaggerate it in the drawing.

According to the diagram below, I effin NAILED it! :lolgoku:

Anyway, I have enough of the heavy wall tube to make about 4 sets of spindles!
 

Attachments

  • camber.jpg
    camber.jpg
    8.3 KB · Views: 109

chancer

ɔ ɥ ɐ u ɔ ǝ ɹ
Messages
9,358
Reaction score
82
Location
COMFORT, TEXAS
Well like I said on an earlier post "I even showed my mistakes" LOL welcome to the club. At least it is relatively cheap to fix. I learn by doing, so sometimes it takes twice.
 

SoBored

New member
Messages
38
Reaction score
0
Location
Ontario, Canada
Ugh, maybe I should start over. Does anyone think this will be good enough? Does the bolt head need to be square on the bolt body?
 

Attachments

  • 2016_08_10_spindlfix02.jpg
    2016_08_10_spindlfix02.jpg
    196.2 KB · Views: 11
  • 2016_08_10_spindlfix01.jpg
    2016_08_10_spindlfix01.jpg
    157.3 KB · Views: 10

chancer

ɔ ɥ ɐ u ɔ ǝ ɹ
Messages
9,358
Reaction score
82
Location
COMFORT, TEXAS
There is the right idea.
I don't think Bolt need to be square with the hex head, I cut the head off mine completely.
But the bolt does need to be level with the spindle barrel.
 

SoBored

New member
Messages
38
Reaction score
0
Location
Ontario, Canada
But the bolt does need to be level with the spindle barrel.

I don't think I follow you. Do you mean the bolt need to be aligned with the center of the spindle hole when viewed from above or do you mean I should cut the bolt head off and attached the bolt body directly to the tube?

I think I'll just start the spindles over and grind the bolt head to a 10 degree angle. I'm not really confident in the penetration of that weld.
 

chancer

ɔ ɥ ɐ u ɔ ǝ ɹ
Messages
9,358
Reaction score
82
Location
COMFORT, TEXAS
Yeah my statement did not make sense, now that I think about it. lol
I always worry about my weld penetration on spindles too.
 

SoBored

New member
Messages
38
Reaction score
0
Location
Ontario, Canada
Well five days of almost continuous rain shut this shadetree builder down for quite a while. We had a dry afternoon so I ground the spindle bolts and welded them up tonight. One sin corrected! :)
 

Attachments

  • 2016_08_17_newspindle01.jpg
    2016_08_17_newspindle01.jpg
    110.2 KB · Views: 13

chancer

ɔ ɥ ɐ u ɔ ǝ ɹ
Messages
9,358
Reaction score
82
Location
COMFORT, TEXAS
Cool. Those look good!
Also I like your work table. What is that? Looks handy for small parts fab.
 

SoBored

New member
Messages
38
Reaction score
0
Location
Ontario, Canada
It's a Toolsmith folding workbench, you can pick it up and move it in one hand and it folds pretty flat. Best part was it was free on the side of the road.

With a C clamp and a couple of wooden V blocks I made, it's proven itself very handy, and I just set it on the porch when I'm done with it.

http://www.toolsmithdirect.com/folding-multi-purpose-workbench.html

Oh, 3 passes with the mig should have those spindles good and strong.
 

SoBored

New member
Messages
38
Reaction score
0
Location
Ontario, Canada
Well the weekend is here and we're expecting rain this Friday evening and Saturday and Sunday so I thought I should get right to the kart after getting home from work.

I fabbed up brake and gas pedals, bobbed the square corners off my spindle brackets and welded some 5/8" threads onto the ends of my 1" axle.

Once I get my steering sorted I can place the pedals and then see how far forward I need to make my seat be able to slide.
 

Attachments

  • 2016_08_19_pedals01.jpg
    2016_08_19_pedals01.jpg
    262.1 KB · Views: 20
  • 2016_08_19_axle01.jpg
    2016_08_19_axle01.jpg
    268.9 KB · Views: 16

chancer

ɔ ɥ ɐ u ɔ ǝ ɹ
Messages
9,358
Reaction score
82
Location
COMFORT, TEXAS
I found a machine shop to Thread the 1" Axle for me. Just in case that does not work.
 

SoBored

New member
Messages
38
Reaction score
0
Location
Ontario, Canada
Good idea chancer but it worked like a charm and I only needed to buy a bolt for it. Later a cotter pin will be added.

I fit a spindle and started figuring out my ackerman for my spindle arms. Not happy. I should have placed my king pin bolt hole further out on the spindles. It's going to be a tight squeeze. I can either shave the back off my spindle brackets where the spindle arm goes or dog leg the spindle arm. I think I'll try dog legging the spindle arm first but one thing effects the next and I may need to add a 1/2" spacer to my spindle bolts to move my wheels out. Not the end of the world. I have some cardboard templates made and a picture taken and I'll start with a dogleg spindle.
 

Attachments

  • 2016_08_20_axlekeeper01.jpg
    2016_08_20_axlekeeper01.jpg
    132.1 KB · Views: 13
  • 2016_08_20_spindle01.jpg
    2016_08_20_spindle01.jpg
    286.6 KB · Views: 16
  • 2016_08_20_ackerman01.jpg
    2016_08_20_ackerman01.jpg
    140.1 KB · Views: 11

chancer

ɔ ɥ ɐ u ɔ ǝ ɹ
Messages
9,358
Reaction score
82
Location
COMFORT, TEXAS
Dog leg thing should work. I have used straight ones and Ground a notch in the arm and also had to grind a notch in the C bracket.

I was looking at photos of Race Kart spindles recently. and pretty much it looks like they kinda put that 1/2" spacer on the Bolt and the steering arm is welded to both that and the spindle barrel. This will also help secure the Spindle bolt to the barrel.

Of course they make it all in one piece, but my description is how I/we could DIY it.
May be some thing worth looking at. Here is a pic I stole on line.
 

Attachments

  • TK spindle.jpg
    TK spindle.jpg
    4.5 KB · Views: 61
Status
Not open for further replies.
Top