Off Road Kart Build

Status
Not open for further replies.

SoBored

New member
Messages
38
Reaction score
0
Location
Ontario, Canada
So I've been acquiring parts and now I'd like to start working on the frame so I have a few questions.

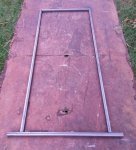
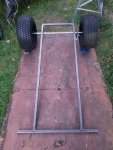
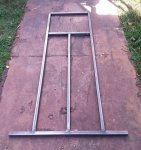
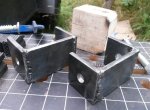
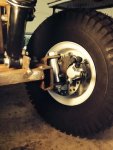
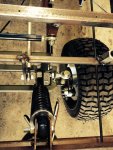
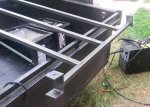
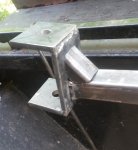
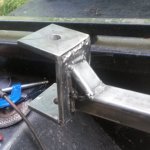
So far I have a 3 foot 1" keyed axle, 20x8.0-10 rear tires assemblies, some axle hangers and a Honda clone of a 197cc and a #40 clutch. I'm planning on trying some 16x5.00-8 tires on the front and I have a disc brake assembly. I also have plenty of 1'x1" 11 gauge tube and some 1"x1" angle.

1. I think I read if the track width of the front tires is narrower than the track width of the rear it can affect the steering negatively. Is this true? Should I keep the front track width equal to the rear or will a few inches be okay?

2. I've seen on a lot of karts, even live axle ones, the engine seems to be off to the left side. Is that for sprocket to ground clearance? I was planning on mounting the engine more centred and having the disc brake assembly mounted outside of the frame on the left.

Any ideas or tips would be welcome, I will add some pictures of my parts pile tonight and hopefully will get some regular progress pics up.

Thanks!
 

SoBored

New member
Messages
38
Reaction score
0
Location
Ontario, Canada
Purchased some more steel and did a full size drawing of the frame on the old floor from my utility trailer.

Got some steel cut tonight with the angle grinder. Frame is 5' long, 24" wide at the back and 32" between where front spindles will be.
 

Attachments

  • 2016_07_27_frame01.jpg
    2016_07_27_frame01.jpg
    123.2 KB · Views: 14

Jfive

New member
Messages
645
Reaction score
1
Location
Great falls Montana
Make sure to put the rear wheels on the axle and see how much room you need to clear the frame. 3 ft axle doesn't leave much error.
 

chancer

ɔ ɥ ɐ u ɔ ǝ ɹ
Messages
9,358
Reaction score
82
Location
COMFORT, TEXAS
My Azuza Frames are 22" wide at the rear and taper to 17 at the front. The front Axle beam is again 22" wide.
 

SoBored

New member
Messages
38
Reaction score
0
Location
Ontario, Canada
I really wanted to get 22" wide but with mounting the caliper outside the frame and having room for the brake rod I think 20" is going to have to do.

Looking forward to doing more frame work and starting the spindles and spindle brackets this weekend. Kids are no **** help at all!! :roflol:
 

Attachments

  • 2016_07_29_frame01.jpg
    2016_07_29_frame01.jpg
    230.1 KB · Views: 18

SoBored

New member
Messages
38
Reaction score
0
Location
Ontario, Canada
More framework and I cut out 6 pieces of 1.5" x 1/4" for the spindle brackets. I think I'm going to pre-drill the holes and bolt them together when I weld them so they are square.
 

Attachments

  • 2016_07_30_frame01.jpg
    2016_07_30_frame01.jpg
    99.5 KB · Views: 13

chancer

ɔ ɥ ɐ u ɔ ǝ ɹ
Messages
9,358
Reaction score
82
Location
COMFORT, TEXAS
Looking good. I think that sounds like a good idea to bolt those together so they are square.
I learned the hard way. Make sure everything is square and level and flat and plane and true. LOL
I do not know your ability so don't take this wrong if you know.
Always tack both sides double check for square then weld a little more continuing to check.
 

SoBored

New member
Messages
38
Reaction score
0
Location
Ontario, Canada
I do know to tack, but thanks for the tip, it is important to know.

When it comes to mount the spindle brackets, the top should angle inward and rearward 7 degrees?
 

chancer

ɔ ɥ ɐ u ɔ ǝ ɹ
Messages
9,358
Reaction score
82
Location
COMFORT, TEXAS
I used 10° and 15° on mine. It is not done yet. So I have not tested that.
Page 3 and 4 here: even shows my mistakes.
http://www.diygokarts.com/vb/showthread.php?t=32730&highlight=2016+diygk&page=3

Also search threads by "desertduler" Wifes Kart and 2015 Diy build off entry.
He is where I learned and he also helped me get mine done.

However my angles are a little radical to induce "Frame Jacking" If you look at desertdulers threads you will see how and why.

All of the above mentioned threads also explain "Ackerman"

---------- Post added at 07:57 PM ---------- Previous post was at 07:45 PM ----------

Here is Brett's (dd) front end go to Post 131 be sure to see the video on the next page.
http://www.diygokarts.com/vb/showthread.php?t=24346&page=7
 

SoBored

New member
Messages
38
Reaction score
0
Location
Ontario, Canada
The thing I don't get Is how many people are "aware" of Ackerman but I'm still seeing lots of builds with no ackerman, caster or camber. I'm mostly going off a modified kartfab design and I think he has no caster or camber.

I have a similar protractor to the one you have, I'm going to try for around 7-10 degrees of caster and camber and do as much ackerman as I can with my leading arm spindles. Spindle brackets and spindles are my biggest worry at the moment but I'll learn more from a mistake than doing nothing.
 

SoBored

New member
Messages
38
Reaction score
0
Location
Ontario, Canada
I got my spindle brackets welded. It went pretty well but the ends did warp in a little once it was out of the jig and I welded the inside joints.
 

Attachments

  • 2016_07_31_bracket04.jpg
    2016_07_31_bracket04.jpg
    155.7 KB · Views: 17
  • 2016_07_31_bracket03.jpg
    2016_07_31_bracket03.jpg
    74.4 KB · Views: 13
  • 2016_07_31_bracket02.jpg
    2016_07_31_bracket02.jpg
    91.4 KB · Views: 14
  • 2016_07_31_bracket01.jpg
    2016_07_31_bracket01.jpg
    130.5 KB · Views: 14

Hybridyne

New member
Messages
86
Reaction score
5
I ended up cutting part of my spindle mount off and installed a heim joint so I could add adjustability. Pics are before and after mod.
 

Attachments

  • spindle_01.jpg
    spindle_01.jpg
    71.7 KB · Views: 42
  • spindle_02.jpg
    spindle_02.jpg
    112.3 KB · Views: 41

SoBored

New member
Messages
38
Reaction score
0
Location
Ontario, Canada
Holy crap, those are some impressive front ends. I'll have to plan a more involved build for over the winter months.

---------- Post added at 11:55 AM ---------- Previous post was at 11:37 AM ----------

However my angles are a little radical to induce "Frame Jacking" If you look at desertdulers threads you will see how and why.

Aahhhh! I finally get why frame jacking is important after reading this post of yours. I never knew why you would want a rear tire to lift.

http://www.diygokarts.com/vb/showpost.php?p=425631&postcount=45

I was holding off on doing more work until the lightbulb moment! :thumbsup:
 

MrC.

Member
Messages
238
Reaction score
0
Location
florida
Cool video. So this is how to make a live axle corner and not push the front end.
good to know.
thanks for sharing.
MrC.
 

chancer

ɔ ɥ ɐ u ɔ ǝ ɹ
Messages
9,358
Reaction score
82
Location
COMFORT, TEXAS
There is a little more to it. Not a bad Idea to do some Google research. Frame flex to some extent is needed (I think) otherwise the opposite happens and you just get a front wheel lifting.
 

SoBored

New member
Messages
38
Reaction score
0
Location
Ontario, Canada
Nice to have another weekend, work was nuts and we had a heat wave so nothing was done through the week. Today I printed out paper templates to lay on my spindle brackets to give them 10 degrees caster. I center punched the corners and tacked them onto the frame. One was off bad so I removed it, ground the welds and did it again.

I was having problem with the duty cycle on my welder so my starting welds weren't that good. I turned down the wire speed and got me cycle and penetration back but thought it would be a good idea to box in the brackets so I cut up some 1x1 square tube, tacked them in and welded them up.

Not really sure what to do next. I guess spindles and maybe steering support? I have pedals to make also.
 

Attachments

  • 2016_08_06_bracket01.jpg
    2016_08_06_bracket01.jpg
    82 KB · Views: 14
  • 2016_08_06_bracket02.jpg
    2016_08_06_bracket02.jpg
    234.5 KB · Views: 13
  • 2016_08_06_bracket03.jpg
    2016_08_06_bracket03.jpg
    79.7 KB · Views: 11
  • 2016_08_06_bracket04.jpg
    2016_08_06_bracket04.jpg
    74.4 KB · Views: 15
Status
Not open for further replies.
Top