Newbie here. Rebuilding carter gx150IIr

Status
Not open for further replies.

Sandmanbjj

Well-known member
Messages
218
Reaction score
257
Slowly getting there. I decided to buy the paint by the quart and use the harbor frieght hvlp sprayer to knock it out. Its bright hahaha. I am going to hit it with some other colors to dress it up some.
Then i will start the assembly. I painted over some things i will be replacing anyway so i know it is an old school earl schrive paint job but it is not rusting any more
 

Attachments

  • 20181003_114121.jpg
    20181003_114121.jpg
    479.7 KB · Views: 10
  • 20181003_143224.jpg
    20181003_143224.jpg
    448.1 KB · Views: 13
Last edited by a moderator:

Sandmanbjj

Well-known member
Messages
218
Reaction score
257
I about got it covered in paint. Going to put some accent colors just to break up the yellow. (My girls want purple so i guess this will be an LSU theme kart).
I will start assembing tomorrow most likely.
 

Attachments

  • 20181004_113741.jpg
    20181004_113741.jpg
    590.4 KB · Views: 9
  • 20181004_113749.jpg
    20181004_113749.jpg
    431.8 KB · Views: 9
  • 20181004_113756.jpg
    20181004_113756.jpg
    532.9 KB · Views: 7

Sandmanbjj

Well-known member
Messages
218
Reaction score
257
Got the old bearings off the rear axel, the new ones on. And have it bolted in place. Now to bolt it back on the rest of the kart.
 

Attachments

  • 20181005_131034.jpg
    20181005_131034.jpg
    488.2 KB · Views: 12
  • 20181005_131015.jpg
    20181005_131015.jpg
    566.7 KB · Views: 6

Sandmanbjj

Well-known member
Messages
218
Reaction score
257
I put the axel on backwards. The sproket should be on the other side.
 

Sandmanbjj

Well-known member
Messages
218
Reaction score
257
Quick question. How free should the rear axel spin when all that is attached is the bearings? I have them bolted up and can turn the axel but it has resistance.
 

Sandmanbjj

Well-known member
Messages
218
Reaction score
257
A pic of the bearings bolted up to the frame
 

Attachments

  • 20181008_145817.jpg
    20181008_145817.jpg
    447.6 KB · Views: 8
  • 20181008_145821.jpg
    20181008_145821.jpg
    354.9 KB · Views: 9

Sandmanbjj

Well-known member
Messages
218
Reaction score
257
I got my axel fixed up. Just got new break lines and calipers in the mail today along with new throttle cable, new clutch cable and an air filter. Got the reverse assembly and carb on the motor. So i am going to start mounting this stuff.
 

Sandmanbjj

Well-known member
Messages
218
Reaction score
257
What part am i missing?

Hey guys, i mounted my motor on my 05 carter talon gx150IIR. I am not sure what the back mounting point mounts to. I only have the bare bones motor on, and reverse assembly. Is there a bracket im missing?
 

Attachments

  • 20181016_145424.jpg
    20181016_145424.jpg
    901.3 KB · Views: 14
  • 20181016_145415.jpg
    20181016_145415.jpg
    880.2 KB · Views: 15
  • 20181016_145411.jpg
    20181016_145411.jpg
    755.8 KB · Views: 15

itsid

Moderator
Staff member
Messages
11,563
Reaction score
245
Location
Ruhrpott [Germany]
Hi first of all:
please keep all related questions together
(i.e. stick with this thread instead of creating new ones for specific parts)
I merged the two threads for you .

There is a motor mounting Fork (Don't know how to describe that differently)
you'll find it in the GSX manual on page 54

'sid

PS as you can see it's a fairly std part... you can mock one up with hardware store items yourself if you don't have the original part and are unable to find one online.
[EDIT]
just found the parts on carterbrothersparts.com.. I still think hardware store is as simple and cheaper (maybe even easier ;)) but at least you know where to find backup ;)
 

Attachments

  • motor_mount.jpg
    motor_mount.jpg
    382.8 KB · Views: 18

Sandmanbjj

Well-known member
Messages
218
Reaction score
257
Thanks a bunch sid. Yeah i wasnt sure where i should post that. I guess its directly related. Brain fart.
I have to download that manual. The one i downloaded doesnt have a lot of the exploded parts. Thanks again!
 

Sandmanbjj

Well-known member
Messages
218
Reaction score
257
Made my own bracket from an old caster that i drilled out. It fits. Motor is now mounted. Got the new calipers, master cylinder and break lines on. Going to change the throttle cable and clutch cable next.
I only get about an hour a day if that to mess with it. So this is taking longer than i want, but its getting there

I will post a pic of what i did and you guys can tell me how bad it is. Ha. Or tell me if you see it being an issue. Im going to order the correct parts soon.
 

Sandmanbjj

Well-known member
Messages
218
Reaction score
257
Here is my home made bracket
 

Attachments

  • 20181018_173342.jpg
    20181018_173342.jpg
    420.8 KB · Views: 18

Sandmanbjj

Well-known member
Messages
218
Reaction score
257
Installed my carburetor, lines and gas tank. I also have my brakes installed, new throttle cable and new reverse cable in. About to see if i can salvage the exhaust pipe and muffler
 

Attachments

  • 20181025_153551.jpg
    20181025_153551.jpg
    300.4 KB · Views: 12
  • 20181025_153540.jpg
    20181025_153540.jpg
    476.5 KB · Views: 17
  • 20181025_153530.jpg
    20181025_153530.jpg
    435.6 KB · Views: 14

Sandmanbjj

Well-known member
Messages
218
Reaction score
257
This may be showing my ignorance. But the nipple in the picture i have a blue arrow pointing to. and I believe the corresponding manual pic are the same. Does that nipple have a hose that stays open to air. Its listed as a breather tube.
Any help would be appreciated.
 

Attachments

  • 20181028_095749.jpg
    20181028_095749.jpg
    143.3 KB · Views: 9
  • 20181028_100117.jpg
    20181028_100117.jpg
    453.7 KB · Views: 15

itsid

Moderator
Staff member
Messages
11,563
Reaction score
245
Location
Ruhrpott [Germany]
chances are it's open to air, yes..

some add a "catch can" just in case some oils comes dripping out the tube...
But if none's listed in the manuals, the kart came without one originally.

'sid
 

Sandmanbjj

Well-known member
Messages
218
Reaction score
257
I was not able to salvage my exhaust. That sucked, it was just too rusted.
I got the chain on and managed to put the master link the correct way. Got my airbox on and connected to my carb. I have the seat put back together. But i wont install it until i get all the electrical components connected back up to their appropriate places and wires tucked neatly away. I hope that goes smooth. Then i will do a final check on all the nuts and bolts, fill it with oil and gas.... then come back here when it doesnt start! Hahah.
 

67StingrayJ

Member
Messages
73
Reaction score
0
Hey guys, I just wanted to post and say keep this thread alive. I just bought a Carter Talon (not sure what model, year, make, code, etc). I can say, the thing is identical to the one that Sandman is working on. The thing runs great but is in rough condition. My biggest complaint is the lack of power. I mean it does what it's supposed to but being that it's only a 150cc, I can't get into sand, or anything too steep of grade. Anyhow, I'll post photos soon.

---------- Post added at 09:43 PM ---------- Previous post was at 09:32 PM ----------

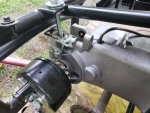
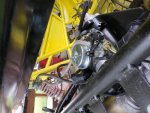
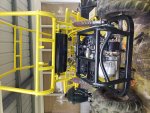
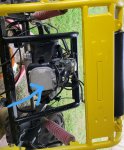
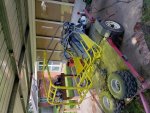
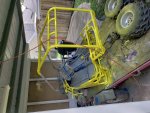
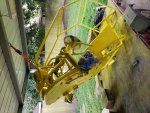
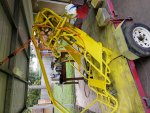
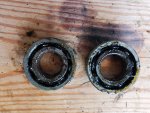
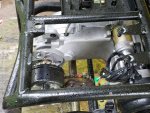
I got my Tc today. But wont mess with it until i get closer to installing the motor. I have stripped a bunch of old paint and rust off. Primed the top half. My goal is not a prestine paint job but more to stop the rust and corrosion from getting worse. So i have been grinding and sanding a bunch. Took off the gas tank, stripped the paint, sanded any rust spots, primed it and painted it. I have a new petcock im installing on it then it will be ready to be out back on the kart when i get every thing cleaned up. I will post a few pics of my current progress shortly

Hey Sandman, great work. Seriously, and thanks. I'll be following in your footsteps here soon.

Where did you get the Petcock you installed? Was there anything specific you had to look for when you got one? Thread sizes? Tube diameters? etc. Does your mount directly to the underside of the factory tank?

Maybe I could talk you into taking a few pictures, and possibly posting a link to what you used?
 

Sandmanbjj

Well-known member
Messages
218
Reaction score
257
I am happy to help. This forum has been gracious enough to help me, im happy to help you as best i can. I have not finished my cart yet. I am getting there. I need to get a battery, fill the engine with fluids, change the back tires, bolt the seat and fenders on. Then see if it goes.
I got my petcock from buggy depot. They have verified fit parts for the carters. Lots of the smaller parts ive needed i have gotten there. I will post a link to the petcock itself but not sure if it is allowed.
http://www.buggydepot.com/product/563/petcock-inline-vacuum-auto-shut-off-valve.html
 
Status
Not open for further replies.
Top