Modified Grand Daddy Build

Econdron

Member
Messages
44
Reaction score
38
I don't know where you got that small sprocket, but you have the shop to make it right. I'm sure your kart will run as is, but having a small drive sprocket sitting
out on the end of the jack shaft like that is going to tear the Hell out of the bearings in the mounting plate, and possibly bend the shaft itself, depending on the load placed on it. The sprocket should sit between the plate and the driven clutch. I have never seen one with such a long shoulder on it. The shoulder should be 1/4" on each side of the sprocket. This will push the driven clutch out on the jack shaft about another inch. You might not have enough crankshaft length to slide the driver outwards 1" . The fix is to turn the driver around 180 degrees. Flip it so the bell end is in towards the engine. It will run exactly the same. The belt is the same angle on both sides, so it makes no difference. I have a nice high powered kart sitting in my side yard with the exact same 40 series converter on it, set up as I have explained. It won't last long as you have it set up in the picture you posted.
That sprocket actually came with it. The pictures for the torque converter online showed it had a 12T sprocket, but it came with a 10T, which is actually what I wanted. But thanks for the insight, we'll get this flipped around!
 

Econdron

Member
Messages
44
Reaction score
38
We did get the kart up and running on Friday and took it for a test drive. It felt a little... Doggish? If that's the right word. Bogged down, slow, etc. I really don't have much to compare this too, but I was expecting a little more from the stock engine. I'm going to go ahead and order the stage 2 performance kit from Go Power Sports and get the Mikuni carb for it. I decided I didn't want to have a custom built, "professionally" made kart that really skimped on the performance of the engine.

After the engine has been re-worked, what needs to be done to the torque converter? I've read about different springs and weights, can someone point me in the right direction on this? Where to buy, which ones to buy, etc?

Other than that I was a little disappointed by the braking performance. You have to push pretty hard on the brake pedal to make a sudden stop at relatively low speeds. I'm considering making a longer leverage arm, but I also don't want to break it.

Steering was also a little hard, but not too terrible. I may consider also making longer steering arms on the spindles.

We're just tweaking the main functional details right now, then we'll finish up the rest of the frame and make it look nice!
 

BaconBitRacing

Well-known member
Messages
2,184
Reaction score
1,299
Location
N.C.
We did get the kart up and running on Friday and took it for a test drive. It felt a little... Doggish? If that's the right word. Bogged down, slow, etc. I really don't have much to compare this too, but I was expecting a little more from the stock engine. I'm going to go ahead and order the stage 2 performance kit from Go Power Sports and get the Mikuni carb for it. I decided I didn't want to have a custom built, "professionally" made kart that really skimped on the performance of the engine.

After the engine has been re-worked, what needs to be done to the torque converter? I've read about different springs and weights, can someone point me in the right direction on this? Where to buy, which ones to buy, etc?

Other than that I was a little disappointed by the braking performance. You have to push pretty hard on the brake pedal to make a sudden stop at relatively low speeds. I'm considering making a longer leverage arm, but I also don't want to break it.

Steering was also a little hard, but not too terrible. I may consider also making longer steering arms on the spindles.

We're just tweaking the main functional details right now, then we'll finish up the rest of the frame and make it look nice!
This is always a process, ain't nothing comes easy.
 

panchothedog

Well-known member
Messages
1,433
Reaction score
1,959
For your 40 series torque converter the stiffer springs and lighter weights that go into the driver (engine ) clutch will really help BUT ONLY if the govoner is removed. With both springs and weights it will raise the clutch engagement by about 1000 rpm from 1600 to 2600 rpm. If the govoner is still active you will run
out of rpm long before the clutch gets into high gear. I don't know what your
stage 2 kit includes but a different cam and stronger valve springs so that the engine can get up to the 5000 to 6000 rpm range will really let it take advantage
of the clutch modifications. Go Power Sports sells everything you need for the engine and the clutch. So does OMB Warehouse.
 

Econdron

Member
Messages
44
Reaction score
38
For your 40 series torque converter the stiffer springs and lighter weights that go into the driver (engine ) clutch will really help BUT ONLY if the govoner is removed. With both springs and weights it will raise the clutch engagement by about 1000 rpm from 1600 to 2600 rpm. If the govoner is still active you will run
out of rpm long before the clutch gets into high gear. I don't know what your
stage 2 kit includes but a different cam and stronger valve springs so that the engine can get up to the 5000 to 6000 rpm range will really let it take advantage
of the clutch modifications. Go Power Sports sells everything you need for the engine and the clutch. So does OMB Warehouse.

Thank you! I did find the stall kit at GoPowerSports:

2,600 RPM Stall Kit, 40 Series - GoPowerSports.com

While messing around with the kart yesterday, we found the pedal was only partially opening the throttle. We tightened that up a bit and it feels a lot more like what I was expecting. It takes off pretty quick and gets up to a good 30ish MPH. I think I will keep it like this, at least for now.

Incorporating the Ackermann angle now and building the roll cage today/tomorrow.
 

panchothedog

Well-known member
Messages
1,433
Reaction score
1,959
Glad to hear you found some hidden horsepower. Getting full throttle sure helps in those situations. In your post the other day you sounded pretty disappointed. Not so anymore. GOOD.
 

Econdron

Member
Messages
44
Reaction score
38
I had one of the guys here who is an off-road enthusiast take the kart out, and basically try to break it, with the intention of trying to find weak points in the design to reinforce. Which he did, but it happened before he even got off road. He went over a speed bump in the parking lot and it shattered the bearings in both front wheel hubs. I'm hoping I just selected cheap hubs and the bearings were low quality. I ordered these hubs as replacements:

4 x 4 Heavy Duty Wheel Hub (Front with 5/8" Bearing) | K260056 | BMI Karts And Parts

I couldn't find much info on why these ones are "heavy duty" and the other ones aren't, but hopefully this solves that issue. He did also point out a pretty significant weight imbalance "feel" while driving. When turning at mid speed, the kart would keep skidding forward and make a pretty rough turn. Maybe won't be much of an issue on turf, but I'm hoping the final build will put some extra weight on the front end.
 

Denny

Canned Monster
Messages
8,492
Reaction score
4,726
Location
Mayberry, Indiana
Before you run those hubs replace those bearings. The ones with the cheap steel seals like those bearings never last. Buy a sealed bearing and remove one of the seals so they can get grease when you grease the hubs. I hope you can understand what I mean. You’ll want the sealed bearings with the giant snap ring around them. Flanged bearings. BMI also carries them.
 

Econdron

Member
Messages
44
Reaction score
38
Before you run those hubs replace those bearings. The ones with the cheap steel seals like those bearings never last. Buy a sealed bearing and remove one of the seals so they can get grease when you grease the hubs. I hope you can understand what I mean. You’ll want the sealed bearings with the giant snap ring around them. Flanged bearings. BMI also carries them.
You're referring to bearings like these?:

Flanged Wheel Bearing (5/8" x 1-3/8") | 300171 | 15300000041 | BMI Karts And Parts

Or the high speed version:

High Speed Wheel Bearing with Snap Ring (5/8" x 1-3/8") | 600630 | AZ8205 Azusa 8205 | BMI Karts And Parts
 

Denny

Canned Monster
Messages
8,492
Reaction score
4,726
Location
Mayberry, Indiana
High speed with the snap ring. If you remove the inner seal and add a zerk to the hub that will make them greaseable. I use a marine wheel bearing grease if it is going to see water to protect the bearings from moisture. But I’m weird like that.
The all steel bearings are a lower quality, low speed bearing.
 

BaconBitRacing

Well-known member
Messages
2,184
Reaction score
1,299
Location
N.C.
High speed with the snap ring. If you remove the inner seal and add a zerk to the hub that will make them greaseable. I use a marine wheel bearing grease if it is going to see water to protect the bearings from moisture. But I’m weird like that.
The all steel bearings are a lower quality, low speed bearing.
Yep made for carts, not karts. Also wheelbarrows and other low speed rollers.
 

Econdron

Member
Messages
44
Reaction score
38
Are those high speed bearings I linked to above a good enough quality? Seems kind of odd BMI would sell wheel hubs for go karts under their go karts section if they weren't intended for use with go karts.
 

TNThomas

Well-known member
Messages
386
Reaction score
369
Location
Washington
Are those high speed bearings I linked to above a good enough quality? Seems kind of odd BMI would sell wheel hubs for go karts under their go karts section if they weren't intended for use with go karts.
I agree with that logic. Its simple enough to swap them out if they hand-grenade on you anyways, I say run what you got and solve problems as they come.
 

Econdron

Member
Messages
44
Reaction score
38
We're having some issues with the hydraulic brakes. They will stop the kart, but relatively slowly, and the piston is fully extended. I do not see any air bubbles in the lines, and we've gone back and forth pumping the brake pedal, opening and closing a bleed screw, releasing the pedal, waiting, and repeating. I'm not seeing bubbles in the fluid coming out. We spent a good amount of time repeating this process and went through a whole small bottle of brake fluid and have not gained any noticeable improvement in the braking performance.

Is there any adjustment on the brake pads that can be made so their resting place is closer to the rotor? I feel like I'm missing something obvious. We originally had the brake system mounted upside down, with the bleed screws on the bottom, but we realized that and flipped it over. We also had some issues with air in the lines that was not moving at all with the bleeding process, but we got that corrected as well, to the best of my knowledge anyway.
 

TNThomas

Well-known member
Messages
386
Reaction score
369
Location
Washington
If I had to guess, you might need a second disc break. Remember frictional force works in the opposite direction of your movement. So that single itty bitty (small radius) disc is basically acting like a little lever dragging on the break pads, there is a decent amount of momentum in your kart at speed, and you likely need another disk, or you might be able to get away with a larger diamete (taller) disc. Im going with a duel disc setup myself. Even mist standard motorcycles have duel dusc breaks up front, and 1 or 2 in the rear. They are usually taller too. I think most break setups are designed around smaller karts/scooters, hence the issues you listed. For cheap you could try running a mechanical break with a hand lever, or better yet rig up a few. I was thinking of doing this to act as a parking break if I could somehow lock the lever in the engaged position, sort of like an e-brake in a car.
 

redflash

Well-known member
Messages
650
Reaction score
619
I had the same problem.....what I figured out in reflection was that my disc was not as thick as the caliper required. On line there are 5-6 different thicknesses of disc, and the calipers are rated by what the thikness of the disc is. My caliper was rated for a thicker disc, and I had not noticed that.
so I took the pucks out and welded a 1/16 washer on each and that ended up being just perfect, and the calipers now clamp the disc correctly.

Da redflash
 

Econdron

Member
Messages
44
Reaction score
38
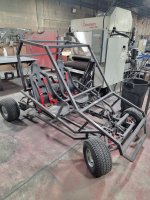
Well sorry for the lack of updates, we've gotten pretty busy here at the shop these last couple weeks and unfortunately hobby go kart builds are the least of our priorities! We have made some slow progress, I attached the pictures of the current build. As it is, it's ready to drive. I think I want to shorten the front bumper a little though, I think it's too close to the ground.

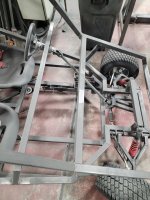
We did incorporate the Ackermann angle too. It was such a slight change, but it's crazy how visible the different angles the wheels turn at. This did end up causing us to lose some turn radius because as the wheels turned, the tie rod ends lined up perfectly in line with the spindle steering arm, so the steering would seize up and we couldn't turn back, if that makes sense. But I suppose it's possible the Ackermann angle allows a tighter turn radius, so maybe we didn't lose anything? We welded in some stops so it wouldn't seize up any more.

I have a polished sheet of aluminum diamond plate I'm going to CNC cut for the floor, but I want to save that for last to ensure all the holes cut out of that will be in the correct location. We're also going to make some custom, heavy duty pedals. Mainly "just for fun", but then I can offset the pedals to center them with the seat and they'll also have a larger, heavier duty feel to them. I was planning on CNC cutting them from 3/8" plate and bending to size:

Pedals.jpg

I also bit the bullet and decided to add a FNR gear box. I could only find one option for this for a 40 series engine:

40-SERIES-GO-KART-FORWARD-REVERSE-GEAR-BOX (blastled.com)

Hopefully it works out well, but this is definitely going to take some customizing to get everything right. I just feel like this kart will get used MUCH more if it's easy to simply reverse the kart out of the garage vs having to push it out. I'll need to confirm, but it does say the forward position is geared down 1:2, so if that's true, I'll need to change the sprockets around to get the same speed we currently have.

Some other work we still have to do include adding a second set of shocks to the rear (the one set that is currently shown is WAY too soft), wire up the battery, and lights, then do the final finishings like the floor, sheet metal, dash, handles, maybe some steps, etc.

I've seen some very simple speedometers for bikes that I think I can configure for the go kart, it would be nice to have a speedometer on here. That's about it. I have no idea how much longer until this is complete, hopefully the FNR transmission gets here soon and we can have this all finished up next week, but that's being VERY optimistic.
 

Attachments

  • 20230426_154303.jpg
    20230426_154303.jpg
    2 MB · Views: 14
  • 20230426_154311.jpg
    20230426_154311.jpg
    2.2 MB · Views: 15
  • 20230426_154321.jpg
    20230426_154321.jpg
    1.7 MB · Views: 15
Top