
You are using an out of date browser. It may not display this or other websites correctly.
You should upgrade or use an alternative browser.
You should upgrade or use an alternative browser.
Manco Dominator solid axle project
- Thread starter Herky
- Start date
- Status
- Not open for further replies.

Anyone have a closeup of their wheel mounts on this style axle? looks like I have a choice as to how far out the wheels go...don't have the nuts yet (so to speak)
The further out you have the wheels, the more chance there is of the axle bending. Try keep the wheels as close to some sort of support as possible, like a hanger or bearing. This reduces the stress on the axle
I have the 1" axle with the 3/4" step down, but it looks like the way the wheels mount, it would be better to have the axle with a constant 1" all the way across (including the threaded ends).
Anyone have a picture of their live axle wheel mounting?
Anyone have a picture of their live axle wheel mounting?
SCK
Custom builder
Thats pretty sweet kart! Keep up the good work
I'm back at my project...I'm looking for wheels now...I have access to machining, and was thinking about alternatives for a second manco rear drive wheel.
I already have a 1" axle with a 3/4" step down. any thoughts on how to use wheels with a 1" bore hole?
I already have a 1" axle with a 3/4" step down. any thoughts on how to use wheels with a 1" bore hole?

coltsmith
New member
- Messages
- 2
- Reaction score
- 0
your have a 1" axle with 3/4 threads? you can use 1" heavy wall pipe or round stock and weld a bolt on the end for your axles in the future. Just make sure you get good penetration when welding. I would recomend using a stick welder unless you have a large mig.
headway
after another break, I was able to get up to Montana to visit my uncle in his AWESOME machine shop! He thought he had some 1" steel for an axle, but after digging it out of his scrap pile, we realized it was 1 1/8"!
It was 4pm, but we decided to make a mad run for Pacific Steel in Missoula, about 35 min north of us in Florence, and they were able to cut us a piece of 1" x 48" for $16, which I thought was reasonable.
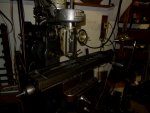
We cut 1/4" keyways on monday night on his milling machine (made in 1893, btw, no ****!), and it was almost 10pm, so we knocked it off for the night.
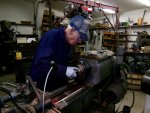
Tuesday mid morning we were able to get the axle off the milling table and into the lathe (1940s Italian model...jumping up in technology!) and turned the ends down to 3/4" , then cut some #16 fine threads into the ends.
I had to leave Wednesday, but left the axle and rims with him to finish for me this week...still need keyways cut on 3/4" ends, as well as in our rims.
Our rims ID were .0015 larger than 1"...anyone have any idea why? is it for grease or oil? bought them off flea bay.
Back home in Dallas now, waiting for our finished parts in the mail. Ready to start mounting the motor!!
:toetap05:
after another break, I was able to get up to Montana to visit my uncle in his AWESOME machine shop! He thought he had some 1" steel for an axle, but after digging it out of his scrap pile, we realized it was 1 1/8"!
It was 4pm, but we decided to make a mad run for Pacific Steel in Missoula, about 35 min north of us in Florence, and they were able to cut us a piece of 1" x 48" for $16, which I thought was reasonable.
We cut 1/4" keyways on monday night on his milling machine (made in 1893, btw, no ****!), and it was almost 10pm, so we knocked it off for the night.
Tuesday mid morning we were able to get the axle off the milling table and into the lathe (1940s Italian model...jumping up in technology!) and turned the ends down to 3/4" , then cut some #16 fine threads into the ends.
I had to leave Wednesday, but left the axle and rims with him to finish for me this week...still need keyways cut on 3/4" ends, as well as in our rims.
Our rims ID were .0015 larger than 1"...anyone have any idea why? is it for grease or oil? bought them off flea bay.
Back home in Dallas now, waiting for our finished parts in the mail. Ready to start mounting the motor!!
:toetap05:
Attachments
-
 DSCN0242.jpg92 KB · Views: 22
 -
 DSCN0241.jpg70.9 KB · Views: 26
 -
 DSCN0245.jpg93.1 KB · Views: 32
 -
 rim without keyway.jpg32 KB · Views: 21
Nice work. Those old milling machines last forever!!
Lots of steel in those old overhead machines...keeps things flat and true according to my uncle.
His drive mechanism for the table is actually an old drill motor connected via a universal joint to the table. He controls speed via a rheostat on the wall! even that part might be 60 years old lol!!
I may inherit some of his machines and tooling some day...trying to learn as much as I can from him while I can...hard to do when he's in Montana and I live in Dallas. He's 82!
His drive mechanism for the table is actually an old drill motor connected via a universal joint to the table. He controls speed via a rheostat on the wall! even that part might be 60 years old lol!!
I may inherit some of his machines and tooling some day...trying to learn as much as I can from him while I can...hard to do when he's in Montana and I live in Dallas. He's 82!
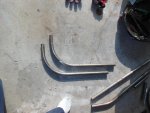
took some trying but I found a commercial electrician to use his electric bender to bend my 1" tubing. I didn't get a choice on bend radius...looks like a 5" radius or so...but I think it will work.
I picked up some steel plate for the new motor mount also.but I think it's too big. (3/8"). Hard to work with that thick of material, and I don't think it's necessary.
Garland Steel here in E. Dallas charged me $15 for 35 lbs of scrap off their break machine. Said they'd charge another $35 to cut it to my preferred size. It's new material, but seems expensive to me...Hey I thought steel prices were down??
My plan is to move the motor to the center-right and add some tubing and plate steel for the mount, then mount some sort of jack shaft running to the torque converter, which in turn will run to the sprocket off the jack shaft on the LEFT side of the motor (TAV will be on RIGHT side of motor).
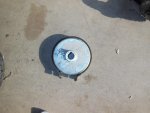
Oh, here's my BFB...a 6" band brake! it's HUUUUGE!!! lol
I picked up some steel plate for the new motor mount also.but I think it's too big. (3/8"). Hard to work with that thick of material, and I don't think it's necessary.
Garland Steel here in E. Dallas charged me $15 for 35 lbs of scrap off their break machine. Said they'd charge another $35 to cut it to my preferred size. It's new material, but seems expensive to me...Hey I thought steel prices were down??
My plan is to move the motor to the center-right and add some tubing and plate steel for the mount, then mount some sort of jack shaft running to the torque converter, which in turn will run to the sprocket off the jack shaft on the LEFT side of the motor (TAV will be on RIGHT side of motor).
Oh, here's my BFB...a 6" band brake! it's HUUUUGE!!! lol
Attachments
-
 DSCN0314.jpg94.2 KB · Views: 27
 -
 DSCN0311.jpg84.6 KB · Views: 32
 -
 DSCN0308.jpg97.1 KB · Views: 26
more work
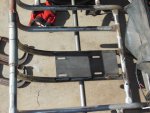
rounding up the last big pieces...finally have it narrowed down how I'm going to rig this thing up in the back!
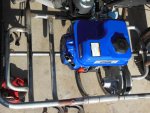
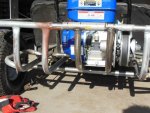
Here is the finished motor mount which was moved over. I plan on putting a jackshaft (somewhere) maybe above or even below the torque converter. I'll put the main sprocket on the left where the old motor mount was, and just outboard from that, the BFB.
Only problem I have is that now, I can't get the darn bolts underneath the motor mount because it's so close to my tubing support. Had to do it this way because of the narrow setup of the TAV.
I started grinding the tubing away for relief for a nut and washer, but got tired tonight. Worked all day on this project.
waiting for my jackshaft and sprocket hub from BMI now. I think the end is in sight!
rounding up the last big pieces...finally have it narrowed down how I'm going to rig this thing up in the back!
Here is the finished motor mount which was moved over. I plan on putting a jackshaft (somewhere) maybe above or even below the torque converter. I'll put the main sprocket on the left where the old motor mount was, and just outboard from that, the BFB.
Only problem I have is that now, I can't get the darn bolts underneath the motor mount because it's so close to my tubing support. Had to do it this way because of the narrow setup of the TAV.
I started grinding the tubing away for relief for a nut and washer, but got tired tonight. Worked all day on this project.
waiting for my jackshaft and sprocket hub from BMI now. I think the end is in sight!
Attachments
-
 DSCN0331.jpg106.5 KB · Views: 31
 -
 DSCN0332.jpg100.7 KB · Views: 25
 -
 DSCN0334.jpg117.4 KB · Views: 40
 -
 DSCN0335.jpg107 KB · Views: 29
 -
 DSCN0336.jpg105.7 KB · Views: 35
I didn't realize I was going to have to put the motor so far forward due to the TAV and the huge radius bends in my support tubing (electrician's bender only has that radius...no other choice).
I took the muffler off of my Greyhound 6.5 clone, and it looks like I could easily weld a pipe on in place of the muffler...might sound cool...dunno. Anyone run a straight exhaust with no muffler on one of these engines?
I'll run it just past the gas tank and angle it up and away. Don't have a bender, but I do have a scrap piece of pipe with a 90 in it already. Looks like it will slip over the stock exhaust pipe stub that will be left over after I chop the muffler off the end!
I took the muffler off of my Greyhound 6.5 clone, and it looks like I could easily weld a pipe on in place of the muffler...might sound cool...dunno. Anyone run a straight exhaust with no muffler on one of these engines?
I'll run it just past the gas tank and angle it up and away. Don't have a bender, but I do have a scrap piece of pipe with a 90 in it already. Looks like it will slip over the stock exhaust pipe stub that will be left over after I chop the muffler off the end!
mckutzy
Well-known member
Set the kill to the off position. Slowly pull the handle to check the rotation.
Its a common mistake, people think the cylinder should face forward. These type are a slant rear motor.
I run a straight pipe on my bike, but depending if you also change the air filter or not you may have to rejet the carb.
Its a common mistake, people think the cylinder should face forward. These type are a slant rear motor.
I run a straight pipe on my bike, but depending if you also change the air filter or not you may have to rejet the carb.

OzFab
Well-known member
you have the engine mounted backwards, my friend...
Yep, PTO needs to be on the left, starter on the right

machinist@large
Active member
Oops!!
Unless you have some rare, reverse rotation model the rest of us haven't heard of (or you flipped the photo before posting) then your engine is installed backwards. Standard rotational direction for industrial engines (like yours) is clockwise as seen from the front (pull start side) of the engine. The PTO (power take off) side rotates counter clockwise. As installed in your kart, you're going to be running in reverse.

As for the bend radius on your tubes; the radius is standardized based on the dia. and wall thickness of the tube/ pipe. The only way you would get to choose your radius is if you make/ have custom made your own dies.

Unless you have some rare, reverse rotation model the rest of us haven't heard of (or you flipped the photo before posting) then your engine is installed backwards. Standard rotational direction for industrial engines (like yours) is clockwise as seen from the front (pull start side) of the engine. The PTO (power take off) side rotates counter clockwise. As installed in your kart, you're going to be running in reverse.
As for the bend radius on your tubes; the radius is standardized based on the dia. and wall thickness of the tube/ pipe. The only way you would get to choose your radius is if you make/ have custom made your own dies.
- Status
- Not open for further replies.