It's The Little Things That Make The Biggest Difference

Status
Not open for further replies.

OzFab

Well-known member
Messages
15,615
Reaction score
67
Location
Warwick Qld, Australia
To save creating a thread everytime I do something, this thread will serve as a place for all the little jobs & fixes I do around here, a bit like Dougs "The Poboy Way" thread...

At the moment, my big air compressor isn't running so, I have to rely on my small back-up unit. The biggest problem with it, which has annoyed me since I bought it, is the small, useless, plastic wheels; ironically, the same size compressor at my ex's house has more robust rubber wheels, you'd thing I'd simply swap them but, that would be too easy :lolgoku:

To add insult to injury, the 10mm axle runs through 1/2" (12.7mm) holes so, not only are the wheels hard & clunky but, tha axle swings around in the mounting holes too; add to that fact that the wheels are only held on the axle by a push in plug... which tend to be self removable...

Today I decided to do something about it; I had some 1/2" round bar sittiing around which I could use as a replacement axle, now all I needed was replacement wheels...

Remember the small, useless edger from this thread? Turns out it does have a use, the wheels make perfect replacements...

After measuring the distance between to two mounting holes & the depth of the new wheels I cut the 1/2" bar to length, turned the ends to take the 10mm wheels & cut a 10mm thread on each end; a quick squirt of paint to keep the rust away &... WOW! What a difference...
 

Attachments

  • IMAG0340[1].jpg
    IMAG0340[1].jpg
    110.5 KB · Views: 20
  • IMAG0341[1].jpg
    IMAG0341[1].jpg
    59.9 KB · Views: 22
  • IMAG0353[1].jpg
    IMAG0353[1].jpg
    141.1 KB · Views: 19
  • IMAG0354[1].jpg
    IMAG0354[1].jpg
    108.2 KB · Views: 18
  • IMAG0343[1].jpg
    IMAG0343[1].jpg
    82.8 KB · Views: 19
  • IMAG0356[1].jpg
    IMAG0356[1].jpg
    59.4 KB · Views: 21
  • IMAG0355[1].jpg
    IMAG0355[1].jpg
    80.8 KB · Views: 16
  • IMAG0352[1].jpg
    IMAG0352[1].jpg
    140.3 KB · Views: 19
  • IMAG0345[1].jpg
    IMAG0345[1].jpg
    104.9 KB · Views: 19
  • IMAG0346[1].jpg
    IMAG0346[1].jpg
    75.8 KB · Views: 22

OzFab

Well-known member
Messages
15,615
Reaction score
67
Location
Warwick Qld, Australia
Here's a little tip I learned: When starting a thread on round bar, I place the bar in the head chuck of my lathe with the drill chuck in the tail stock; I then sandwich the die between the bar & the open drill chuck. As I turn the die onto the bar, I wind in the tail stock, which keeps the drill chuck in contact with the die, keeping it straight & square on the round bar.

Once the thread is established, I can then move the round bar to my bench vice & continue/complete the job...
 

Attachments

  • IMAG0347[1].jpg
    IMAG0347[1].jpg
    74.1 KB · Views: 31
  • IMAG0348[1].jpg
    IMAG0348[1].jpg
    66.7 KB · Views: 22

OzFab

Well-known member
Messages
15,615
Reaction score
67
Location
Warwick Qld, Australia
A couple of weeks ago, I picked up a couple of trolleys (or dollys, whatever you want to call them) sans wheels thinking I have wheels at home, I can fix these; the larger blue one will be easy, just fit new wheels but, the smaller orange one only had a 1/2" axle...

As I didn't have any wheels that would fit, I set about modifying the axle; I found a length of round bar that fit the hubs perfectly after a quick clean so, I cut two pieces to the desired length & bored the centres to fit the existing axle, which I had removed from the trolley, cleaned & cut down...

I then made 2 spacers to act as a backstop for the wheels & cross drilled a 1/8" hole in one end of each of the new large axle ends, welded it all together & then into the trolley frame...

It's all rubbed down, ready for paint but, it's cuttently raining...
 

Attachments

  • IMAG0365[1].jpg
    IMAG0365[1].jpg
    100.5 KB · Views: 9
  • IMAG0357[1].jpg
    IMAG0357[1].jpg
    113.9 KB · Views: 8
  • IMAG0359[1].jpg
    IMAG0359[1].jpg
    77.4 KB · Views: 10
  • IMAG0358[1].jpg
    IMAG0358[1].jpg
    133.4 KB · Views: 9
  • IMAG0364[1].jpg
    IMAG0364[1].jpg
    79.3 KB · Views: 9
  • IMAG0363[1].jpg
    IMAG0363[1].jpg
    80.8 KB · Views: 11

OzFab

Well-known member
Messages
15,615
Reaction score
67
Location
Warwick Qld, Australia
Thanks; the biggest problem is I HAVE TOO MANY! :lolgoku: I've had a kart frame standing in the corner for two & a half years waiting for an engine...
 

Poboy kartman

Senior Moments Member
Messages
12,461
Reaction score
66
Location
White Settlement Texas
Don't feel too bad.....I had the Manco finished (except for tires) shortly after joining this forum.....I somehow screwed up the timing on the Tecumseh....so...I finally got around to that less than 2 hour job a couple of weeks ago.......
 

OzFab

Well-known member
Messages
15,615
Reaction score
67
Location
Warwick Qld, Australia
I'm not sure "bad" is the best word... overwhelmed, frustrated, anxious maybe...

I managed to lay two coats of international orange on the trolley yesterday; spraying in the back yard &, just as I was finishing the second coat, it starts raining...

Also laid a coat of aluminium on the wheels, not too happt with the colour though, it's more of a dull grey than bright aluminium...
 

Attachments

  • IMAG0367[1].jpg
    IMAG0367[1].jpg
    95.8 KB · Views: 15
  • IMAG0368[1].jpg
    IMAG0368[1].jpg
    93.6 KB · Views: 20

Denny

Canned Monster
Messages
11,628
Reaction score
8,065
Location
Mayberry, Indiana
AAwwwwww, Someone didn't shake the can of paint for the required 2 1/2 hours and painted with high humidity. I'm telling Mom. :lolgoku:

Denny
:feedtroll:
 

OzFab

Well-known member
Messages
15,615
Reaction score
67
Location
Warwick Qld, Australia
Aparently, that's just how it comes out; it's high temp paint...

Edit: That's more like it; isn't it funny how different brand paints have a completely different finish...

Now I just need to make two tubes hold air...
 

Attachments

  • IMAG0378[1].jpg
    IMAG0378[1].jpg
    87.6 KB · Views: 16
Last edited:

OzFab

Well-known member
Messages
15,615
Reaction score
67
Location
Warwick Qld, Australia
Moving right along...

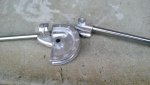
For some time I've been trying to make a catcher setup for my riding mower; the most difficult part to date has been bending the steel tube for the framework of the catcher itself; the cheapest quote I've had was over $100... for 8 bends!

Then I saw this; I knew it was only for copper or aluminium but, thought for $20, lets see what happens...

Well, it arrived the other day & out of the box (so to speak) the result is below which, IMO, isn't too bad considering; I knew it would probably need a bit of "beefing up" so, the first thing I did was replace the tube retainer mechanism. The original was inadequate at best, the tube had the opportunity to move around too much which can easily create unwanted errors...

Next part is to replace the single spacer/guide plate with two stronger pieces & replace the interference fit pint that hold the whole unit together with grade 8 bolts & nyloc nuts... once I finish the lock mech...
 

Attachments

  • IMAG0371.jpg
    IMAG0371.jpg
    101.4 KB · Views: 15
  • IMAG0377.jpg
    IMAG0377.jpg
    96.3 KB · Views: 14
  • IMAG0372.jpg
    IMAG0372.jpg
    132.2 KB · Views: 13
  • IMAG0374.jpg
    IMAG0374.jpg
    121.6 KB · Views: 13

OzFab

Well-known member
Messages
15,615
Reaction score
67
Location
Warwick Qld, Australia
So, I made a new lock mech, I made the new plates, put it all together, put the same piece of tube in, pulled on the handle &... see pic 1 for the results...

Anyhoo, some of you may recall some time ago I re...erm, built/engineered a lawn edger for my brother; well, a few weeks ago, I came across a pair of edgers the same, one little wonder & a chinese version, hopingh to do the same thing, create one out of both; since I still had some parts, I didn't see it being a problem... until I started playing with the chinese engine...

I managed to get it to run for a short time but, it just wouldn't idle; the next day, it wouldn't start at all so, I started at the beginning; fuel? check; spark? check; compression?... um, compression??? NOTHING!

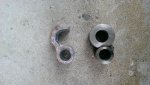
Today I opened it up & no wonder it had no compression...

Pic 2 is what was left after draining the oil...
Pic 3 is (or was) #1 compression ring
Pic 4 is #2 compression ring inside the bore...

New rings are on their way...
 

Attachments

  • IMAG0387[1].jpg
    IMAG0387[1].jpg
    34.4 KB · Views: 35
  • IMAG0386[1].jpg
    IMAG0386[1].jpg
    55.4 KB · Views: 33
  • IMAG0385[1].jpg
    IMAG0385[1].jpg
    81 KB · Views: 30
  • IMAG0384[1].jpg
    IMAG0384[1].jpg
    83.1 KB · Views: 25

Denny

Canned Monster
Messages
11,628
Reaction score
8,065
Location
Mayberry, Indiana
In my 48 years on this earth I have never seen a ring worn like that. And I've been in hundreds of engines!

Denny
 

Poboy kartman

Senior Moments Member
Messages
12,461
Reaction score
66
Location
White Settlement Texas
In my 48 years on this earth I have never seen a ring worn like that. And I've been in hundreds of engines!

Denny

The only explanation I can come up with is that new rings were put in a dirty groove and there was something under that land..(or it was too narrow) on that side....

A narrow land...(whether from carbon or mis-machining) makes a little more sense, as that ring could not have rotated....

Edit: Or that ring was thicker on that side....

Double edit: Or that's an oil ring...that's not worn...but twisted...
 

OzFab

Well-known member
Messages
15,615
Reaction score
67
Location
Warwick Qld, Australia
In my 48 years on this earth I have never seen a ring worn like that. And I've been in hundreds of engines!

Denny

:iagree:

The only explanation I can come up with is that new rings were put in a dirty groove and there was something under that land..(or it was too narrow) on that side....

A narrow land...(whether from carbon or mis-machining) makes a little more sense, as that ring could not have rotated....

Edit: Or that ring was thicker on that side....

Double edit: Or that's an oil ring...that's not worn...but twisted...

It's definitely a compression ring...

You make some interesting points, Doug; I will be sure to (obviously) check & clean the grooves before fitting the new ring... which arrived yesterday :wai:

The things to remember are:
1. It's a chinese engine with chinese parts
2. The engine would've been worked hard, running at max RPM for 95% of it's life
3. It appears the oil was never changed...

Now all I need to do is figure out which of the two rings is the top ring; they're almost identical but one has a polished edge (see pics); My guess is the one with the shiny edge is the top ring but, I think I'll need to verify somehow...

Meanwhile, both trolleys are finished & ready for work; the large blue one I simply fitted the wheels I repainted after finding two decent tubes & tyres; the smaller orange one has two new wheels...
 

Attachments

  • IMAG0403[1].jpg
    IMAG0403[1].jpg
    51.2 KB · Views: 4
  • IMAG0402[1].jpg
    IMAG0402[1].jpg
    42.8 KB · Views: 4
  • IMAG0405[1].jpg
    IMAG0405[1].jpg
    39.7 KB · Views: 4
  • IMAG0400[1].jpg
    IMAG0400[1].jpg
    162.6 KB · Views: 7
  • IMAG0401[1].jpg
    IMAG0401[1].jpg
    95.3 KB · Views: 8

OzFab

Well-known member
Messages
15,615
Reaction score
67
Location
Warwick Qld, Australia
On a different note, I had a call from a buddy the other day who has a workmate looking for a lawn mower & line trimmer; as I don't have any ready for sale ATM, I started looking & found a listing for two mowers & two line trimmers, all of which needed minor repairs (to me anyway)...

We settled on a price & I went & picked them up; this is where it gets interesting: I placed the two mowers in the trailer & secured them; while I was doing so the seller put the two line trimmers & the two grass catchers in the trailer &, me being preoccupied, didn't even think to tie down the catchers...

Needless to say, after a 20 minute drive on a freeway @70mph, by the time I reached home, the catchers were gone... I didn't even notice them flying out of the trailer but, obviously, they did... :censored::mad2: Now I'm on the hunt for replacement catchers...

On the upside, one of the line trimmers started & ran after putting some fuel in the tank & pulling the cord :wai: one of the mowers needs a bit of fab/welding work & it'll be ready to go...
 

chancer

ɔ ɥ ɐ u ɔ ǝ ɹ
Messages
9,358
Reaction score
89
Location
COMFORT, TEXAS
How fast do they clean the roads down there. Here in Ca you can see the same debris on the side of the road for several days. I would go back and look. The time and gas money would be easier than trying to find random grass catchers for sale minus mower. and be the one you need. Even if they were damaged by other traffic. I am sure YOU of all people could fix them.
 
Status
Not open for further replies.
Top