GX390 Boat Build

Mammoth

Active member
Messages
174
Reaction score
74
Location
Durham, CA
A mirror finish would look awesome except the flat surfaces are so large the suns reflection burns eyeballs out. Just the finish on it now is too much in the sun. I've polished enough aluminum to know its a lot of work, and you can't even touch it without leaving a mark. Lake water oxidized aluminum pretty quick. It wouldn't be the same after the first use.

I will probably end up painting it with a spray gun, but I can't get too carried away. If I make it nice I will freak out if I scratch or dent it, and I can't be tip toeing around where this is going.

It will be a bare bones build to keep the weight to a minimum. None of the extra stuff people put on. Anything extra will just make it sit lower in the water, hitting more rocks and causing more drag.

Ive been focusing on keeping it light weight from the start. All the bolts on the engine are either titanium or aluminum except the ones that have to be steel. I'm in decision weather or not I should install a smoke system because it will save a few pounds.
 

Bansil

Painter of gnomes....
Messages
1,414
Reaction score
1,110
Location
Mnts of the farthest NE TN you can go
Have you given it any thought to having it hard anodized? It can’t be that expensive.
Finding tanks setup to do hard anodize will be fun, I know Ken built the longest tanks East of the Mississippi maybe 10 years ago, because he got a flagpole contract. they where like 6 ft tall and 2 ft wide and 40 ft long, he sold the business maybe 5 years ago.
 

Mammoth

Active member
Messages
174
Reaction score
74
Location
Durham, CA
Spending a couple hours each day on the bodywork. It was pretty lumpy after assembly, but with lots of sanding and some hammering its starting to come around.


Mammoth

Active member
Messages
174
Reaction score
74
Location
Durham, CA
Too many builds at once slows me down on this project.

Most people leave the window solid aluminum, then use large seats to where there head is above the windshield. This makes wind drag and exposes them to the elements. This also raises the center of gravity and I've always been taught to keep the weight as low as possible.

To improve upon this I will be running the seats all the way to the floor with a uesable windows. I modified the windows quite a bit.

20210704_200034.jpg

Many jet boats have a lexan windshield held in place by a rubber gasket. The rubber gasket makes a big bump which on a windshield is the worst place to have a bump when considering aerodynamics.

To work around this I spent the extra time flush mounting the windows making them streamlined.

20220522_190620.jpg

I cut and sized clear lexan to fit with aluminum tapered head Allen bolts holding it in.

20220528_100941.jpg

Next obstacle is the prop tunnel. After studying everything i could find on tunnel sterns I figured out how the shape will be and drew the footprint on the hull. Im waiting for a prop thats on backorder to begin this next faze.
 
Last edited:

madprofessor

"Loose Cannon Creations"
Messages
2,899
Reaction score
959
Location
Jacksonville, Florida
Very impressed with your little squirt boat. Do I understand correctly that you'll power it with a single-cylinder 390, like for a gokart? What kind of pump could you use for that?
Mine was a 23' Spectra hull, bare inside but for some green Astroturf and a stereo, with a Lincoln 460 cu. in. monster under a Holley 751 double-pumper, direct-coupled to a Berkeley pump. Raw exhaust, not a wet exhaust or even dry marine headers, just straight off the manifolds, poked through the transom. Neighbors hated me, so did a lot of the people on Pottsburg Creek and Arlington River. Named it the "Swamp Rocket", 60mph in a foot of water.
Word of experience: Make your tunnel intake ridiculously oversized, with a tight set of steel bars. Mine was 2' long and about 8" wide, and I tried to launch it from a standstill in 6' of water. Sucked up oyster shells from the bottom, jammed in my bars, broke up the vortex too badly to even get it up on plane. Overboard without even a mask, using a 14" screwdriver to pry out the shells.
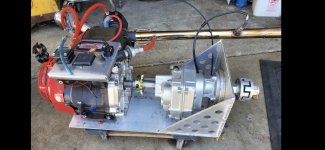
 

Mammoth

Active member
Messages
174
Reaction score
74
Location
Durham, CA
It's a mini jet boat hull, but I'm going to use a 12" propeller that will be tucked inside a tunnel to increase efficiency. I'm trying to build a light weight efficient boat that can go long distances and be able to take a beating.
If I can pull this off creeks and rivers turn into roads opening up a lot of areas for exploration.

Wasn't expecting the propeller any time soon, but surprisingly it showed up today.
 
Last edited:

Mammoth

Active member
Messages
174
Reaction score
74
Location
Durham, CA
I've really fallen behind with this one, just too many projects. I have made progress over the years. Many time consuming obstacles have been overcome.

Measured the footprint of the tunnel and cut it out.

Screenshot_20260214_191341_Gallery.jpg
Screenshot_20260214_191433_Gallery.jpg

Started welding in pieces of the tunnel.

Screenshot_20260214_191833_Gallery.jpg
Screenshot_20260214_191908_Gallery.jpg

Made a folding seat that sits as low as possible.

Screenshot_20240121-104813_Gallery.jpg
Screenshot_20240121-104838_Gallery.jpg

Made a cradle for the engine and transmission. Also made a shaft coupler that adapts the trans to the engine. This was a big obstacle. It took me the better part of a summer to figure out how to make it. It has 6 internal splines on one side, and 1 internal keyway spline on the other. I failed many times making this.

The sprocket is to run an alternator, although I think I'm going to swap it to a belt drive.

Screenshot_20260214_193010_Gallery.jpg


Fitting the engine.

Screenshot_20260214_192938_Gallery.jpg

Made a steering wheel mount. The mounting location is adjustable. With one person in the boat I will have it in the middle to balance the boat. With two people, I will slide it over to the left or right. Will get some close up pictures tomorrow if it's not raining.

Today I got the engine mounted, I will get some pics of that as well.

20260119_150538.jpg
 

Attachments

  • Screenshot_20260214_193010_Gallery.jpg
    Screenshot_20260214_193010_Gallery.jpg
    2.2 MB · Views: 4
Last edited:

Denny

Canned Monster
Messages
11,590
Reaction score
8,026
Location
Mayberry, Indiana
Glad to see you back. I’ve wondered about how this project is going or did you give up on it. What kind of transmission is that? And where did you get it?
 
Last edited:

Mammoth

Active member
Messages
174
Reaction score
74
Location
Durham, CA
It's a transmission designed by CLP for long tail boats that has a 2 to 1 gear ratio, forward, neutral and reverse. With the gear ratio it allows me to run a bigger prop at a lower rpm which is more efficient.

Nobody has these transmissions in the US, but I did learn that BeaverDamMudRunners sells CLP parts. So I contacted them and they were able ship me one from the Philippines.

I never did do any pulls on my friends dyno. I only fired it up one time, and the drive chain was shaking so much I had to stop the engine to build a chain slider to stop it from shaking. Some time later in the week the shop next to my friends caught fire and almost burned down his too. Luckily he didn't lose anything, just had smoke damage. He was forced to move his machine shop into storage along with the dyno. He finally got a new shop after all this time up in Salem OR.
 

Mammoth

Active member
Messages
174
Reaction score
74
Location
Durham, CA
Had to make the steering wheel detachable so the seat would clear when folding down.

20260215_080722.jpg

Here's the mount.

20260215_080903.jpg

Drilled as many holes as possible to make it lighter. I'm making every piece as light as I can. All bolts are titanium or aluminum which is light weight and more resistant to corrosion than steel.

20260215_081051.jpg

Here's the engine/transmission shaft coupler.

20260215_081644.jpg
20260215_081655.jpg

Got the engine mounted yesterday. I bolted the cradle to the hull so I had the option to remove it if I ever needed to work on the tunnel.

20260215_082030.jpg

I made this propeller shaft coupler out of titanium. Ive been working with titanium a lot lately, and it's really hard to work with. It beats all my tooling up. It took several hours just to make, and I was surprised it didn't break the threading taps.

20250817_171419.jpg

Figured out the transmission didn't have a thrust bearing, so I couldn't have the propeller shaft pushing into it. I made this aluminum block to hold a thrust bearing and bolted it to the transmission. Now the propeller shaft can push all it wants.

20260215_083144.jpg

Made this bearing block for the shaft. It also holds a seal to keep the water out of the boat.

20260215_082037.jpg
20260215_082106.jpg
 
Last edited:

Hellion

Moderator
Messages
8,421
Reaction score
3,553
I had no idea this was a boat build, if you want a title change (as it's incredibly misleading), let me know. 🤯 🤩

Utterly fantastic!
 

Mammoth

Active member
Messages
174
Reaction score
74
Location
Durham, CA
I had no idea this was a boat build, if you want a title change (as it's incredibly misleading), let me know. 🤯 🤩

Utterly fantastic!
It started as an engine build. Years later I decided to build a boat which needed a motor. I just happen to have this GX390, so I figured they belonged together.

We will see if it's a good match.

I took a guess at the prop size and pitch. Very unlikely it's perfect. I won't know until I run it on water. Will most certainly have to adjust the pitch.
 

Mammoth

Active member
Messages
174
Reaction score
74
Location
Durham, CA
I extended the height of my press so I could thread the propeller shaft. The one that's on the boat is Stainless. I wanted to try one out of Titanium to shed weight, so I bought a new $90 threading die just for the job.

It took a lot of force to cut the threads, but not as bad as normal. Then I tried to back the die off and in the process the $90 die broke. Titanium is never easy with me.

20260215_140256.jpg
20260215_145727.jpg
 
Top