Frederic's Backbone Kart

Status
Not open for further replies.

frederic

The Junk Man
Messages
385
Reaction score
1
Location
New Jersey
I think a v8 should be in order or a 440 sled engine!

Well, when my son is old enough, he and I can convert this electric thing to lawnmower powered. Since the differential's input shaft is vertical, we can use a vertical engine and a vertical jackshaft, putting the usual kart CVT bits between the engine and the jackshaft, and sprockets and chain between the jackshaft and the differential.

That actually would be a great thing considering the gearing. I have to gear down the electric motor.
 

frederic

The Junk Man
Messages
385
Reaction score
1
Location
New Jersey
I got the motor today, tested it, and repeatedly tripped the circuit breaker on my 55A battery charger/starter. This motor draws some serious current. If I got my ammeter shunt correct, without any load at all the motor draws 63 amps. I'm not certain of that figure because the charger/starter kept shutting off to quick, but at least I know it's a serious amount of current.

Anyway, I haven't done much these past few days as I've just been to busy and also hurt my back this past wednesday hauling solidified bags of concrete to the dump. Two pallets worth, 80lb bags of Sakrete. Three trips! But, today I was feeling a little better so I worked out how the motor is going to mount on the chassis as well as finalize the top Audi differential mount (same plate).

Pic 1 - I hacked out a piece of 3/8" steel to the same dimensions as the square tubing of the backbone. This piece of metal doesn't seem important but it will allow me to drill and tap it for 1/2" bolts, and the motor plate will bolt to this. I was going to weld a mount on top however I didn't have a piece of 3/8" steel laying around that was big enough but I had aluminum in this thickness so I used that instead.

Pic 2 - the finished mount, minus a bolt or two and some washers. Once I find the correct sprocket for the transaxle (#40, about 48 teeth or so) I'll be making a mount on top of this so I have a place to bolt a chain guard to. The motor mounts on the front of the plate, also in front of the vertical piece of the backbone, and is heavy enough that it does try to bend the aluminum plate. To solve this I either have to make another plate that's much thicker (I don't have stock to do this) or make a half-circle type of thing out of steel where that circle part matches the diameter of the motor. Weld to the vertical of the backbone, then strap it all together with a big, industrial-quality hose clamp. If I'm in the mood I may actually make a real clamp that's two half-circles that bolt through, however that's a lot more work. I just need the motor to not pull the plate downward and bend it as that will severely impact sprocket and chain alignment later on. It doesn't take much misalignment to throw chains, and I'm going to avoid this best I can.

Anyway, that's the scoop for the latter half of this past week.
 

Attachments

  • elec-truck-182.JPG
    elec-truck-182.JPG
    45.5 KB · Views: 15
  • elec-truck-183.JPG
    elec-truck-183.JPG
    47.5 KB · Views: 41

frederic

The Junk Man
Messages
385
Reaction score
1
Location
New Jersey
Thanks! Wait until you see how I got a piece of the backbone BEHIND the differential ;-) When I mounted it vertical (which made sense for a variety of reasons) I missed the fact that I needed to have a mount for the suspension behind it, yet still be able to get the differential out for service and replacement if necessary.

I'll post the pictures tomorrow... left the camera in the garage.
 

frederic

The Junk Man
Messages
385
Reaction score
1
Location
New Jersey
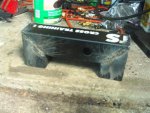
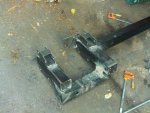
We had a brief discussion about motors/controllers on another thread, and since I shared what I'm doing for this project, I figured I'd post it here as well.

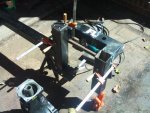
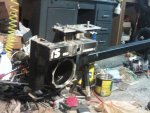
The motor is a 4.5 HP, 12V Winch motor, made in china as a "knock-off" of a Ramsey. I disassembled it and it has decent bearings at both ends (double roller), atypical of what comes out of china. Not a bad deal for what I paid.

It has a 3/4" keyed shaft (requires a woodruff key rather than a square key) and is about 4-1/2" diameter. It's a series-wound motor so it will make a ton of torque at lower RPMs and max out around 2000-2500 RPM, which is fine for my application.

My controller is of my own design, and the power section is a set of IGBT's arranged as what is called an "H" bridge. The IGBT's replace S1 - S4 in this schematic:


Basically how an H-Bridge works is:
  • To drive the motor clockwise, you'd close S1 and S4.
  • To drive the motor counter-clockwise, you'd close S2 and S3.
  • To freewheel the motor, you leave all four open, and
  • To cause a braking action you'd close S2 and S4.

Closing S2 and S4 essentially short circuits the motor leads to each other (and ground) and since a motor spinning through inertia is a generator, this shorting action causes the motor to brake very quickly, decreasing it's braking ability as it slows down.

I chose IGBT's over mosfets simply because of the current requirements - a 4.5HP motor produces about 3400 watts which can easily draw 300A continuous and peak higher than that. Mosfets, while they switch much faster than IGBT's, are not made large enough (in an affordable package) to do this job as a single unit, so I'd have to run multiple mosfets in parallel to be able to pass the kind of current this motor is going to draw. The drawback to running mosfets in parallel is that the input (gate) capacitance goes way up and it becomes increasingly more difficult to switch them quickly, and that's one of the more important things to consider when designing a high-current motor controller - switching time.

Because semiconductors never turn on and off "instantly" and instead take a few microseconds, there are instances where S1 can be told to turn off while simultaniously S2 is turned on, and because S1 doesn't shut off instantly and S2 doesn't turn on instantly, there's a moment in time where S1 and S2 are closed enough whereas high current will go from the battery positive rail to the battery negative rail (ground). With a system capable of pumping 300+ amps through the motor, that's a ton of current for the semiconductors to sink. So the design has to consider this fact and devise a way to minimize it. It's difficult to eliminate entirely, but the smaller time window this "short" exists the better for the semiconductors, power supply, nearby radios and televisions and computers (EMI radiation).

Mosfets switch faster, but can't handle 300A in a single, affordable device. IGBT's switch slower, but can be had in 300A and 600A packages as a single, affordable device.

To control motor speed one has to build a PWM controller and that can be done a variety of ways either as a dedicated circuit or implemented through a computer chip/processor of some kind. Because I want programability and the ability to do more than stop/start/change direction, I'll be using a PIC chip - particularly the 18F4550 because I have two of them to experiment with. This is the point I'm at right now, writing code.

To cause a slow-start condition on a PWM-controlled motor, one simply has to make the pulses increase their width slower than what the throttle potentiometer says to do so. This is one of the advantage of the PIC chip because I can use that chip to read the value of the pot, then increase the pulse rate based on a constant over time until it matches the pot, rather than using the pot to determine the pulse width directly. I'll give an example, maybe that will help.

The motor is at rest, and the pulse width is 1%.

The pot is rotated to it's midpoint.

The PIC notices the pot was rotated to it's midpoint, and every second increases the pulse width by 2% until the pulse width equals 50%, matching the potentiometer.

Once the pulse width equals the value of the potentiometer (50% in this example), the PIC maintains that pulsewidth until the pot is changed to another setting.

As described, you also have a slow-down feature unless you modify the code so that any decrease in the setting of the pot *instantly* changes the pulse width to the new, lower value.

I'm taking it a step further and adding some logic, and a second pot, to use as a proportional brake pedal, which will have priority over the throttle pedal. More brake pedal equates more braking action.
 

frederic

The Junk Man
Messages
385
Reaction score
1
Location
New Jersey
Back to welding.

Pic 1, 2, 3 - the start of the "bends" of the backbone that will go around the differential. Obviously I cannot go *through* the differential ;-)

Pic 4: The backbone is essentially complete as now I have the rear a-arm mounts drilled, machined and welded on. The next step is my most hated part of any metal project - grinding off slag and mig balls.

I also started machining the bushings for the rear a-arms (upper and lower) and I'm assuming since they're almost identical to the front bushings you probably don't want another 20 pictures of my lathe spinning away. I figure I'll save the space on this forum system.
 

Attachments

  • elec-truck-185.JPG
    elec-truck-185.JPG
    52.6 KB · Views: 15
  • elec-truck-187.JPG
    elec-truck-187.JPG
    54.3 KB · Views: 12
  • elec-truck-188.JPG
    elec-truck-188.JPG
    51.6 KB · Views: 19
  • elec-truck-191.JPG
    elec-truck-191.JPG
    48 KB · Views: 11

frederic

The Junk Man
Messages
385
Reaction score
1
Location
New Jersey
In order to determine the appropriate length of the rear a-arms, I needed to assemble the rear spindles fully, but not before I machine a pocket for the upper and lower a-arms to go into. So, that's what these pictures are of... machining the pockets.

I imagine some of this gets boring to look at after a while however some of you did ask for machining pictures, so I'll continue to post the nitty gritty details as things progress.
 

Attachments

  • elec-truck-194.JPG
    elec-truck-194.JPG
    36.8 KB · Views: 10
  • elec-truck-195.JPG
    elec-truck-195.JPG
    43.2 KB · Views: 13
  • elec-truck-196.JPG
    elec-truck-196.JPG
    34.4 KB · Views: 14

freakboy

the names 'mater
Messages
3,961
Reaction score
2
Location
hick town
**** those things are all nice and shinny! bet this things gona be near indestructable when its finished!
 

frederic

The Junk Man
Messages
385
Reaction score
1
Location
New Jersey
Aluminum parts are generally shiny for a long while because it doesn't rust the way steel does. Aluminum can corrode (aluminum oxide). I'd love to anodize all the aluminum parts (colored too!) however I cannot find any companies willing to sell me sulfuric acid, thanks to the 9-11 related extra security measures.
 

dpaxson

New member
Messages
346
Reaction score
0
Location
parma heights, oh
not to be a naysayer but compared to the rest of the parts you've made, the walls of those pockets look kind of flimsy. how are you going to mount the a-arms to them? it seems like if you put a hole through them for a bolt , then there isn't going to be much material left.
 

frederic

The Junk Man
Messages
385
Reaction score
1
Location
New Jersey
The walls are 1/4" thick. They were supposed to be 3/8" however when i set the stops on the milling machine (so I could machine the pockets without thinking) I inadvertently had them too far apart. So, the walls are thinner than intended.

I was going to bolt through the walls, through the sleeves I've already machined, however I may have to adjust that thinking.

The simple solution seems to be taking two pieces of 1/8" steel and attaching them to each side using small screws, into threaded holes, and bolt through those plates and the walls and the sleeve that will be inside the pocket.

Sad thing is I measured the stops twice before clamping them tight.

Ooops ;-)
 

frederic

The Junk Man
Messages
385
Reaction score
1
Location
New Jersey
It's going to be steel on steel, however the area will be filled with a thick axle grease I plan to insert via a zerk fitting on each pivot.
 

frederic

The Junk Man
Messages
385
Reaction score
1
Location
New Jersey
It's in the same spot since I last posted... had a lot of distractions, mostly work-related. Then when I finally had some free time, it rained for a week. Then I decided to repaint the "beater" and that sucked up a few weeks of time between work and the endless rain.

Started off with a 16 y/o badly sunburnt Olds...


And after some casual terd-polishing I ended up with this:


Not bad for a Rustoleum, backyard paint job done between rain storms and endless streams of pine needles falling down non-stop.

I probably have 45-50 manhours into this (mostly sanding) and maybe $100-125 in materials. When the rain stops tomorrow I'll put the lights and trim back on and peel off all the tape and plastic.
 

frederic

The Junk Man
Messages
385
Reaction score
1
Location
New Jersey
Me either, I still have to rework the rear suspension mounts since somehow I managed to mount all four of them at the identical 85 degrees rather than 90 (from the floor).

Thanks for the compliments on the car, I'm not complaining considering how little I spent to get a few more years out of it.
 
Status
Not open for further replies.
Top