First Go Kart

Status
Not open for further replies.

OzFab

Well-known member
Messages
15,615
Reaction score
68
Location
Warwick Qld, Australia
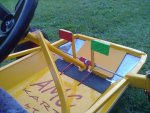
Thanks for the praise, I tried to keep everything as simple as possible & still make it look good & work well


since you have front steering, you might want to but another reinforced bar directly in front of the steering and let the first front bar absorb any impacts without crushing your very nice looking homemade tie rod ends.

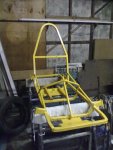
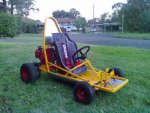
There's a really good reason I set the front wheels back from the front of the frame... & that's it :roflol: I've been tossing up the idea of a brush guard type setup that extends out in front of the wheels & I WILL be putting a cover plate under the front.

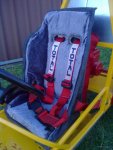
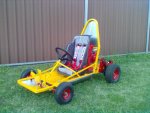
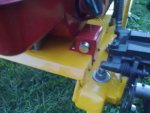
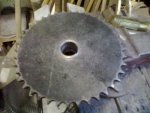
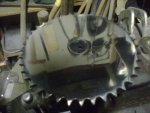
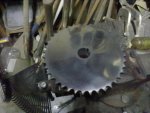
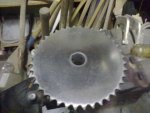
Oh, & I had to change the brake setup, it interfered with the seat; I'll put up some pics of the new setup in the next day or two
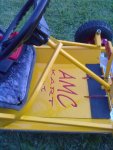
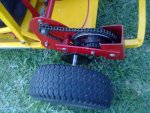
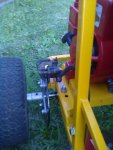
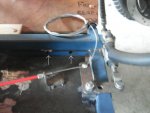
 

OzFab

Well-known member
Messages
15,615
Reaction score
68
Location
Warwick Qld, Australia
Brake Relocation

As mentioned earlier, I had to move the brake master cylinder as it interfered with the seat where it was so, drill a few holes, 2 new bolts and...


You can see from the arrows where the old holes are.
 

Attachments

  • SDC10137.jpg
    SDC10137.jpg
    77.7 KB · Views: 52
  • SDC10139.jpg
    SDC10139.jpg
    70.6 KB · Views: 51
  • SDC10140.jpg
    SDC10140.jpg
    68.6 KB · Views: 47

OzFab

Well-known member
Messages
15,615
Reaction score
68
Location
Warwick Qld, Australia
Frame is stripped, welded & primed, ready for paint.

I haven't been doing much on the kart lately as the weather has been lousy & I've been working on another project: the trailer the frame is sitting on. When I got it a month ago it looked like this:
 

Attachments

  • SDC10127.jpg
    SDC10127.jpg
    101.7 KB · Views: 27
  • SDC10125.jpg
    SDC10125.jpg
    97.2 KB · Views: 28
  • Photo149.jpg
    Photo149.jpg
    91.3 KB · Views: 31

OzFab

Well-known member
Messages
15,615
Reaction score
68
Location
Warwick Qld, Australia
While tinkering around with nothing to do (waaaay too cold to paint) I wondered what the sprocket would look like if it was polished...
 

Attachments

  • Photo152.jpg
    Photo152.jpg
    77.5 KB · Views: 26
  • Photo158.jpg
    Photo158.jpg
    65.7 KB · Views: 53

OzFab

Well-known member
Messages
15,615
Reaction score
68
Location
Warwick Qld, Australia
Through a series of steps that make the metal flatter each time. Here's some step by step pics but, to get a better idea, checkout some of these videos:
http://www.polish-up.com.au/pages/gallery-videos.html

Pic 1. Before
Pic 2. 80 grit on random orbital sander
Pic 3. 400 grit on random orbital sander
Pic 4. Sisal mop on power drill
Pic 5. Cotton buff on power drill
 

Attachments

  • Photo158.jpg
    Photo158.jpg
    65.7 KB · Views: 23
  • Photo157.jpg
    Photo157.jpg
    74.3 KB · Views: 20
  • Photo156.jpg
    Photo156.jpg
    70.4 KB · Views: 19
  • Photo155.jpg
    Photo155.jpg
    58.6 KB · Views: 18
  • Photo152.jpg
    Photo152.jpg
    77.5 KB · Views: 15

OzFab

Well-known member
Messages
15,615
Reaction score
68
Location
Warwick Qld, Australia
It just looks cool. There is no benefit, except that you can see the sweat on your face when replacing a fallen off chain :D

Bahahahaha:roflol:

True, there's no benifit apart from reduding the risk of rust & looking good. If I didn't want this kart to look good It would've been finished 6 weeks ago.
 

OzFab

Well-known member
Messages
15,615
Reaction score
68
Location
Warwick Qld, Australia
Almost done

Well, the little princess's birthday is in two days, but it's almost done. Just a few little things left to do & I'll test it before delivery on Saturday...

Pics of finished product coming soon.
 

Attachments

  • Painted Frame.jpg
    Painted Frame.jpg
    82.8 KB · Views: 42

OzFab

Well-known member
Messages
15,615
Reaction score
68
Location
Warwick Qld, Australia
It's finished!

Finally, It's done &, as promised, here are the photos...
 

Attachments

  • Photo170.jpg
    Photo170.jpg
    86.9 KB · Views: 54
  • Photo169.jpg
    Photo169.jpg
    96.6 KB · Views: 54
  • Photo168.jpg
    Photo168.jpg
    113.9 KB · Views: 62
  • Photo167.jpg
    Photo167.jpg
    125.9 KB · Views: 64
  • Photo166.jpg
    Photo166.jpg
    93 KB · Views: 79
  • Photo171.jpg
    Photo171.jpg
    113.9 KB · Views: 55
  • Photo172.jpg
    Photo172.jpg
    83.6 KB · Views: 53
  • Photo173.jpg
    Photo173.jpg
    68.6 KB · Views: 50
  • Photo174.jpg
    Photo174.jpg
    109.4 KB · Views: 57
  • Photo175.jpg
    Photo175.jpg
    66.7 KB · Views: 46

benvui

New member
Messages
5
Reaction score
0
Location
New Brunswick, Canada
Nice job! I hope you don't mind but I think I might steal a couple of things from your to stick on the one I'm building for my kids.
I hope mine turns out as nice as yours
 

benvui

New member
Messages
5
Reaction score
0
Location
New Brunswick, Canada
I like the way your throttle and brake lines run through the floor. I was also thinking about how you hooked up your throttle and that I could use the way you hooked up the throttle to the pedal, but I would make it so I could adjust where the throttle hooked to the pedal to "govern" how fast the kids can go.
 

OzFab

Well-known member
Messages
15,615
Reaction score
68
Location
Warwick Qld, Australia
I like the way your throttle and brake lines run through the floor. I was also thinking about how you hooked up your throttle and that I could use the way you hooked up the throttle to the pedal, but I would make it so I could adjust where the throttle hooked to the pedal to "govern" how fast the kids can go.

Yep, I thought of that too. Have a look at the pics in post #11. There's an adjuster on the throttle & the brake at the other end of the cables: that way they're in the line but out of the way.

All the parts (cables, anchors, adjusters, etc) are bicycle parts.

You probably can't tell from the pics but there's a 1" gap between the floor & the belly pan; the main reason is for somewhere to hide the cables. If you need any help or plans let me know.

Oh, I discovered one little design flaw the other day: due to the short length of the pitman arm the steering joints jam the pedals when turning. ie: you can't accelerate when turning right & you can't brake while turning left. It's not that big a deal, I'll simply reverse the pedals so that the bars are on the outside.
 
Status
Not open for further replies.
Top