First Go Kart

Status
Not open for further replies.

OzFab

Well-known member
Messages
15,615
Reaction score
68
Location
Warwick Qld, Australia
About two months ago I decided to build a go kart with my 7yo daughter. The plan was to make it small enough so she can use it now but large enough so she can still use it at age 12 - 13 with very little alteration along the way. I knew I needed to include a jackshaft to gear it down so it would only do about 10 - 15 mph until she got used to it/ got a bit older at which time it could be removed & it would become direct drive.

So far the only thing that I've bought new is the steel (& some of that I didn't pay for), the axle bearings (of course) & the front wheels. Just about everything else has either been hand made or modified in some way. All the parts have been sourced from lawn mowers.

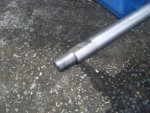
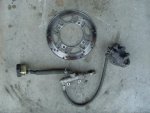
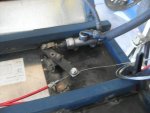
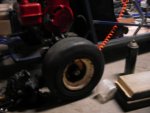
This is where the drive train came from
http://www.diygokarts.com/vb/attachment.php?attachmentid=17585&stc=1&d=1324682261

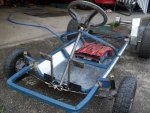
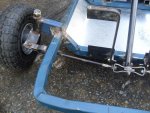
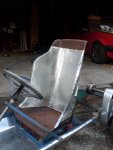
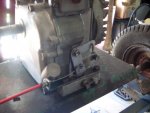
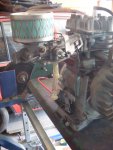
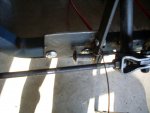
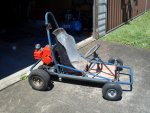
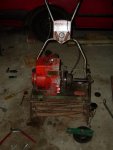
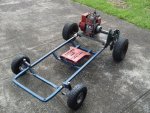
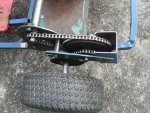
& this is what I have so far
http://www.diygokarts.com/vb/attachment.php?attachmentid=17586&stc=1&d=1324682261
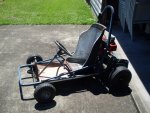
http://www.diygokarts.com/vb/attachment.php?attachmentid=17587&stc=1&d=1324682261
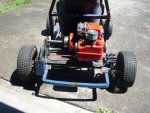
http://www.diygokarts.com/vb/attachment.php?attachmentid=17588&stc=1&d=1324682261

More pics coming soon...
 

Attachments

  • SDC10056.jpg
    SDC10056.jpg
    67.3 KB · Views: 194
  • SDC10065.jpg
    SDC10065.jpg
    189.9 KB · Views: 227
  • SDC10066.jpg
    SDC10066.jpg
    174.2 KB · Views: 203
  • SDC10067.jpg
    SDC10067.jpg
    172.8 KB · Views: 206

OzFab

Well-known member
Messages
15,615
Reaction score
68
Location
Warwick Qld, Australia
Update

Steering is done. As you can see from the pic the tie rods & ends are hand made; I had lots of fun making them, as I have for the whole project.

Belly pan is on, just a few finishing touches needed; same for the chain guard.

Racing style seat almost ready for fibreglass.

The rear, solid, one piece axle is machined from 3/4" round bar
 

Attachments

  • SDC10068.jpg
    SDC10068.jpg
    145.2 KB · Views: 165
  • SDC10069.jpg
    SDC10069.jpg
    134.2 KB · Views: 163
  • SDC10070.jpg
    SDC10070.jpg
    113.3 KB · Views: 115
  • SDC10071.jpg
    SDC10071.jpg
    92.1 KB · Views: 117
  • SDC10073.jpg
    SDC10073.jpg
    146 KB · Views: 104

redsox985

Active member
Messages
4,092
Reaction score
11
Location
PA
Just a heads up on those tires...they may not hold up very well. But the tie rods are really cool. I like them a lot!

So, did you modify the clutch outer drum to have that shaft on it?
 

B.M.800

TheBeal.
Messages
2,387
Reaction score
24
Location
Central PA
Cool looking kart, seems to be coming along nicely!

Another member on here (Bluethunder?) had put some Harbor Freight hand kart wheel/tires on a kart, they apparently got destroyed with the first ride(?). I dont know what kind you got there, just be safe! :thumbsup:
 

Bluethunder3320

New member
Messages
5,677
Reaction score
36
Cool looking kart, seems to be coming along nicely!

Another member on here (Bluethunder?) had put some Harbor Freight hand kart wheel/tires on a kart, they apparently got destroyed with the first ride(?). I dont know what kind you got there, just be safe! :thumbsup:

speed above 10mph will make chunks of tread fling off those tires. doesnt seem like it but it will!

looks like the clutch is from a reel mower
 

OzFab

Well-known member
Messages
15,615
Reaction score
68
Location
Warwick Qld, Australia
speed above 10mph will make chunks of tread fling off those tires. doesnt seem like it but it will!

looks like the clutch is from a reel mower

Lucky for me I don't plan for it to do much more than 10mph. By the time it does I'll get some better wheels.:roflol:

Again, check out the first pic; the whole drive train is from a reel mower
 

OzFab

Well-known member
Messages
15,615
Reaction score
68
Location
Warwick Qld, Australia
Cool looking kart, seems to be coming along nicely!

Thanks, I can't wait 'til it's finished... I'm building it & even I'm getting impatient:roflol:

Another member on here (Bluethunder?) had put some Harbor Freight hand kart wheel/tires on a kart, they apparently got destroyed with the first ride(?). I dont know what kind you got there, just be safe! :thumbsup:

That's pretty much what they are. I got them cheap off ebay just to have something on there but I do plan to upgrade to something a bit more sturdy (& straight)
 

OzFab

Well-known member
Messages
15,615
Reaction score
68
Location
Warwick Qld, Australia
Look what I just got...

BRAKES!
Kawasaki GPX 250 rear brakes to be exact. Master cylinder, caliper, disc & hoses all for the princely sum of $50 :wai:

Now I have all the pieces of the puzzle, all I have to do is finish putting them all together:roflol:
 

Attachments

  • Brakes.jpg
    Brakes.jpg
    111 KB · Views: 49

OzFab

Well-known member
Messages
15,615
Reaction score
68
Location
Warwick Qld, Australia
Update

Make & install accelerator linkages, cable & pedal, done.
This was interesting, trying to figure out the best way to run the cable & then fabricate linkages to work efficiently. The hardest part was making springs to suit the carby & the pedal, carby spring is still not 100% but it works. Also note the home made air filter.

Install brake master cylinder, linkage, cable & pedal, done.
A bit of trial & error trying to get a good balance between necessary movement & pedal pressure needed to engage the caliper. A bit of fine tuning later & it should be ok. Again, pedal is sprung to maximise return.

Coming soon: Brake caliper & disc installation & home made muffler
 

Attachments

  • SDC10099.jpg
    SDC10099.jpg
    72.8 KB · Views: 103
  • SDC10100.jpg
    SDC10100.jpg
    87.7 KB · Views: 112
  • SDC10102.jpg
    SDC10102.jpg
    62.9 KB · Views: 96
  • SDC10103.jpg
    SDC10103.jpg
    71.1 KB · Views: 109
  • SDC10104.jpg
    SDC10104.jpg
    81.1 KB · Views: 89

OzFab

Well-known member
Messages
15,615
Reaction score
68
Location
Warwick Qld, Australia
Rust removal ideas

Ok, I'm having a bit of a problem removing heavy, pitted rust from the seat base. Outside & the top section were ok but, for some reason that I can't explain (being a panel beater you'd think I should know), the top side of the seat is that much harder to clean. So far I've tried:

random orbital sander
wire wheels (cup type on grinder & 2 others in the drill)
air sander
flap/sanding disc on the grinder.

Due to the heave pitting, all of these just seem to be "polishing" the surface. The only thing that has worked is sandblasting but that's taking a while because my little 2hp compressor can only put out the 70psi needed for about 30 seconds, then I have to wait for it to "catch up".

Chemical cleaning is pretty much out: I can't dip it because the outside has been fibregassed &, apart from being rather expensive, I'm not sure metal conditioner will do too much.

Any ideas?
 

Keegan

New member
Messages
68
Reaction score
0
Location
Blaine, MN
Super heavy rust scale is tough!! I use a chisel on my air hammer. Set the pressure low and use it 90 degrees to the surface to knock the scale off. You could use a cold chisel and hammer too. After the scale falls off, your flap discs will smooth out all the chisel marks.

You could also try electrolytic rust removal. Just water, washing soda and a battery charger. It shouldn't hurt the glass. I've used this method with delicate parts that I don't want to remove any good metal while removing rust.

Good luck!
 

OzFab

Well-known member
Messages
15,615
Reaction score
68
Location
Warwick Qld, Australia
I use a chisel on my air hammer. Set the pressure low and use it 90 degrees to the surface to knock the scale off. You could use a cold chisel and hammer too.

You could also try electrolytic rust removal. Just water, washing soda and a battery charger.

Not sure about the hammer idea but tell me more about electrolytic rust removal. I did a bit of research & it all talks about dipping or filling (in the case of a container, fuel tank etc); how would this work on a flat, non submersible surface?
 

Keegan

New member
Messages
68
Reaction score
0
Location
Blaine, MN

landuse

Moderator
Staff member
Messages
18,748
Reaction score
523
Location
Pietermaritzburg, South Africa
You could also try electrolytic rust removal. Just water, washing soda and a battery charger. It shouldn't hurt the glass. I've used this method with delicate parts that I don't want to remove any good metal while removing rust.

Good luck!

Here are a couple of websites regarding reverse electrolysis. I have tried it myself, and it works well. A large object might be a little more difficult to deal with, but you will just need to get a bigger container.

Electrolysis to remove rust
http://www.diygokarts.com/vb/showthread.php?t=9832&highlight=electrolysis
http://www.stovebolt.com/techtips/rust/electrolytic_derusting.htm
http://www.instructables.com/id/Electrolytic-Rust-Removal-aka-Magic/
http://myweb.tiscali.co.uk/andyspatch/rust.htm
http://www.antique-engines.com/electrol.asp
http://www.1bad6t.com/rust_removal.html
 

OzFab

Well-known member
Messages
15,615
Reaction score
68
Location
Warwick Qld, Australia
First Ride

Well, it's all together & drivable so I took it for a test drive to iron out the bugs.

Problem 1: Brake pedal broke.
Just a quick re tack & I'm good to go. After it's fully welded that won't happen again.

Problem 2: Due to live axle setup, THERE'S NO STEERING!
Solution: I grabbed one of the front wheels for my next project, which just happen to be the same size but, being a FRONT wheel, free spinning. Throw a collar on the axle, put on free spinning wheel, bolt it on &, hey presto, WE HAVE STEERING!:wai:

It has a turning circle of around 20 or so feet &, in a straight line, gets up a bit of speed (around 15mph & I didn't open it up) but not enough to freak out "the little princess" (I hope)

I still have to do things like finish off the brakes (they work but they're not finished), finish the seat, mount the harness...then all I have to take it all apart, finish welding & paint it :mad2:
 

Attachments

  • SDC10115.jpg
    SDC10115.jpg
    137.2 KB · Views: 93
  • SDC10116.jpg
    SDC10116.jpg
    145.4 KB · Views: 77
  • SDC10117.jpg
    SDC10117.jpg
    137.4 KB · Views: 88
  • SDC10122.jpg
    SDC10122.jpg
    57.1 KB · Views: 73

landuse

Moderator
Staff member
Messages
18,748
Reaction score
523
Location
Pietermaritzburg, South Africa
Thats one cool little kart. Well done. I like it when you finish a project and you are happy with it. You can look at the before and after photos and say "I did that!"
 

kaymo

New member
Messages
123
Reaction score
0
Location
hickory nc
i like a lot of things about this kart. first off that brake looks excellent! second, i like the crazy shaft on the motor, it puts it more centered than a normal setup would. i like the nice seat, and i like how it sits inside the simple roll bar with "door bars" its well executed and simple. since you have front steering, you might want to but another reinforced bar directly in front of the steering and let the first front bar absorb any impacts without crushing your very nice looking homemade tie rod ends.
 
Status
Not open for further replies.
Top