• OFF TOPIC fun forum - NO politics - NO religion - NO jerks. It's not complicated. Thanks!

First Car!! 1982 VW Rabbit Convertible!!!!

Status
Not open for further replies.

Poboy kartman

Senior Moments Member
Messages
12,461
Reaction score
63
Location
White Settlement Texas
Let's just hope he doesn't have a good looking non running car.....
Anyway- congrats- and never forget this is a huge privilage and not a right- so ......no texting and driving.....and whatever else the two of you may have in mind it ......it can wait till you park somewhere! :thumbsup:
 

j.concepcion54321

Rebuilding KTM, Need Kart
Messages
1,251
Reaction score
5
Location
East Providence RI
Thanks everyone!!

The weather is supposed to go up tomorrow and Saturday so im hoping to get some work done on the rabbit!! First up is removing the fuse box, taking it apart and giving it a good cleaning. Then i gotta check all the grounds, finally im gonna see if i can get some power to the pump again!!! Hopefully this all works and i can have it running by the weekend!! Ill keep you guys posted.
 

j.concepcion54321

Rebuilding KTM, Need Kart
Messages
1,251
Reaction score
5
Location
East Providence RI
OK guys i had a friend come and take a look at the rabbit and he gave me a pretty cool idea for something he had done on one of his cars. Instead of replacing his fuel pump he hard wired in a switch that would just send the 12 volts necessary to the pump. SO before he started the car he would pop the switch into the on position, let the pump start to send gas then start the car. When he was getting near his destination (like pulling up to his driveway) he would just shut it off before he shut off the car.

What do you guys think of this idea for the rabbit? It save the hassle of finding my electrical problem, and it serves as a lo jack. haha. If someone tries to take it then theyll only be driving for a couple of minutes before they get no gas and it shuts off on them :)

Let me know guys, pros and cons list em here!!
 

itsid

Moderator
Staff member
Messages
11,563
Reaction score
240
Location
Ruhrpott [Germany]
NO!
just NO...

I cannot even think of a pro...

cons: forget it once and you'll destroy the new fuel pump;
like when you let your girlfriend take it and she doesn't think of it,
or you're in a hurry..

NO
The relay acts on provided pressure by the pump (enough pressure, pump off, not enough pump on,
during the ride as well ... it's not just an on off motor running or not,
like it'd be in a car with carbs. (and not even then it's a good idea)

Donot shortcut the relay.
it will do more harm than good.

'sid
 

Poboy kartman

Senior Moments Member
Messages
12,461
Reaction score
63
Location
White Settlement Texas
I once had a vehicle that lost the connection from the key switch to the coil- so I wired in a switch under the dash. Worked out pretty well and was an anti-theft device too!
 

OzFab

Well-known member
Messages
15,615
Reaction score
67
Location
Warwick Qld, Australia
I've seen & used many different variations of that trick; coil trigger, push button starter, even a switch in the EFI trigger line but, never have I seen a fuel pump switch work successfully & flawlessly, for the most part, due to human error...
 

itsid

Moderator
Staff member
Messages
11,563
Reaction score
240
Location
Ruhrpott [Germany]
:idea2:Could the fuel pressure switch be the issue?:surrender:
I really hope it's not ;)

I think we should narrow it down to judge.

Josh? You got your testlight & multimeter handy?

Okay here it goes:
Let's test the relais first;
Remove the Relais from it's socket (nothing but the relais!)
Ignition to Pos 1 (On)
1)
testlight between contact 2 and ground (engine block)
testlight between contact 4 and ground

Both times the lamp must light up, if not there's a broken wire,
or missing connection, remember which one to identify the wire later.

If that's okay let's carry on...
car ignition to pos 0 (Off)
2)
Testlight between contact 4 and 6.
now turn on the ignition (back to pos 1 again)
The testlight should go on for about a second and then turn off again.

If the lamp doesn't light up remember the numbers, and check for broken wiring, hopefully that's the problem now.
The other option would be the ECU is toast.
(it is if the lamp will light up and stays on)

Now if your testlight shows a perfect result;
it is in fact the relais that's not working properly;
get a new one or try to repair it;
it's fairly simple to pry it open and resolder broken contacts,
no broken contacts to repair; buy a new one ;)

Next the in tank fuel pump:
Remove the rear bench and unscrew the lid.
Now remove the rubber cap (V) from the plug
300px-Krafstoffsystem02.jpeg
keep the plug attached.
Get your multimeter (or a voltmeter) and measure between 1 and 3 (ingnition ON of course)
anything between 9V and 12V is perfectly okay.

less or no voltage: find the broken wire.
voltage okay, pump not working:
remove it from the tank and inspect; maybe it needs to be replaced.

At last The second fuel pump
The easiest one ;)
Underneath the car, right side of the tank
Remove the rubber cap from the plug
Get your multimeter (or a voltmeter) and measure between 1 and 2 (ingnition ON of course)
again anything between 9V and 12V is perfectly okay.
any or no voltage find the broken wire.

If you reached this point and everything was okay or you found and fixed everything on your way down here,
the only thing that could prevent fuel from reaching your engine is the fuel lines or a clogged fuel filter.

Let me know.

'sid
 

Attachments

  • 300px-Krafstoffsystem01.jpg
    300px-Krafstoffsystem01.jpg
    24.4 KB · Views: 6

j.concepcion54321

Rebuilding KTM, Need Kart
Messages
1,251
Reaction score
5
Location
East Providence RI
So i went out and checked your instructions real quick, and as far as the diagram goes im not seeing anything like that... :mad2:

Also discovered that there was a connector that was just unplugged and i looked around and couldnt find a source for it :ack2:

Also pulled the relay and took the cover off. Pictures are attached but the terminal that is marked 30 (one of the main power ones) isnt really attached... i can take it off easily and it just slides around.
 

Attachments

  • IMAG0612.jpg
    IMAG0612.jpg
    64.4 KB · Views: 4
  • IMAG0613.jpg
    IMAG0613.jpg
    48.7 KB · Views: 4
  • IMAG0614.jpg
    IMAG0614.jpg
    60.9 KB · Views: 4
  • IMAG0615.jpg
    IMAG0615.jpg
    39.7 KB · Views: 4
  • IMAG0616.jpg
    IMAG0616.jpg
    61.6 KB · Views: 4
  • IMAG0621.jpg
    IMAG0621.jpg
    112.6 KB · Views: 3
  • IMAG0620.jpg
    IMAG0620.jpg
    52.2 KB · Views: 2
  • IMAG0619.jpg
    IMAG0619.jpg
    58.7 KB · Views: 3
  • IMAG0618.jpg
    IMAG0618.jpg
    52.9 KB · Views: 3
  • IMAG0617.jpg
    IMAG0617.jpg
    61.2 KB · Views: 4

itsid

Moderator
Staff member
Messages
11,563
Reaction score
240
Location
Ruhrpott [Germany]
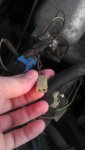
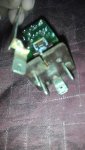
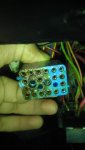
well either 30 or 87 should be loose (I thought 87 but cannot remember exactly)
but you said it's 30 and that might be it.
(I thought 30 is the one 90° apart and the one you're holding is 87...anyways)

In fact it must not be connected at all.
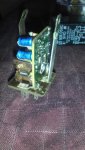
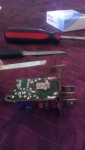
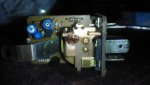
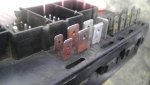
You see the electro magnet in IMAG0622 and see it protruding the pcb in the following pictures.
Once it's engaged it will pull the loose contact to it's copper plate and make it connect to 87 (closing the circuit and running the pump) :D
but there should be a spring IIRC ...
I'm sorry it's too long ago to remeber how mine looked on the inside :(

But again either 30 or 87 must not be connected in non engaged state.

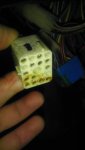
That's a UH2 relais isn't it?

let me see if I can find any internal schematics...

Now for the previous post..
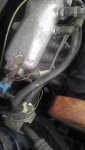
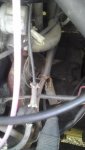
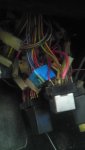
The loose connector you found (brown,darkgrey) looks to be T2c in the wiring schematics (left blinker or T2g right ;)) I have no idea why it's that close to the engine.

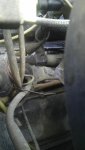
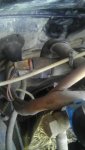
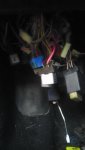
It's hard to tell where the connectors are located relative to the engine on your pictures,
and I don't want to make wild guesses..
it's alread messed up, and I don't want to make things worse ;)

Let's bypass a 'broken relais' for a real quick test:
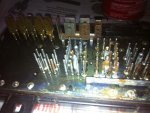
Find the slots on the relais socket for ppin 30 and 87;
turn the ignition off, and bridge the two connectors
turn the ignition back on and check if the fuel pump is running or not,
turn off again, remove the bridge and you know if it's the relais or not.
(not as precise, but much quicker until we find the connectors to check in the engine compartement ;))
Do not leave the bridge in longer than absolutely necessary to know if your fuel pump is running.
(that's the post #126/127 thing!!)

Also, Now that you say it.. the drawing I posted above might not be very precise
(might be a different engine depicted maybe even a G60) but it was the only one at least close to help locating the connectors.

Anyways.. you can measure the exact same thing directly at the relais socket;
it's just the other end of the wires.
same numbers apply (2->ground, 4->ground , 4->6)

[EDIT]
I just crosschecked.. the image was BS!!! indeed a G60 completely different harness :(
My fault, removed the image and stuff above...
test directly at the relais socket, that's the only way I can think of unfortunately.
And while you're at it, add 1->ground to the testing procedure
I think 4->ground is useless, since 6 is ground anyways and 4->ground and 4->6 should behave exactly the same way....
if not you'll know the groundwire 6 causes the failure ... so maybe not too uselesss :D

I'm sorry for the confusion I caused.. liquid cooled VW are not my specialty ;)

'sid
 

j.concepcion54321

Rebuilding KTM, Need Kart
Messages
1,251
Reaction score
5
Location
East Providence RI
when i installed the pump i tried jumping the relay like you have described and i didnt get anything. Even when i turned the key, etc. I used some speaker wire i had laying around and did it from 30-87... Should i try again with some heavier duty wire?
 

itsid

Moderator
Staff member
Messages
11,563
Reaction score
240
Location
Ruhrpott [Germany]
speaker wire? what gauge :D

No honestly, use at least 2.5mm² (~AWG 13) here and a short piece not longer than maybe an inch.
at best with matching male connectors soldered to it (I think 6.3mm x 0.8mm should fit)

'sid
 

j.concepcion54321

Rebuilding KTM, Need Kart
Messages
1,251
Reaction score
5
Location
East Providence RI
Pulled the fuse box today.... Now I am left with a big jumble of spaghetti.

As far as the box goes I only have one thing to say... sooo... much ... Corrosion!!!!!!!!!
 

j.concepcion54321

Rebuilding KTM, Need Kart
Messages
1,251
Reaction score
5
Location
East Providence RI
Sorry for not posting in a while... got caught up with school stuff this week.

Here you guys can see the condition of the fuse box, it was such a a pain to get that back cover off!! literally took a couple of days and 3 guys to get it off :ack2:

The plan as of now is to try and clean each of the terminals and try getting the box and terminals as clean as possible... hoping that solves some issues.

Also if you take a look at the terminals they aren't in the best shape (the blue one is the worst)

Side note: that blue terminal was the last one to get pulled because it absolutely wouldnt come out! I had to cut the tab from the side of the box in order to get a flat head under neath and pry it up, while someone else was pulling, this was all after i emptied a can of electrical cleaner and wd-40 on it :censored:

Nonetheless, im gonna have my work cut out for me as far as this wiring stuff goes
 

Attachments

  • IMAG0635.jpg
    IMAG0635.jpg
    63.7 KB · Views: 7
  • IMAG0633.jpg
    IMAG0633.jpg
    38.5 KB · Views: 6
  • IMAG0632.jpg
    IMAG0632.jpg
    35.1 KB · Views: 4
  • IMAG0631.jpg
    IMAG0631.jpg
    50.1 KB · Views: 8
  • IMAG0630.jpg
    IMAG0630.jpg
    33.7 KB · Views: 4
  • IMAG0636.jpg
    IMAG0636.jpg
    47.7 KB · Views: 3
  • IMAG0637.jpg
    IMAG0637.jpg
    59.6 KB · Views: 4
  • photo 1.jpg
    photo 1.jpg
    100.7 KB · Views: 3
  • photo 4.jpg
    photo 4.jpg
    87.9 KB · Views: 7
  • photo 3.jpg
    photo 3.jpg
    90.3 KB · Views: 4
Status
Not open for further replies.
Top