***Dont know much about this

Status
Not open for further replies.

anderkart

Moderator
Messages
6,427
Reaction score
369
Location
Surprise Arizona USA
ok I took these pictures and I need to know what these numbers are.

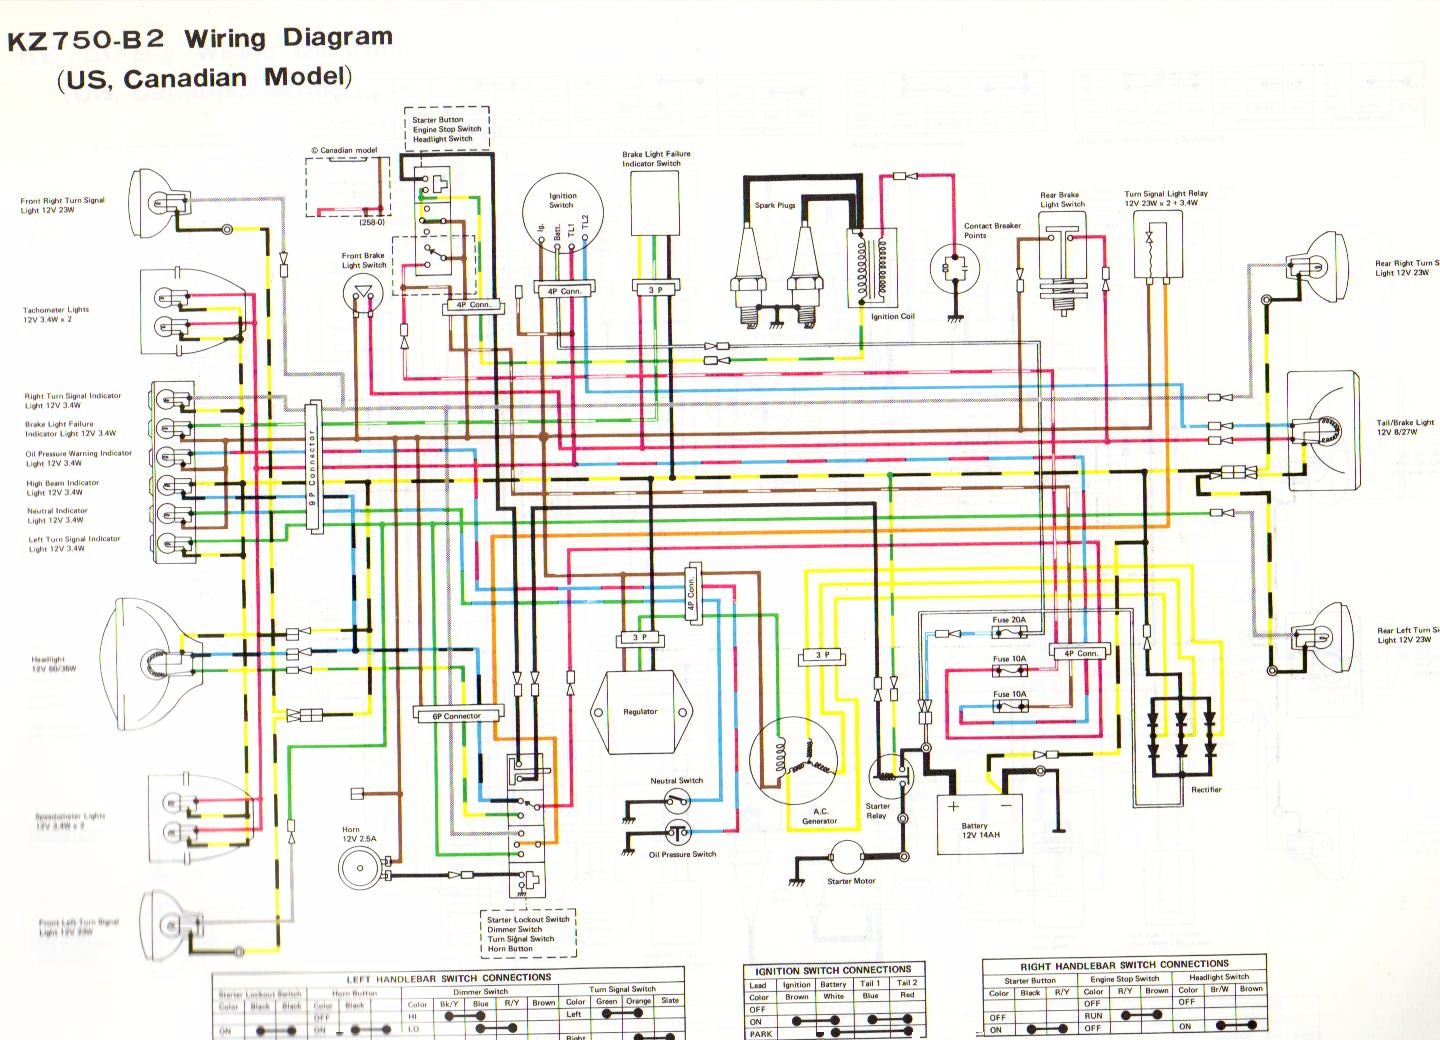
#3 seems to be a rectifier for your charging system, 1,2,4,5 and 6 are its related wiring, but their colors and number of wires dont seem to match the schematic I posted above, I think its the wrong year.

Did that other forum ever confirm what year your engine is for sure?

Anyway, for now your engine would start and run fine without any of 1 - 6 connected up, I can tell they're definitely just for your charging system.

#7 was probably used to supply power to everything except the starter.

#8 gets connected to your battery's positive post.

#9 and #10 are both used to activate your starter relay, you could just permanently ground the black one and send power to the yellow to crank the engine over.

#11 is the starter relay.

#12 I dont know. Once we have the correct year schematic I'll figure it out from the wire colors.

#13 is going to your points and condenser. It gets connected to the negative (-) side of your coil. (most all coils have 2 wire connections labeled + and -) The positive side of your coil could connect up to any type of 2-wire on/off switch you want, that switch would get its power source from the positive side of the battery (or #7)
 

metalthrashinman

New member
Messages
279
Reaction score
0
Location
Hope, NJ
Ok , do you know how many amps that starter will draw? Because I have a few 12v 7ah gelcell around. would that work if I used 2 ?

Don't use those batteries, use car jumper cables. Pull up someone's car, attach the jumper cables, and connect power. Ground (black on the car battery(usually)) to any thick piece of metal on the Kawasaki motor, positive (red on the car battery(usually)) to the Kawi's starter positive post - just tap it to see if the motor cranks.

That engine never had a kick start.
 

T-man

New member
Messages
1,232
Reaction score
4
Location
Missoula,MT
Awesome We're getting this figured out , I am getting a little lost useing the schimatic , its not the colors so much as the routing that gets me lost andtring to "see" the paths of electricity doing what and where.
Anderkart I'll plug in the info of you post up above in the desription latter on today
Rusty : no I didn't get the coil I think I'll have to buy one when I get the funds.

http://www.youtube.com/watch?v=N3axhlk1d9Y
 

anderkart

Moderator
Messages
6,427
Reaction score
369
Location
Surprise Arizona USA
Hey were making progress.

I'll just mention again that if you own or can borrow most any functioning Ignition coil and 2 spark plug wires off a car or truck, you could
use them to test start your engine. I've expanded below how to wire up the coils + and - wires. Then all you'd have to do is rig both
spark plug wires together into your coils single output. Your engines original coil fired both spark plugs simultaneously just like this,
it just had dual spark plug wire outputs.


Ok cool, its a 77.
Below is the correct 1977/B2 schematic and I've updated my wiring identification info from my previous post:

1- Rectifier ground wire (I'd connect this to the same location your negative battery cable bolts to the engine)

2- Rectifier power feed (connects to + side of battery)

3- Rectifier. (It converts A/C to D/C voltage)

4, 5 and 6 are the three AC-voltage legs coming from your engines charging coil.
(looks like that plug just went bad and they bypassed 2 of the wires around it)

For now your engine would start and run fine without #1 through 6 or #12 connected. (they're all just to charge the battery)

#7 was probably just used as a main power source for everything except the starter.

#8 gets connected to your battery's positive post.

#9 and #10 are both used to activate your starter relay, you could just permanently ground the black one and have a push button switch send
power to the yellow to crank the engine over.

#11 is the starter relay. (this relay is a heavy duty switch that can be electrically activated from a small light duty switch)

#12 - I suspect its the voltage regulator plug, but I need a wire count and they're colors going to that plug to be absolutely sure.
(once again your engine would most likely start and run for now without this connected)

#13 is going to your points and condenser.
It gets connected to the negative (-) side of your coil. (most all coils have 2 wire connections labeled + and -) The positive side of your coil
could connect up to any type of 2-wire on/off switch you want, that switch would get its power source from the positive side of the battery (or #7)

Let me know if you have any questions.

When you get ready to do the final wiring in the kart, I'll tell you about installing a few In-line fuses just in case anything ever shorts out.


T-man

New member
Messages
1,232
Reaction score
4
Location
Missoula,MT
COOL I just up-dated the description.

on a bad note I got some very dishartning info.. I'm so tempted to just stop doing YT.
 

KieranM

Doin It!!
Messages
1,409
Reaction score
3
Location
Kilkenny, Ireland
Hey T-Man, I have used wd40 to clean carbs on quads when I was out of carb cleaner, seen no trouble once it was all taken out. Those black pipes at the end of the bowls are to drain the bowl/the over flow pipes.
 

T-man

New member
Messages
1,232
Reaction score
4
Location
Missoula,MT
over flow line, ok. when I started it, did it sound ok because I couldn't tell if the pistons were moving.
 

anderkart

Moderator
Messages
6,427
Reaction score
369
Location
Surprise Arizona USA
Cool it turns over. If your pretty sure its in Neutral, your clutch discs are probably just sticky and dragging a bit causing the sprocket to turn. (no biggie)

Yep those 2 larger sized carb fittings are fuel inlets, the 2 smaller ones must be your bowl vent drains
That plunger connected to your choke linkage is probably is just seized up with old congealed gasoline inside. Looks like your carb rebuild kits are fairly low priced and that Kawasaki Twin forum has lots of carb rebuild info posted.

I still think I'd try to hear it run for a few seconds before spending much money on parts. An Automotive junkyard would probably sell ya a functioning older style ignition coil: http://www.google.com/imgres?imgurl...dsp=24&ved=1t:429,r:14,s:116&biw=1259&bih=772 and a couple long plug wires for $10 or so. (these types of coils were used on most every brand of car and truck from the 70/80's on back)

You could then just bolt your carbs back on (as-is) and prime each one with a half once or so of gas just to hear it run for a few seconds. You could even substitute spraying a quick blast of your carb cleaner into each carbs bore instead of priming with gas. (it'll run off carb cleaner)

You'll have to work the throttles a bit with one hand and it'd really help if the chokes would completely close. You might be able to spray some carb cleaner down around that plunger shaft to loosen it up without dis-assembly.

Probably wouldn't hurt to spray a little WD40 into each cylinders spark plug hole before starting.
 

anderkart

Moderator
Messages
6,427
Reaction score
369
Location
Surprise Arizona USA
Cool, good job man. I've ran across all kinds of stuff that bees or some small critters just packed with leaves and debris like that.

Maybe those fuel inlets are plugged up with bug stuff or congealed gas, try carefully poking something in each end to hopefully help clear it. You've already removed each of the needle valves the floats operate, right? Those needle valves seal up against Seats that usually unscrew for replacement. Taking those seats out first might help you in clearing those fuel passages.

Needle and seat valve:


I'm not sure, but those other 2 ports/fittings you just noticed might be vacuum ports/fittings used for synchronizing the carbs or something.

I'm not all that familiar with carbs like yours but I remember Kaptain Crunch here on DIY seemed to know quite a bit about these vacuum assisted slide models. If no one else offers advice I'd try PM'ing him.
 

HellSpawn

New member
Messages
476
Reaction score
2
Location
Wadena, Minnesota
spray a little bit of carb cleaner into the fuel ports then blow through with the air hose.

Just wear a set of safety glasses or keep it pointed away from your face.
 

Lynx_Genisys

New member
Messages
194
Reaction score
1
Location
Alberta, Canada
OMG!!!

*Goes totaly off topic*

You're T-man off of youtube arent you!!!

Amazing!!!

I watched your vids a few times :D

I love em! ur like a celebraty!

:D

okay sorry..

i end up youtube all time when looking into or researching things, and came across your karts several times.. lol

just.. i dunno.. amazed to find you here or something.. :D

gotta say, im a fan.. lol

and i dnt know either why you arent a "partner"..

realy dissapointing..

anyways, hope you get tis going soon !
 

The Mechtician

Gargamel Jr.
Messages
183
Reaction score
1
Location
Surrey, BC, Canada
I use lacquer thinner for cleaning old dirty carbs. Don't get the environmentally friendly stuff, it doesn't work as good, get the freak-nasty-bad-cancer-causing-poison stuff, it's got MEK in it and it'll melt anything! Keep it away from the rubber parts (including the float needle), just put the emulsion tubes, needles & jets in a dish of lacquer thinner and let it sit for a few hours. Often it's saved me a jet poke on tiny pilot jets. Cool motor, too bad the rest of the bike is gone, but I'm sure it'll make a great kart motor :D Good luck!
 

T-man

New member
Messages
1,232
Reaction score
4
Location
Missoula,MT
Mech . thats good to know, I have some of that stuff. I might have to resort to useing that.

Lynx thanks for the kind words. I dont realy see my self as a celeberity, I just simply do the same thing every one else does, by going out and collecting info to get a job done. Its just that I do videos and tutorials of it to pass the info on. I'll also throw in some of my own ideas and spice from time to time.
I'll also do videos of common questions that pop up in here because I know these guys get a little sick of answering the same "?" over and over.
I can tell you that I have fallen very far behind because of the shop build and the lack of funds. But soon I'll be busting out videos L&R because I'm a little mad about the speed of progress that I have been forced to deal with.
 

T-man

New member
Messages
1,232
Reaction score
4
Location
Missoula,MT
ander I did take out the fuel pins, mine look differant then the picture you poster. Mine dont have the rubber tips or the flat head on the pin thats on back. But I'm sure that its still ok.

HellSpawn : I did just that, stuck the air hose up to one end and all sorts of junk flew out.
 
Status
Not open for further replies.
Top