Dirtbox Venom mini-buggy upgrade/rebuild!

Status
Not open for further replies.

mysteryboy28

New member
Messages
1,582
Reaction score
10
Location
Lansing, MI
got the CV axles mounted, grub screws tightened. putting everything together was like doing a jigsaw puzzle. everything had to go together the RIGHT way, or it wasn't going together at all. lol. had to remove bolts and bearings, and leverage things just right, place 1/4" key in CV hub, THEN tip trailing arm up while placing CV axle in place at an angle while slowly lowering the trailing arm, while at the same time sliding the wheel hub axle stub through the bearing into the CV axle hub - which would only go so far until it had to be tapped the rest of the way in with a hammer and large bolt. yay.

also mounted the spool sprockets and brake rotor, and made a new mount for the rear brake master cylinder. i'm not happy with the leverage of the brake pedal - as soon as you press the pedal the brake engages. so i will tinker with the leverage and position of the master cylinder.

also the right side of the buggy is about 1/2" higher than the left. just enough to irritate me. lol. the rear will be an easy fix. just hack off the top shock mount, trim off the end of the tripod mount a half inch or so, then weld the shock mount back on. the front will be a little trickier, but doable. i want it perfect dammit! i don't want the buggy looking all lopsided when there's only one person riding it. lol.
 

Attachments

  • IMG_20130311_051601.jpg
    IMG_20130311_051601.jpg
    95.6 KB · Views: 36
  • IMG_20130311_051720.jpg
    IMG_20130311_051720.jpg
    91.6 KB · Views: 21
  • IMG_20130311_051751.jpg
    IMG_20130311_051751.jpg
    82.6 KB · Views: 22

fowler

New member
Messages
5,463
Reaction score
16
Location
Bullsbrook West Aus
Ha that's a good job
I reckon a orange or green one would be sick

Switch the shocks around

They may be slightly differant lengths
If u put the left on the right or so on
Alternately the shocks should have some adjustment anyhow
 

jamyers

Well-known member
Messages
1,444
Reaction score
47
Location
Buffalo Gap, TX
I'd drive it awhile and see where it sits after everything gets settled in, before I went and fired up the sawzall and welder.
 

mysteryboy28

New member
Messages
1,582
Reaction score
10
Location
Lansing, MI
got the brake pedal feeling good. so back brakes are done. need to bust out the front calipers and get a piston un-seized.

finished welding the underside of the exaust header. got the motor all bolted it, fuel pump connected, started hooking up the radiator and concluded i need some new hoses. i already snipped off a section of hose that i shouldn't have. oops. lol. studying the cooling diagram and a pic i found of the motor on the web showed me that a hose i thought wasn't needed (so i cut it to use elsewhere) - was in fact needed. doh!

what's your thoughts on using heater hose that's rated for 212 degrees F? Lowes has a 10' section for like $18. or should i shop around and find some real radiator hose rated for 275 degrees? it needs to be pretty flexible, or i need to find some cheap elbows and adapters.
 

exenos

Project Nut
Messages
1,217
Reaction score
0
Location
Ontario, Canada
Well if you hit anything over 200 there's a good chance that your not going to be driving away from it so I would think that that's fine. Does this have a temp guage?
 

jamyers

Well-known member
Messages
1,444
Reaction score
47
Location
Buffalo Gap, TX
What Is the normal operating temp? if its anywhere near 190 or so, I'd be leery of 212* hose, there's not much room for error/overheat. Last thing you want is an overheating engine with failing hoses.
 

exenos

Project Nut
Messages
1,217
Reaction score
0
Location
Ontario, Canada
Technically your good up to 180-190, but I get nervous with anything over 160 because I notice a slow decline in power after that. The normal operating temp of a sled engine varies greatly because of snow conditions and amount of cooling/surface area of heat exchangers on the sled but a good number to shoot for as a constant operating temp is 140. Gives a decent amount of room for error.
 

mysteryboy28

New member
Messages
1,582
Reaction score
10
Location
Lansing, MI
picked up some heater hose from O'Reilly auto parts. they claim it's rated for 257*. i'm gonna hold them to it!

so the smart part of my brain kicked in as i was finishing connecting the hoses to the radiator and motor, and it dawned upon me that the original reservoir probably isn't going to work because it is lower than the radiator. normally you can check your coolant level by looking at the reservoir and add coolant as needed. but because the reservoir is now lower than the radiator the laws of gravity will cause the reservoir to fill up completely. there is also a little breather hose coming out of it that i can assume that coolant will just come squirting out of. my only thought on that was to connect the breather hose to the breather outlet on the top of the radiator. the smart part of my brain tells me this won't work.

so... help me out here. how do you think i should set this up? do i need to purchase a new seperate reservoir (or hack off the old one) and remount it just above the radiator and re-run the hoses accordingly?

brought the buggy out of the garage for a little sun. :) it's still damm cold out. blah.
 

Attachments

  • IMG_20130314_141758.jpg
    IMG_20130314_141758.jpg
    133.3 KB · Views: 28
  • IMG_20130314_141717.jpg
    IMG_20130314_141717.jpg
    142.6 KB · Views: 32
  • IMG_20130314_141433.jpg
    IMG_20130314_141433.jpg
    129.8 KB · Views: 26
  • IMG_20130314_140950.jpg
    IMG_20130314_140950.jpg
    102.9 KB · Views: 26
  • IMG_20130314_141458.jpg
    IMG_20130314_141458.jpg
    152.1 KB · Views: 24
  • IMG_20130314_141820.jpg
    IMG_20130314_141820.jpg
    142.2 KB · Views: 27
  • IMG_20130314_141850.jpg
    IMG_20130314_141850.jpg
    181.4 KB · Views: 27
  • IMG_20130314_141912.jpg
    IMG_20130314_141912.jpg
    164.4 KB · Views: 28

jamyers

Well-known member
Messages
1,444
Reaction score
47
Location
Buffalo Gap, TX
Overflow tanks ... The hose going to the tank from the radiator needs to end at the bottom of the tank, soo that when the rad cools off it'll suck coolant and not air back into the rad. The tank overflow normally just dumps overboard, once the coolant level is set it shouldn't dump any but the level inside will go up/down. One thing often overlooked is a good rad cap, be sure yours is good.
 

mysteryboy28

New member
Messages
1,582
Reaction score
10
Location
Lansing, MI
ok, so what do i do with these connections marked in red? just leave them open with maybe a little drain hose connected, or should i connect them together like i've done?
 

Attachments

  • IMG_20130314_141458.jpg
    IMG_20130314_141458.jpg
    280.5 KB · Views: 33

jamyers

Well-known member
Messages
1,444
Reaction score
47
Location
Buffalo Gap, TX
Wow, you've got a pressure cap on both the rad and the tank(plumbed inside the pressurized system like that its NOT an overflow tank...)? That's not going to work properly...you could put an overflow on the tank but then you'll need another one on the rad to burp the air out - as already mentioned. Too much, too complicated.

I'd take the tank out of the pressurized system altogether and connect the coolant lines going in/out of it to each other. Then mount the tank wherever you want, closer to the rad cap is best. Hook the rad overflow tube to the tank, making sure the end of the hose is at/near the bottom of the tank soo it sucks coolant not air when the engine cools off. Run a dump hose from the top of the tank to some place overboard, this'll only be needed in the cast of a boil over (or if you overfill the system. Put a pressure-relief cap (standard auto-type) on the rad, then once you fill/ burp the system the first time, you'll monitor the coolant level at the tank - and shouldn't have to take the rad cap off for a loooong time.
 

jamyers

Well-known member
Messages
1,444
Reaction score
47
Location
Buffalo Gap, TX
...
In this case, you would need to make sure you have 2 good caps, one for the radiator, and one for the the reservoir. I would burp the coolant form the radiator cap, as it will be the highest point in the system and should bleed out without issue.
.
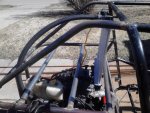
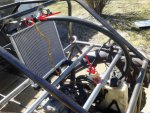
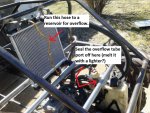
Any air that gets sucked in will go to the top of the rad, the lower tank will be redundant - might as well put a solid cap on it.
 

mysteryboy28

New member
Messages
1,582
Reaction score
10
Location
Lansing, MI
overflow tube... dump hose...??? they sound the same to me. care to use my unedited picture to make a diagram for me please? :huh:

some directional arrows showing direction of coolant flow would help too.
 

Attachments

  • IMG_20130314_141458.jpg
    IMG_20130314_141458.jpg
    152.1 KB · Views: 13
Status
Not open for further replies.
Top