Dirtbox Venom mini-buggy upgrade/rebuild!

Status
Not open for further replies.

Doc Sprocket

*********
Messages
15,677
Reaction score
142
Location
Ontario, Canada
You shouldn't have a problems using galvanized pipe. While a bit heavy, keep in mind they were used in plumbing systems for decades (and still are in some applications).
 

greaser

new here
Messages
126
Reaction score
0
Location
moose lake mn
I dont see any issues with that set up, everything looks like it flows well as long as your Y doesnt leak It should be fine.
 

mysteryboy28

New member
Messages
1,582
Reaction score
10
Location
Lansing, MI
houston, we have a working motor!

after finding and fixing a no-spark issue, cleaning the heck out of the carbs, a little gas in the spark plug holes, and a little carb cleaner spray in the carbs (and my eye when cleaning the carbs) - the beast fired right up!

the coolant was leaking from the motor's top coolant output where i flipped the thingy around (the rubber seal was pretty squashed), so i cleaned that up and applied some silicone gasket maker to it. letting that sit till tomorrow and will hook the hoses back up and fill 'er up again.

https://www.youtube.com/watch?v=7aSbOwIc-aA
 

mysteryboy28

New member
Messages
1,582
Reaction score
10
Location
Lansing, MI
so spent the night fabbing up the throttle cable/linkage. the sled throttle cable has a barrel end on it, so i needed to make something that would hook up to that. my initial idea of using a U-clamp didn't work out too well, because due to the angle that the U-clamp pulled on the barrel - it was always pulling out the barrel end enough to rev up the engine a bit. that wasn't gonna work. so i'm brainstorming on how to make some kind of clamp or bracket to hook onto the barrel end, that will allow me to feed the throttle cable coming from the pedal through it (and be able to clamp that wire down tight too).
 

Attachments

  • throttle cable fail.jpg
    throttle cable fail.jpg
    24 KB · Views: 8

mysteryboy28

New member
Messages
1,582
Reaction score
10
Location
Lansing, MI
made a neat little bracket out of some decent thickness sheet metal.
 

Attachments

  • IMG_20130326_170351.jpg
    IMG_20130326_170351.jpg
    75.8 KB · Views: 22
  • IMG_20130326_170414.jpg
    IMG_20130326_170414.jpg
    78.6 KB · Views: 16
  • IMG_20130326_170524.jpg
    IMG_20130326_170524.jpg
    44.7 KB · Views: 19
  • IMG_20130326_170731.jpg
    IMG_20130326_170731.jpg
    91.7 KB · Views: 22

mysteryboy28

New member
Messages
1,582
Reaction score
10
Location
Lansing, MI
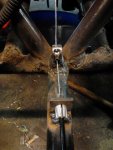
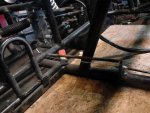
highlight of the evening: the buggy moves! one sprocket welded on and edges of the welds ground down so the chain rides on the sprocket, not the welds. you can tell when i put the buggy back into forward that it's gonna have some real pep to it! that was just tapping the gas... :)

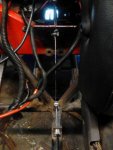
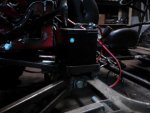
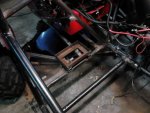
also whipped up a battery platform and welded it onto the buggy. made sure i had plenty of clearance for the trailing arm. wasn't really any other place to put it. it's interesting how making more cabin/leg room made so much less room for everything else. lol. oh, and the seat isn't all the way back. my wife sat in it earlier to check it out, and she had to slide the seat forward (she's almost 5'11"!). man i got fat over the winter. lol.

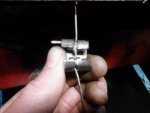
i've got a small gas leak coming from the mini tee that connects the fuel line to the primer pump. honestly, the buggy fires up great WITHOUT using the pump, and having all these extra little fuel lines running everywhere is just asking for trouble. so i think i'm gonna bypass the tee (eliminating the primer) and just run a fuel line straight from the fuel filter to the fuel pulse pump. if there's ever a cold morning that the buggy is hard to start - a quick spray of carb cleaner in the carbs will do the trick!

dumped what was left of the coolant into the radiator after letting my silicone gasket cure for 24 hours. so far no leaks. gotta buy another jug of coolant (probably need a half a jug to fill 'er up), then really warm the buggy up to see if we're good to go... i wonder if the temp sensor on the motor can be used for good (instead of evil?)?

http://www.youtube.com/watch?v=_ByPFU2jVa8
 

Attachments

  • IMG_20130327_022620.jpg
    IMG_20130327_022620.jpg
    61.1 KB · Views: 11
  • IMG_20130327_022542.jpg
    IMG_20130327_022542.jpg
    78.5 KB · Views: 12
  • IMG_20130326_205235.jpg
    IMG_20130326_205235.jpg
    83.1 KB · Views: 16

greaser

new here
Messages
126
Reaction score
0
Location
moose lake mn
Wow you can tell she really wants to run when you hit the gas. Looks like the suspension is working well also.

Oh yeah, i second getting rid of the primer there should be more than enough gravity feed with the tank on the rack.
 

mysteryboy28

New member
Messages
1,582
Reaction score
10
Location
Lansing, MI
got to take the buggy for a couple of trips up and down the street today. holy cow does it fly!

on a bad note though, I apparently was expecting too much from the CV axles at the angle in which they're running, and one of them popped the boot while accelerating. that was fun (not!). i heard a noise and suddenly it was pulling (pushing) to one side. it doesn't look like the CV is damaged, so i think a new boot will hold it together. worse case scenario, i will have to buy a new (used) CV axle for $30. to avoid the risk of this happening again though, i am going to lower the buggy 2-3 inches in front and back. that will lessen the sharp angle of the CV axle, and prevent the shaft from popping out of the socket. given that the rear currently has 16 inches of ground clearance, i don't feel too bad about lowering it a bit. :)

i also eliminated the primer pump from the equation, and made crown nuts for the front spindles and tie-rods. drilled the cotter pin holes, so now the spindles are on solid! also installed new plugs. it seems to be burning a bit too much oil, which should be easily adjusted where the cable connects to the oil pump.
 

Attachments

  • IMG_20130328_180316.jpg
    IMG_20130328_180316.jpg
    100.2 KB · Views: 20

exenos

Project Nut
Messages
1,217
Reaction score
0
Location
Ontario, Canada
Definitely need to work on reducing the distance between cv and axle bearing, it'le help a huge amount with the durability of the cv's.
 

mysteryboy28

New member
Messages
1,582
Reaction score
10
Location
Lansing, MI
care to find me some cost effective pics of alternative setups that meet that criteria? i'm always happy to learn something new.

there are several factors that went into the design of my IRS setup:

low cost
width of rear of the buggy had to be kept minimal
availabilty of parts
durability (not so much this time around. lol)
simplicity (sort of)
 

mysteryboy28

New member
Messages
1,582
Reaction score
10
Location
Lansing, MI
Picked up a universal boot kit for $7 at auto zone. Tried o'reilly first, but their universal boot was a bright blue! Yeah, no. Lol. The boot just wraps around the joint, and then is held together with several small screws. Comes complete with clamps and grease! Yay!

Hit harbor freight to pick up a floor jack, found one that cranks up to 20 inches for $85, but they wouldn't let me use a 20% off coupon. Pass. I'll check the local pawn shops first.
 

mysteryboy28

New member
Messages
1,582
Reaction score
10
Location
Lansing, MI
just scored a nice used 2 1/2 ton floor jack for $20! drove out to flint, mi (an hour and a half away) with my brother to help him pick up a jeep grand cherokee, figured i'd check flint craigslist while i was out there. the girl was selling it for her "man", wanted $30, took $20. yay!
 

exenos

Project Nut
Messages
1,217
Reaction score
0
Location
Ontario, Canada
This is all I would suggest, not much different but enough to help I think. I can explain why I think it would be stronger, just let me know.

EDIT: Oh, and nice score on the jack!
 

Attachments

  • arm 1.jpg
    arm 1.jpg
    23 KB · Views: 12
  • arm 2.jpg
    arm 2.jpg
    16.6 KB · Views: 10
  • arm 3.jpg
    arm 3.jpg
    21.4 KB · Views: 10
  • arm 4.jpg
    arm 4.jpg
    14.3 KB · Views: 9
  • arm 5.jpg
    arm 5.jpg
    11.3 KB · Views: 10

mysteryboy28

New member
Messages
1,582
Reaction score
10
Location
Lansing, MI
Cool, thanks dude. I thought about making the bearing section narrower, but I wanted as much horizontal support as possible. The trailing arms for this buggy are narrower than the last buggy, I suppose I will try something similar to your suggested design the next time around. :)
 

mysteryboy28

New member
Messages
1,582
Reaction score
10
Location
Lansing, MI
so i took 2 inches off the rear shock tripods - and it lowered the buggy 5 inches??? grrr... swapped the 15 inch eye to eye front shocks out with 14 inch eye to eye shocks, and it lowered the front 4 inches? dude! grrr... i will get this right... lol.

meanwhile put the new boot on the CV and put the CV back on the buggy. will give it a test run today, maybe make some video (in it's lowered, pimpin' state. lol)! :)
 
Status
Not open for further replies.
Top