Dirtbox Venom mini-buggy upgrade/rebuild!

Status
Not open for further replies.

mysteryboy28

New member
Messages
1,582
Reaction score
10
Location
Lansing, MI
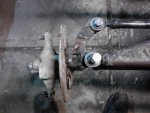
fun night making the dashboard.

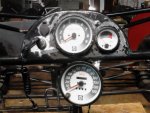
the speedometer won't be accurate. however, it did have 2 spots on the back for connecting the cable to either MPH or KPH (or similar). considering the speedometer was originally connected to the track on the sled (quite a bit smaller than the 25 inch tires), the speedometer will probably read about half of the speed as it originally did. by using the KPH input it will make the needle go farther than MPH. i'll charge up the GPS and mark the speedo with something to indicate 10, 20, 30, 40 mph (some whiteout or something non-permanent). i'd go higher, but i don't have anyplace around here to really open the buggy up without getting busted by the po-po. lol.

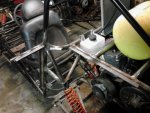
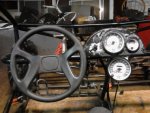
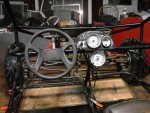
the dash has: tachometer, speedometer, ignition, 12v lighter socket, temp guage, and a light switch (toggles left and right due to space limitations behind the panel). the speedometer is mounted below (mainly because that's as far as the cable would reach), pointed up and towards the driver. i think it turned out pretty nice. :)
 

Attachments

  • IMG_20130409_025108.jpg
    IMG_20130409_025108.jpg
    90.7 KB · Views: 35
  • IMG_20130409_025051.jpg
    IMG_20130409_025051.jpg
    92.1 KB · Views: 31
  • IMG_20130409_025351.jpg
    IMG_20130409_025351.jpg
    95.4 KB · Views: 24

mysteryboy28

New member
Messages
1,582
Reaction score
10
Location
Lansing, MI
mounted the second brake cylinder in line with the 1/4" steel rod going back to the rear brake cylinder. simply welded a 1/4" bolt onto the rod, which goes through the lever arm that compresses the cylinder.

now to hook up the tee connector and hoses to the front calipers, then fill and bleed the brakes. then to test them out to make sure the the front and rear brakes are getting about the same amount of stopping power.

http://www.youtube.com/watch?v=DTe_6uw0z1Y&feature=youtu.be

however, now the motor is getting flooded with fuel, and the right spark plug keeps getting fouled. i need to determine if it's just some dirt keeping the float valve from closing all the way, or if there's a crack in the fuel pump diaphragm, allowing gravity to drain the contents of the fuel tank into the motor.
 

mysteryboy28

New member
Messages
1,582
Reaction score
10
Location
Lansing, MI
alright - 2 weeks! let's do this! i just sold another buggy, time to step it up and get 'er done!!!

so... not the end of the world on the fuel flooding. it'll be either a bad diaphragm in the fuel pump, or a leaky needle valve in the carb. both are cheap fixes (only like $10 for a fuel pump rebuild kit).

to clear out excess fuel that has flooded the crankcase, simply remove the spark plugs, then unhook the pulse pump hose that connects the fuel pump to the motor. crank and crank the motor over until no more fuel sprays from the pulse nipple on the motor. supposedly you gotta charge the battery up a couple of times to do this, and you don't want to run the starter for more than 20 seconds or so at a time (with a few minutes to cool of in-between) or you'll burn it up.

trying to determine exacly which fuel pump rebuild kit to buy. if anyone feels like being helpful and pointing me in the correct direction - i'd appreciate it! here's a picture of the pump (and my new battery charger!), and it's from a 97 ski-doo formula 500 deluxe. :)
 

Attachments

  • DSCF4771.jpg
    DSCF4771.jpg
    105.8 KB · Views: 9
  • DSCF4773.jpg
    DSCF4773.jpg
    112.5 KB · Views: 8

exenos

Project Nut
Messages
1,217
Reaction score
0
Location
Ontario, Canada
Just pull the impulse line from the crank case and check if fuel comes out of it before you go and buy a rebuild kit, also try swapping the carbs around and see if the flooding follows the carb. That will tell you what the problem is.

Also there should be a drain plug for each cylinder on the front under the manifold, it'll save you time with the starter
 

mysteryboy28

New member
Messages
1,582
Reaction score
10
Location
Lansing, MI
no drain plugs on these ski-doo motors. and yes, gas did squirt out of the pulse line on the motor when cranking it over.

i'm gonna crack open the fuel pump and inspect the diaphagm. think it'll void my warranty? lol.
 

exenos

Project Nut
Messages
1,217
Reaction score
0
Location
Ontario, Canada
Seriously, no drain plugs? And here I thought that European engineers were better than Japanese ones. Every fuji I've worked on has had drain plugs and they can be a godsend at times.

Was the gas coming out of the pulse line from the engine right? Not the pump?
 

exenos

Project Nut
Messages
1,217
Reaction score
0
Location
Ontario, Canada
If it was just from the engine and not from the pump then its almost a guarantee that the needle valve is leaking. Like I said, swap the carbs side to side and see if the problem follows the carb. Thats the best indicator. The problem on my sled followed the carb and it was a bad needle & seat. Hope i'm not being too repetitive or spouting stuff you already know.
 

mysteryboy28

New member
Messages
1,582
Reaction score
10
Location
Lansing, MI
I like spouting and repetition. Lol. I think I want to replace the diaphagm anyway since the pump is getting a wee bit old. For $10 I think its worth it. Plus the tank had drained quite a bit of gas into the motor when I wasn't riding it, which would be another indicater of a leak in the pump.
 

greaser

new here
Messages
126
Reaction score
0
Location
moose lake mn
I like the speedo set up look like it should be easy to see on the fly, the KPH may be pretty close.

I would look at the needle valves as well but I am not going to complain about you changing out the diaphragm.

Its really starting to come together now, are you supplying the beverages when I get out.
 

mysteryboy28

New member
Messages
1,582
Reaction score
10
Location
Lansing, MI
oh hellz yeah! we will kick back a few beers and go dare the golf course. :cheers2: :auto: :wai:

meanwhile, cleaned the carbs again (and switched them around), and took apart the fuel pump. everything looked fine in there, aside from some loose dirt. hit it with a couple sprays of carb cleaner, followed with compressed air, then slapped it all back together again. once fuel made its way through all the hoses it finally fired up and ran great. will give it a good test run in the next couple of days. i ordered some in-line fuel petcocks that may help with any future fuel "creepage".

after all that i decided it was time to tackle front brakes, and everybody's favorite: ackerman steering geometry! yay! got one steering arm done. reinforced it with a second steel plate under the extention. hopefully the other one will be close to even with this one. once they're both done i will need to shorten the tie rods. the buggy will turn much better once this is all done!

i won't be adding brake fluid till the pressure activated brake sensor/switch banjo bolt arrives in the mail. easiest way to add brake lights to your kart/buggy - and only $10 on ebay!

also went to the scrap yard today and bought some angle iron to make mounting rails for the fenders, as well as some steel bar to make supports for the fenders. then went to the welding supply store and exchanged my tank for a fresh one. this one will get a lot more use than the last one did, since i finally sealed all my leaks. i swear i probably leaked half of the tank out. lol. on a positive note though, mig welding wire is about half as expensive as flux core wire. :)
 

Attachments

  • SKU027085-1.jpg
    SKU027085-1.jpg
    48.5 KB · Views: 12
  • IMG_20130413_023431.jpg
    IMG_20130413_023431.jpg
    75.2 KB · Views: 16
  • IMG_20130413_005611.jpg
    IMG_20130413_005611.jpg
    69 KB · Views: 18
  • IMG_20130413_001204.jpg
    IMG_20130413_001204.jpg
    79 KB · Views: 17
  • 9f1a_1.jpg
    9f1a_1.jpg
    9.6 KB · Views: 6

mysteryboy28

New member
Messages
1,582
Reaction score
10
Location
Lansing, MI
finished up the other steering arm. ackerman complete!
 

Attachments

  • IMG_20130415_024034.jpg
    IMG_20130415_024034.jpg
    85.6 KB · Views: 11
  • IMG_20130415_024003.jpg
    IMG_20130415_024003.jpg
    78.1 KB · Views: 9

Desertduler

Active member
Messages
1,736
Reaction score
9
So where do you drive your buggies?
Do you have any open country in your state to drive them on or any OHV parks?
Does anyone where you live put on any racing events for UTV or Off Road Buggies?
I am a member of a Off Road Racing Club in my state and we put on two races every year along with other clubs in my state for a total of twelve to fifteen races each season and at our races we hold ATV UTV Buggies and Motorcycle racing at the same event these races are any where from 80 to 140 miles long you would have alot of fun racing one of your buggies in a desert race I use to race a Class 2 buggy in the Desert and Motorcycles but I can tell you that Racing buggies was one of my favorites if you ever get a chance to race Off Road you should try it there is nothing like it you have to survive along with your machine and try not to break or wreck it which is sometimes hard to do!
 

mysteryboy28

New member
Messages
1,582
Reaction score
10
Location
Lansing, MI
this is where i ride (until the cops catch me, lol). it's an abandoned golf course, now owned by the city. the manco dingo kart i was riding in the first video was set to a pretty low max RPM. i didn't know how to adjust a throttle cable back then. lol.

i would LOVE to go on a long survival race!

www.youtube.com/watch?v=kPQ-6KTWkl8

www.youtube.com/watch?v=sqlLE6Pazi0
 
Last edited by a moderator:

Desertduler

Active member
Messages
1,736
Reaction score
9
That sled powered buggy runs good! You would have a blast in our deserts out here in the west we have it all sand,rocks,hills,whoops,highspeed roads,washes,etc.
Thanks for posting thats a shame to have that golf couse so close to you and you have to watch your back because of cops too bad the city would not turn that place into a OHV park and charge a small fee for day use and reap some revenue from it have you ever thought about asking them about that?
Just a thought.
 

mysteryboy28

New member
Messages
1,582
Reaction score
10
Location
Lansing, MI
front brakes bled and mounted.

headlight mounting brackets cut and welded on.

front fender rails cut and welded on.

also ground off the red paint from the "hood", in preperation for the grabber green paint.

tried out the new impoved "ackermaned" steering. turning radius is much better now. it'll never be as good as a vehicle with a rear differential due to the solid rear drive ("live axle"), but on dirt and grass it'll do better than it will on pavement.

i've determined that the motor does in fact need to have a primer for starting. otherwise after the buggy has been sitting for a bit you have to crank and crank the motor till it sputters, then take the plugs out and blow out the oil build-up with compressed air. then it fires right up. evil. i'll have to find a new tee piece for tapping into the fuel line, as the original one was junk.

ordered a replacement temperature sensor, because the one on the motor was just sending a constantly hot signal, causing the needle to jump to fully hot on the temp guage almost instantly.
 

Attachments

  • IMG_20130416_033029.jpg
    IMG_20130416_033029.jpg
    96.1 KB · Views: 13
  • IMG_20130416_033049.jpg
    IMG_20130416_033049.jpg
    104.9 KB · Views: 15
  • IMG_20130416_033106.jpg
    IMG_20130416_033106.jpg
    95 KB · Views: 14
  • IMG_20130416_033129.jpg
    IMG_20130416_033129.jpg
    93.8 KB · Views: 17
  • IMG_20130416_033207.jpg
    IMG_20130416_033207.jpg
    63.6 KB · Views: 21

n1kogr

New member
Messages
265
Reaction score
0
Location
Mass
What did you use for front brake lines and where did you get that t fitting if you dont mind me asking?
 

mysteryboy28

New member
Messages
1,582
Reaction score
10
Location
Lansing, MI
What did you use for front brake lines and where did you get that t fitting if you dont mind me asking?

i used ATV/quad/motorcycle/go-kart brake hose, with the 10mm banjo ends, readily available on ebay. the cast metal tee connector (not pictured) is also from ebay, and came with 3 10mm 1.25 pitch banjo bolts.

meanwhile, made a tee connector from a 1/4" tee and a 1/8" splicer piece to incorporate the primer back into the mix. got the fuel lines all hooked back up, and had the buggy running in no time from a cold start. took it for a few laps up and down the street, and over in the dirt parking lot. brakes are starting to feel better, as the pads and rotors get aquainted with each other.

spent the rest of the night finishing up the fender mounting rails. only thing left to do for those is bend some steel bar to support the outside edges of the fenders. then it"ll be time to cut, shape, and mount the fenders.
 

Attachments

  • IMG_20130417_032200.jpg
    IMG_20130417_032200.jpg
    108.6 KB · Views: 20
  • IMG_20130417_032123.jpg
    IMG_20130417_032123.jpg
    95.9 KB · Views: 13
  • IMG_20130417_031940.jpg
    IMG_20130417_031940.jpg
    96.4 KB · Views: 17
  • IMG_20130416_155952.jpg
    IMG_20130416_155952.jpg
    92.7 KB · Views: 15
  • IMG_20130416_155240.jpg
    IMG_20130416_155240.jpg
    114.8 KB · Views: 15

mysteryboy28

New member
Messages
1,582
Reaction score
10
Location
Lansing, MI
okay, the same carb seems to be fouling things up. i did as exenos suggested - swapping the carbs, and sure enough the problem is following the same carb. took them both apart and cleaned the heck out of the needle and seat. ran great for a few minutes (sort of), then started running like it was running on a single cylinder again.

took the plugs out, and the left one was wet. looked more like oil than gas. seems almost like the left carb bowl is filling up, then cutting off fuel supply or something. just a guess. cuz the bowl was completely full, and it didn't have any problems filling up when it was completely empty. will try cleaning it a more thoroughly (need a fresh can of carb cleaner with a straw - didn't have a straw for the last can), then blow the heck out of every tube, jet, and cranny with the compressed air. maybe a good soak overnight to loosen up any varnish that is being a little bi-otch might help... i'd really hate to have to buy another carb!

meanwhile working on the fenders. my brother took off with my tape measure earlier today, didn't realize he had it in his haunted truck. yeah that's right. haunted. here's a pic he took a couple of weeks ago when he first bought it. look closely at the driver's seat. who the heck is sitting in it? there wasn't anybody else around...
 

Attachments

  • 544897_10151542011767460_1254989482_n.jpg
    544897_10151542011767460_1254989482_n.jpg
    57.2 KB · Views: 37
Status
Not open for further replies.
Top