Dash Board wiring

Karttekk

Well-known member
Messages
2,003
Reaction score
694
Location
Elizabeth, PA
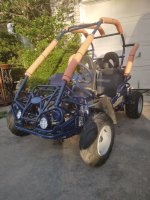
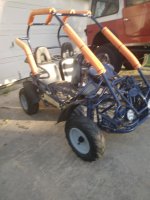
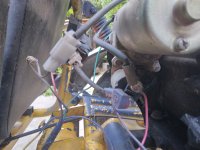
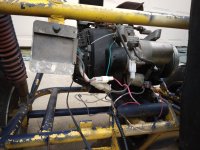
The dangling wire is for the low oil cutoff which is disconnected. I switched from the worn stock engine to a Predator I had put together from a box. At least it was free.
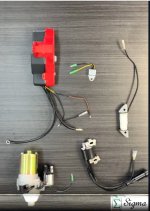
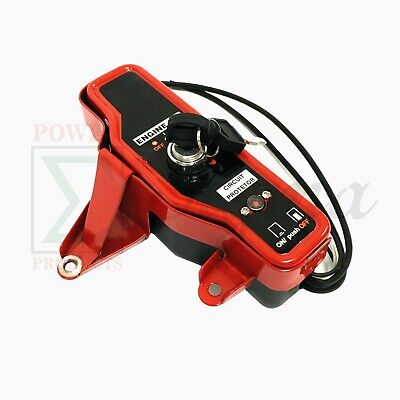
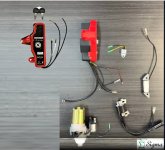
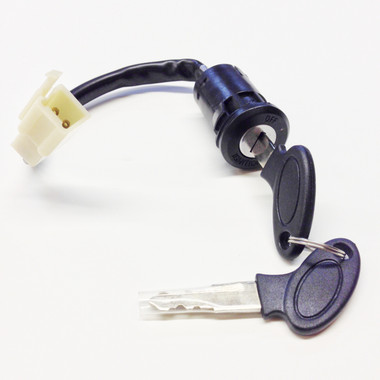
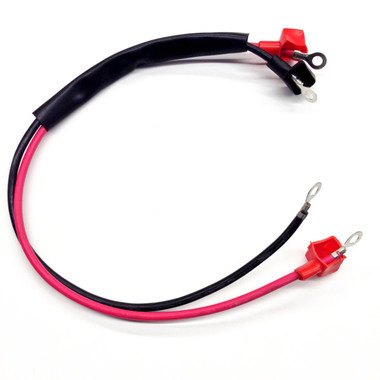
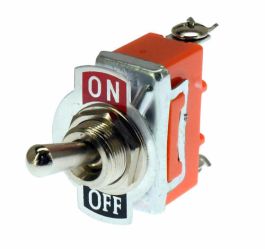
 

Karttekk

Well-known member
Messages
2,003
Reaction score
694
Location
Elizabeth, PA
Take another look at the wiring diagram I sent you. It's almost exactly like we determined. Red/yellow to the solenoid, fuse holder between the starter, battery and key switch, battery to ground. I think we'll be fine. I guess you could jump the key switch once you get your test light. Red should be hot at the harness. Look at the key switch and try to figure out which wire completes the circuit or go from hot to any one of the other female harness terminals.
 

Snaker

Active member
Messages
341
Reaction score
182
Much better pictures. You're missing a fuse holder. Part of it is A and it looks like the other part is D. The fat positive battery wire connects to the solenoid post where that socket wire B is connected or behind it. It looks like it was connected to C at one point. That is a power feed from the key switch. The starter on my kart doesn't have a solenoid, it has a relay with one positive post. The fat black wire running on top of the engine looks like a main starter wire. There should be a fat red wire from the battery to one solenoid post and the other fat red wire runs from the other solenoid post into the starter. The solenoid is basically a relay. The fat battery ground wire bolts to the fan shroud where the green wire is. Pull the boot back where that socket is & see if there's a post behind it. Get a fuse holder before you connect any hot wires. If something goes sideways with no fuse things will start burning. Here's a fuse holder: https://www.bmikarts.com/In-line-Fuse-Holder--Includes-20-Amp_p_25124.html. I'll include a picture of one that's open. I wouldn't worry about the key switch just yet. Connect a fuse holder, attach the battery wires then jump the solenoid posts to see if the engine cranks. Put a fuse holder between A and D. Put a fat red positive wire with an eyelet on it from the positive battery terminal to the solenoid post where D is. Put a butt connector from B to C.
Top job of going through this.
I don't want to hijack this but want to make a quick point.
The fuse holder you show is common in a lot of these carts.
It's also a problem.
The two wires are crimped to the fuse holders and the fuse holders are clamped to the fuse caps.
The fuse element is strung through the fuse tube and folded over the edges.
The fuse caps slide down on the tube along with the fuse element and are glued in place.

What I have found is that stress's on the wires and vibrations will cause the fuse holders to twist and break loose the glue, which causes a intermittent connection within the fuse.
It becomes a very difficult problem to troubleshoot.

The link you posted is likely good because that type of holder tends to contact the end of the fuse cap rather than clamp on it.
Here is the setup I prefer.
A blade style WITH a weather proof rubber cap.
I have found these in the marine section of Walmart even

Temu | Explore the Latest Clothing, Beauty, Home, Jewelry & More
 

electraglide

Active member
Messages
167
Reaction score
190
Karttekk ........ Your Kart looks sharp and impressive. In my case as I said has been painted and some wires look the same as any other. I’ll have to trace the switch wires to the opposite end and see if they are connected to where they are supposed to be to include the loose wires, most importantly the key switch and starter button. I’ll do as you said … peel back the wire bundle sleeve to expose the colors. If I can’t make sense out of that I may just buy a harness ( $49 ) and use the diagram you sent be to make the connections. I might need you to hold my hand and draw pictures along the way as I know very little about technical jargon and I can’t picture it in my mind. Plus I am a disabled veteran , suffer from PTSD and can’t deal with stress, when I come across an obstacle I leave things be for a couple of days until I get over it. Maybe this is To Much Information but I think you should know. I appreciate your time and patience. Thanks. I ordered the test light, meantime I snapped the pull starter cord … thank God it was easy to rewind and install. I’ll keep you informed. This Kart is for my 10 yo granddaughter, she looks forward to driving it one day.
 

electraglide

Active member
Messages
167
Reaction score
190
Karttekk .......... To avoid headaches and mistakes figured I'll just go ahead and get me this Switch Box from ebay. Just gotta figure where the starter part connections are since they are already installed on my kart. I'll take a look see and send you a detailed/labeled diagram of where I think these connection are located so that you can confirm if my findings are corrected.
 

Attachments

  • ebay GX200 Switch Box.jpg
    ebay GX200 Switch Box.jpg
    73.6 KB · Views: 11
  • GX200 Hookup II.jpg
    GX200 Hookup II.jpg
    72.8 KB · Views: 11
Last edited:

Karttekk

Well-known member
Messages
2,003
Reaction score
694
Location
Elizabeth, PA
Sorry about your issues. I wouldn't stress too much over it, these are called fun karts for a reason. Look at it as a learning project, not something to worry about. I didn't say to peel back the wiring to expose the colors, I said pull back the boot on the starter solenoid to see how the positive battery cable is fastened. I don't think there's a need for that starter box either. Your wires are already there, they just need reconnected. You'll need some type of fuse to avoid electrical fires and the power feed wire needs reattached. Put two battery cables on it & you should be fine. Put a fuse between A and D wires, put a butt connector between B and C wires, attach a ground wire from the negative battery post to the engine block and a positive wire from the battery to the starter solenoid or what you call a socket with the yellow line drawn on it and see how that goes. Buying harnesses and starter boxes are only complicating things more. You'll be fine.
 

Karttekk

Well-known member
Messages
2,003
Reaction score
694
Location
Elizabeth, PA
You'll need these parts to get things going. Replacing the key switch is much easier than adding a key box and a wiring harness. I know this seems like a lot to take in but once you understand how things work you'll see it isn't intimidating at all.


electraglide

Active member
Messages
167
Reaction score
190
Karttekk … you are so right. In fact I was thinking along those lines. I put the Switch Box order on hold and started to trace the wires from the dashboard to the other end towards the engine and starter to practice my troubleshooting skills, have peace of mind, learn something and have a sense of accomplishment plus I always welcome a challenge. If I don’t succeed at least I tried. I used a multimeter set on continuity. As I was pulling the connectors off they started to fall apart and crumble. I’ll deal with that later. I had to stop because of my bad back plus I was stumped by a wire I couldn’t trace and it was stressing me out. I’ll follow your instructions, I can see the light at the end of the tunnel … it’s all good … thanks for the advice … I’ll keep you posted …..
 

Karttekk

Well-known member
Messages
2,003
Reaction score
694
Location
Elizabeth, PA
I had the same thing happen to the headlight connectors on this 80T. The previous owner butchered the wires and the connectors were brittle and crumbling. Electric Scooter Parts had pre-made connectors with wires that I was able to install with those waterproof butt connectors. Scroll down the page to see the ones I'm referring to. I used Electric Scooter Parts when I fixed up a Razor Pocket Rocket electric bike and a Razor electric scooter. Great vendor.


electraglide

Active member
Messages
167
Reaction score
190
Thanks for all the links Karttekk ..... those wire connectors will work just fine ... dirt cheap, better than rigging something up and beats what eBay has to offer. Went to Dept of Transportation today to setup and appointment to have a Law Officer check and clear the Vin on my kart ( since it has never been titled and all I have is a Bill of Sale.) Appt is not till 24 May. Trying to get it registered as a Low Speed Vehicle. May may not happen but that's ok. Not setting my hopes up. Driving it in my back yard is good-nuff.
 

Karttekk

Well-known member
Messages
2,003
Reaction score
694
Location
Elizabeth, PA
Keep in mind there are different sizes of connectors for different wires. The 80T headlight connectors are smaller than the main wiring harness connectors. Let the vendor know which connectors you'll need.
 

electraglide

Active member
Messages
167
Reaction score
190
Thanks for the heads up, I'm learning as I go. I got my harness I ordered for my 1971 Honda C70. Another project I'm
working on plus I have a Murray Outrage Go Kart ( rolling chassis ). But first the Trailmaster.
 
Last edited:

Karttekk

Well-known member
Messages
2,003
Reaction score
694
Location
Elizabeth, PA
Are you able to get a picture of the whole kart? At first I thought we were working on the blue one pictured with your first question. It would help if I could see the whole machine to hopefully identify what you're working on. I'm not sure what A & B are for.
 

electraglide

Active member
Messages
167
Reaction score
190
Did the research on the A & B picks. A is choke with the plunger missing. B is an on/off switch. Yeah ... sorry for posting that 1st pic. That is not my Kart. Just a nice picture of one. Original color of mine I guess was yellow and was poorly painted blue. There are about 3 or 4 loose wires and half of the wiring harness wires are also painted blue. That is why I want to trace all wires to make sure they weren't tampered with or rigged. Don't wanna blow up anything. Thanks to you, I am making progress.
 

Attachments

  • 20230413_192130.jpg
    20230413_192130.jpg
    3.8 MB · Views: 19
  • 20230413_192151.jpg
    20230413_192151.jpg
    2.5 MB · Views: 17
  • 20230423_181256.jpg
    20230423_181256.jpg
    2.9 MB · Views: 19
  • 20230423_181537.jpg
    20230423_181537.jpg
    2.6 MB · Views: 21
  • 20230424_163014.jpg
    20230424_163014.jpg
    3.2 MB · Views: 22

Karttekk

Well-known member
Messages
2,003
Reaction score
694
Location
Elizabeth, PA
I should have realized A was a choke knob. I had to replace the choke cable on the 80T, it was rusted and stuck. B is for the headlight switch. Knowing what you're working on is a big help.


electraglide

Active member
Messages
167
Reaction score
190
I decided on getting the Switch Box since I'll be getting a lot more for just $19. Depending on whether I can register my kart as a Low Speed Vehicle I may may not have use for the existing wire harness. If I can't then I won't need lights or horn. If I can I would probably need a harness that accommodates headlights, brake lights, turn signals plus the horn. Seen a video on how to rig one up. Put that on the back burner since the DMV is slow on processing things. I also have on order the toggle switch. Gonna make my own battery cables since I have plenty of 8 & 10awg wire and have a soldering iron.
 

Attachments

  • Key Switch.jpg
    Key Switch.jpg
    213.3 KB · Views: 3

Karttekk

Well-known member
Messages
2,003
Reaction score
694
Location
Elizabeth, PA
Sounds good. I put new eyelets on the 80T battery cables using heat shrink eyelets. I stripped a 1/4" or so of insulation from the end of the wire, crimped it into the eyelet then used my heat gun to shrink the eyelet firmly to the wire. Worked great and it's never coming apart.
 

Attachments

  • heat term.jpg
    heat term.jpg
    9.8 KB · Views: 0

electraglide

Active member
Messages
167
Reaction score
190
Karttekk .... what's your thought on a 5ah vs 14ah battery. I know what ah is and what it does but I figured since the charging system on the kart keeps the battery charged and lights and horn run off the charging system as well why spend more on a 14ah battery.
 

Karttekk

Well-known member
Messages
2,003
Reaction score
694
Location
Elizabeth, PA
Karttekk .... what's your thought on a 5ah vs 14ah battery. I know what ah is and what it does but I figured since the charging system on the kart keeps the battery charged and lights and horn run off the charging system as well why spend more on a 14ah battery.
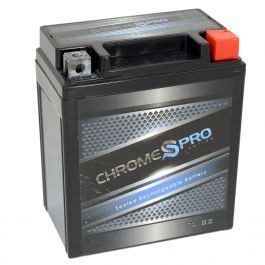
I usually go with what the factory suggests. This is what Hammerhead Performance offers.


Attachments

  • kart_batt.jpg
    kart_batt.jpg
    115.6 KB · Views: 7
Top