2019 - Yard Kart Therapy

J.S.@SMS

Road Hazard
Messages
866
Reaction score
4
Location
Weeki Wachee Fl.
That linkage is better than mine, which took 3 hours and 4 attempts to make (I bent it so that it went over the top of the arm, and around the stationary plate). Would you mind if I use your linkage idea? I think it'd give the throttle much more throw than mine. And it's much, much simpler.
 

gegcorp2012

Active member
Messages
491
Reaction score
62
Location
Alabama
Hi JS,

No problem at all using this outline... If I may suggest an improvement, use 2 plier widths on the vertical segment so the rod will be more horizontal from the butterfly to the throttle arm.

As you can see in that last picture, mine was on a bit more of an angle than I was going for but will never hang on the fuel line.


Sent from my SM-J700T using Tapatalk
 

gegcorp2012

Active member
Messages
491
Reaction score
62
Location
Alabama
FYI, JS
I had to make some tweaks.. now my second revision.

I decided to add some adjustability and try to keep the linkage from moving up and down too much since that was causing mine to hang when opening the throttle after I added my heavy return spring.

Trying to use one 90 degree bend through the new hole in the throttle arm, and moved the unused cable retainer to "hang" the linkage from the arm.

I added a compound bend (to up and to the left) about 1/2" from the factory bend on the butterfly arm to help with articulation around the stationary plate... increasing the distance to 3/4" or 1" may give more clearance around the stationary plate when at WOT.

It is an art form, not a recipe.

Closed
Closed
Open

BTW,

I lost my choke lever a while ago, know of an easy fix for that or should I just buy a replacement ?
Sent from my SM-J700T using Tapatalk
 

gegcorp2012

Active member
Messages
491
Reaction score
62
Location
Alabama
Got mud?

It rained here a few days last week, so the yard track was messy today.

My son and I rode out a tank of gas, but eventually the right front wheel failed. (it worked just fine for me on the track for several laps... I'm just sayin')

Here is a map that shows the general shape of our yard track. This screen shot is from a GPS fitness app and I told it I was riding a bicycle... says the 2 laps was .38 miles for referemnce (GPS speedometer said .34 mi, so ~6 laps for a mile.)


Video #3 [no governor] shows the 2 lap time is decreased from my previous video [ackermann correction] and +5MPH faster.
https://youtu.be/hrJ8_D-eBsU

I added this video of some drive-bys so you can hear what the neighbors hear. Shows my son at the wheel with a little freestyle slip-sliding off the track action.
https://youtu.be/5TwJU9x1GYc


Also weighed the kart front and rear without driver. Less than 300 lbs total.


New high speed on the track is by ME... 23 MPH


The broken front wheel sent me to the shower early.


Sent from my SM-J700T using Tapatalk
 

JTSpeedDemon

2019 Build Off Winner!
Messages
4,026
Reaction score
147
Location
Texas
Nice shirt! ;) I've been meaning to get one soon, hopefully the supply won't run out!
Ya know, you can round that record speed up to 24 MPH.....Just sayin'.....:D:D:D
That wheel is kaput!
 

gegcorp2012

Active member
Messages
491
Reaction score
62
Location
Alabama
They were out of the XL size so I am squeezing into the L.

Here are some closeups of the failed wheel ... shows metal fatigue cracks near each of the 3 bolt holes. The bolts were still tight, and where you see missing metal, well that one was really tight.

I will be keeping an eye on the other wheel for signs of distress around the lug bolt area.

I also interviewed the other driver about possible object impacts like logs or trees or other immovable objects ("mmm, I dont know, maybey") as there has been a few unplanned excursions from the track since the governor removal and we are definitely pushing the braking ability of the worn front tires.

Picking up a set of new tires tomorrow. 2 will eventually be on the front of this kart once I decide what to do about rims and the other 2 will make it to the rear of my spare parts build using the lightweight swingarm and the 4x110 hubs that finally showed up.


Sent from my SM-J700T using Tapatalk
 

JTSpeedDemon

2019 Build Off Winner!
Messages
4,026
Reaction score
147
Location
Texas
Is it aluminum?
You may have overtightened the hub nuts, it probably would serve you well to get some nylock nuts and use those instead.
 

J.S.@SMS

Road Hazard
Messages
866
Reaction score
4
Location
Weeki Wachee Fl.
I don't think so, it looks to me like it's coated. Maybe take a wire wheel on a cordless drill and get that coating off, might not be as bad as it looks, but it still needs to be replaced.
 

gegcorp2012

Active member
Messages
491
Reaction score
62
Location
Alabama
The wheel is steel, two piece, with a completely welded seam where the two pieces meet on the plane of the hub.

The bubbly looking delamination is where the paint is working loose from the metal.

I found a picture of the same wheel earlier during the day and it was showing some creases in the outline of the hub and on the high resolution image, you can see some bubbling starting to happen.

If you happen to see anything like this on your wheels, be aware that the wheel may be on the way out. My guess is the 3 lug design is not as sturdy as a 4 lug, and the clover leaf shape of the hub (with repeated stresses from 20+ MPH turn 2) may caused the fatigue.

IMHO, the 110cc ATV that the wheels are off of would flip over before that much lateral stress could be put onto the wheel.

I have another identical wheel/tire to try before I try my new tires (they are already on 4 lug rims), so I will watch for the right front to fail again and decide if I can add stiffeners, change hubs or get better 3 lug wheels.

Run.Break.Fix....


<Edit> I measured the 3 lug rims and the thickness at the wheel flange is 3.5 mm. The thickness of the 4 lug rims at the wheel flange is 5 mm, so the 4. lug wheels are stronger and have better support with more mating surface area from the hub.

Added a close up of that wheel earlier in the day... you can see the impression of the hub starting to show.


Sent from my SM-J700T using Tapatalk
 

J.S.@SMS

Road Hazard
Messages
866
Reaction score
4
Location
Weeki Wachee Fl.
I'd just put on the 4 lug rims. And I think it's safe to say that, based on the fact that it's a 110cc quad, and has 3 bolt wheels, that it's a chinese quad. And chinesium wheels suck.

And I tend to ride until something breaks and then fix it. But currently my karts brakes are broke, and the broke brakes won't break, I mean brake.:roflol:
 

gegcorp2012

Active member
Messages
491
Reaction score
62
Location
Alabama
3 lug to 4 lug, new front tires !

I got a brand spankin' new set of take-offs for $100 in the local marketplace and did a trial fit to see if the rims will clear the disk brakes.

Yess... they do, but I have to see if I can get 4 lug hubs without messing up anything else.

I talked with BMI and they do not have a hub solution that will work for my parts.

Later on, I found contact info for Peace Sports (mfg of the 110 cc ATV parts on the front end) and was surprised to learn they are nearby...in GA. I called yesterday but the parts lady was out to lunch. Will try again tomorrow.


Sent from my SM-J700T using Tapatalk
 

gegcorp2012

Active member
Messages
491
Reaction score
62
Location
Alabama
I had the tire store put a new valve stem in one of my spare wheels so we could keep riding.

We put on another 4-5 miles today on the yard track. My son is up to 22 MPH now, and I set a new record of 26 MPH in the yard. We set the tach to light up red at 4200 and saw it hit that a few times in the mud.

He's starting to get used to making some higher speed turns and came up with a figure 8 option for the yard track when it is mushy and wet.

Here's some photos of our ride time this afternoon.


Now its my turn....


JTSpeedDemon

2019 Build Off Winner!
Messages
4,026
Reaction score
147
Location
Texas
I'm seeing a few differences in your cornering technique vs. your son's.:D
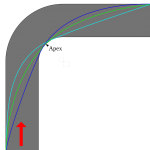
He turns in a little earlier, but then he braked at the apex of the turn. You are more aggressive with your cornering, turning in later and powersliding through the turn. This made it understeer (a.k.a plowing), which hurts the lap time.
Out of the two of you, you have a better racing line, but maybe try tapping the brakes a little bit, and try the racing line technique.
In a nutshell:
Draw the straightest line possible around the track, brake on turn entry, power out once you're past the apex of the turn.:auto:
You want to just about kiss the apex.
(see picture)
The cyan line is turning in too late, the dark blue line is more conservative and a bit easier on the tires, but the green line is what you want. The green line shows perfect turn in, hits the apex, and perfect exit.

I've applied this with concession karts, it really does work! I passed everyone else even though I had the same kart!:cool:

It's fun to watch! Good idea with the GIFs!

P.S - Please invest in some good helmets! Motorcycle grade is good, I got mine on Ebay for less than $50!
 

Attachments

  • external-content.duckduckgo.com.png
    external-content.duckduckgo.com.png
    70.4 KB · Views: 11

gegcorp2012

Active member
Messages
491
Reaction score
62
Location
Alabama
Thanks JT,
I appreciate the illustration.

We have been looking for my helment. It's around the house but got put away after the last move a few years ago.

Rained all weekend, so no driving school for a few more days at least.

Sent from my SM-J700T using Tapatalk
 

gegcorp2012

Active member
Messages
491
Reaction score
62
Location
Alabama
Got to ride through another tank of gas this afternoon. We are recovering from three days of rain... its been nice for two days, but the ground is still pretty wet and sloppy on the lower part of the track so we played around on the top half for a while.

More Yard Kart Therapy...


I moved the cars out of the driveway loop so I could re-distribute the gravel a bit.


I took it out on the pavement to check the RPM and top speed with the governor removed.. I quit looking around 4750.

Sent from my SM-J700T using Tapatalk


....and finally, here's why you need skins on an off road kart.


I think we have worn out our first belt...

I noticed there was more space on the drive pulley, so I added a cutoff wheel as a spacer the other day. Now look at the space !


gegcorp2012

Active member
Messages
491
Reaction score
62
Location
Alabama
I'm supposed to be cleaning out the garage, but I found this stainless steel door from an old gas grill and decided to see if I could skin the front of the Yard Kart with it.

This will help keep some of the mud and moss, grass and dirt out of the drivers compartment.


Sent from my SM-J700T using Tapatalk
 

gegcorp2012

Active member
Messages
491
Reaction score
62
Location
Alabama
All my Christmas gifts are in, and ready for a couple of days use in 2019.

My daughter sent me a 7" driven pulley and a yellow spring (thanks, Ash!) and my son and my wife got me an impact driver (thanks Eli and Aida!)

I got to pick out my own belt this year, so I picked one from Comet and it was the wrong size.

Good thing that happened a couple of weeks ago, so I was able to return and re-order the correct one with the information that is on the Comet belt sleeve.


Here is the sizing guide from the Comet belt sleeve in case you hadn't seen this before. Online listings may say the belt is for a 7" TAV2 but you need to make sure the part number will work with your backing plate by measuring the "CD" center distance.

Note: This photo shows the first belt sent to me for a 7" driven series 30, but is not applicable per the fitment chart.


Sent from my SM-J700T using Tapatalk
 

gegcorp2012

Active member
Messages
491
Reaction score
62
Location
Alabama
First test run with new 7"driven and Comet belt... taking it easy around the sloppy yard track and I nailed it JUST ONCE around a turn and broke the master link.

JTSD - I feel your pain.

BTW... I have not had ANY issues at all with the chain, but made one adjustment for stretch a couple of weeks ago.


I got a package of #40 master links at NAPA for less than a buck a piece.

When installing the chain, I noticed a couple of nicks on the brand new pulley, so it seems I put one of the spacer washers on the wrong side of the driven pulley, crowding the chain. I have to take the bullet for this problem as an assembly error.

I took extra time to check the alignment and make sure the rear sprocket is aligned with the driven sprocket and also that the backing plate is aligned with the rear sprocket.

I used a 5/16 rod to check the backing plate to rear sprocket and had to tweak the motor a bit counterclockwise and made sure it was really tight. I used a framing square against the rear sprocket to check the alignment to the driven.

Next, I adjusted the chain and lubed it with some spray grease.

Then I carefully blocked up the rear carrier and did a wheels up test to 4000 RPM to see if everything was OK with the chain and new TC driven.

All checked out, so we ripped up the yard some more. Got helmet-cam footage of my son and I flinging sod all over the place.


>>> Just noticed the drive side of the belt is riding really high at high RPM... is that because the new belt is long WRT the jackshaft centers ?

First time I have seen my setup at speed.


Camera angle is off a bit at high RPM, but on the original photo I can see it is past the angled sheave.
 
Top