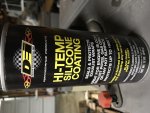
2019 - New GrandDaddy build (contd 2018)

Status
Not open for further replies.

pa17315

Member
Messages
151
Reaction score
0
Painting

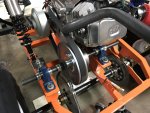
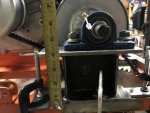
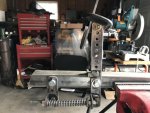
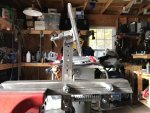
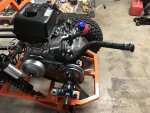
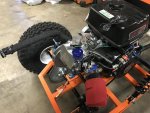
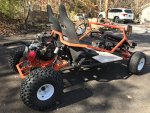
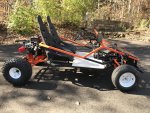
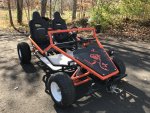
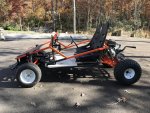
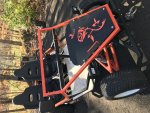
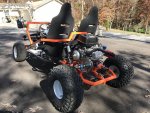
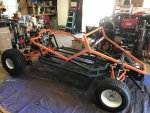
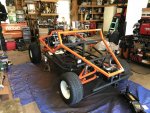
I have driven it over a week, everything work except few minor adjustments that will need to be addressed.

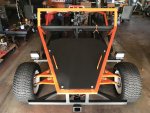
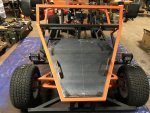
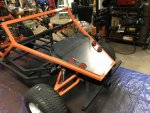
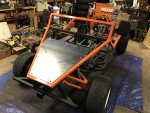
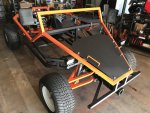
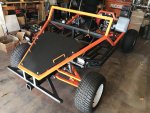
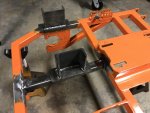
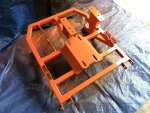
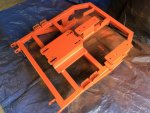
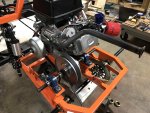
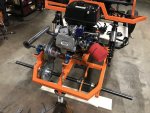
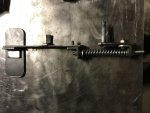
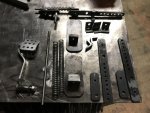
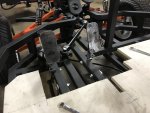
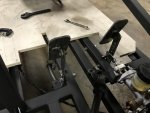
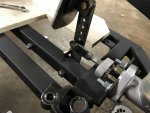
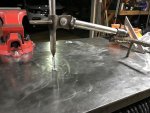
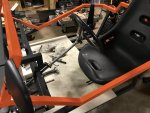
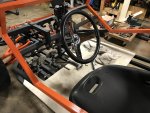
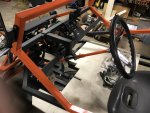
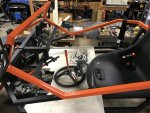
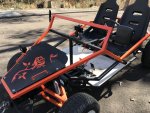
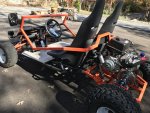
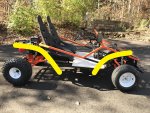
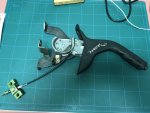
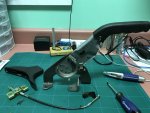
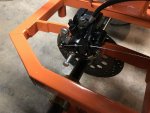
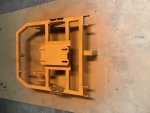
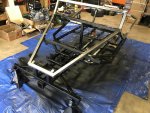
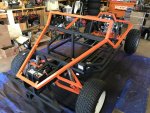
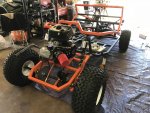
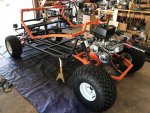
It is time to take it apart and start painting. My daughter have chosen black and blazing orange. I can't talk her out of it. I would have imagined her favorite girly color such as pink, blue, white or whatever.

In the end, she is so adamant with her color so here it goes.
 

Attachments

  • IMG_0603.jpg
    IMG_0603.jpg
    221.2 KB · Views: 29
  • IMG_0611.jpg
    IMG_0611.jpg
    423.9 KB · Views: 28
  • IMG_0612.jpg
    IMG_0612.jpg
    406 KB · Views: 26
  • IMG_0615.jpg
    IMG_0615.jpg
    366.4 KB · Views: 34
  • IMG_0617.jpg
    IMG_0617.jpg
    383.8 KB · Views: 29
  • IMG_0632.jpg
    IMG_0632.jpg
    399 KB · Views: 39
  • IMG_0630.jpg
    IMG_0630.jpg
    417 KB · Views: 34
  • IMG_0628.jpg
    IMG_0628.jpg
    435.1 KB · Views: 33
  • IMG_0627.jpg
    IMG_0627.jpg
    445.2 KB · Views: 32
  • IMG_0625.jpg
    IMG_0625.jpg
    455.3 KB · Views: 37

pa17315

Member
Messages
151
Reaction score
0
Hood

New 10 gauge steel plate to cover the battery compartment and provide some place to put some decals.

Two handles on either sides of hood were made out of 3/8 steel rod. It makes it easier to lift the hood off the go kart for service.

The round Nilight led lights burn out as soon as it was turned on. I bought another set, rectangle this time which has more reviews and hopefully it will be better than the last set.
 

Attachments

  • IMG_0654.jpg
    IMG_0654.jpg
    354.7 KB · Views: 23
  • IMG_0648.jpg
    IMG_0648.jpg
    369.5 KB · Views: 22
  • IMG_0647.jpg
    IMG_0647.jpg
    317.9 KB · Views: 19
  • IMG_0646.jpg
    IMG_0646.jpg
    374 KB · Views: 22
  • IMG_0645.jpg
    IMG_0645.jpg
    426.6 KB · Views: 23
  • IMG_0655.jpg
    IMG_0655.jpg
    373.1 KB · Views: 23
  • IMG_0656.jpg
    IMG_0656.jpg
    382.1 KB · Views: 25

pa17315

Member
Messages
151
Reaction score
0
Jackshaft for 40 series TC

I was using 30 series TC with 1" bore. Due to my large rear wheel tires_22 inches tall and 9.5" wide. It was a struggle to go up small incline. The belt was burning up, black belt residue can be seen on the TC plate.

The 40 series would give me more power and torque to address hilly situations where I am.

Here are the parts needed for Jackshaft construction:

1" Driver and 3/4" Driven
203788A belt with 9-3/4" spacing
3/4" bore pillar blocks
10T by 3/4" bore sprocket
3/4" bore collars
19" by 3/4" jackshaft with 3/4" keyway
Metal scraps to build. I am not quite sure how to build it yet and or which metal supports I would need.

In retrospect, I should have gone straight to 40 Series TC due to current terrain conditions, tire sizes, weight of the go kart. For the Granddaddy built, the size alone should require larger engine such as 420cc with series 40 TC. This combination would give you room to improve.
 

Attachments

  • IMG_0665.jpg
    IMG_0665.jpg
    374.4 KB · Views: 26
Last edited:

pa17315

Member
Messages
151
Reaction score
0
Jackshaft build

I have decided to go with 4" C-Channel steel with 1/4 plate on top and bottom. If anyone has been followed my progress, and building the Granddaddy then they will find out one thing.

The plan layout for engine frame is too small. I would increase the width by 4 inches and lengthen it another 4-6 inches. These would give Predator 420CC more room and jackshaft.

As it is, my engine is pretty much centered on the engine frame. With the series 40TC driver and driven spacing of 9-3/4", it is tight.

I have 10T by 3/4" sprocket with 60T, the jackshaft is 4" total height to clear the engine and enough room for the 41 chain.

It's all sound gibberish, but when you are building it and fitting it together, it will all make sense.
 

Attachments

  • IMG_0694.jpg
    IMG_0694.jpg
    242.8 KB · Views: 20
  • IMG_0693.jpg
    IMG_0693.jpg
    310.9 KB · Views: 22
  • IMG_0681.jpg
    IMG_0681.jpg
    246.3 KB · Views: 19
  • IMG_0680.jpg
    IMG_0680.jpg
    302.9 KB · Views: 22
  • IMG_0695.jpg
    IMG_0695.jpg
    475.4 KB · Views: 18
  • IMG_0696.jpg
    IMG_0696.jpg
    418.8 KB · Views: 22

pa17315

Member
Messages
151
Reaction score
0
Jackshaft Installation

Finally, it is done. I am happy with the 40 series TC and jackshaft. It is way more power, no more belt burning testing unlike 30 series. From idling to running, the belt performs great. Jackshaft is running smooth. However, I won't know for sure until I test it in real world situation.

On one of the image, the 4" total height of jackshaft support is highlighted. If you are doing Granddaddy plan, then it is a good starting point.
 

Attachments

  • IMG_0713.jpg
    IMG_0713.jpg
    297.7 KB · Views: 36
  • IMG_0712.jpg
    IMG_0712.jpg
    342.9 KB · Views: 37
  • IMG_0711.jpg
    IMG_0711.jpg
    341.7 KB · Views: 36
  • IMG_0710.jpg
    IMG_0710.jpg
    308.3 KB · Views: 39
  • IMG_0709.jpg
    IMG_0709.jpg
    317.3 KB · Views: 42
  • IMG_0690.jpg
    IMG_0690.jpg
    234.8 KB · Views: 35

pa17315

Member
Messages
151
Reaction score
0
Brake, Gas pedals build part 1

I am not happy with the pedals that suggested from the plan. It is tiny and it doesn't fit this go-kart. It may fit well on one seater for 5 years old kid.

Anyway, I would like to build new pedals with springs you can buy from a local shop. The torsion springs are so darn expensive. Amazon sells similar spring for 3 tons jack which you can adapt and it is 8 bucks. I can pick up a regular spring at local Co-Op for $2.50 each and only if I can make it work.

I will update this post to show progress and or comments from my mistakes.

I have drawn up a rough sketch of pedal return spring:

The main idea is to have larger pedal surface
Possibility to hide the operation under main frame so nothing can catch and/or hinder operation
Predrill 1/4" holes along the pedal shaft for throttle wire connection.

Mock up seems promising and parts cut ready to go
 

Attachments

  • IMG_0732.jpg
    IMG_0732.jpg
    179.4 KB · Views: 31
  • IMG_0719.jpg
    IMG_0719.jpg
    369.8 KB · Views: 27
  • IMG_0721.jpg
    IMG_0721.jpg
    428.6 KB · Views: 27
  • IMG_0729.jpg
    IMG_0729.jpg
    282.7 KB · Views: 23
  • IMG_0728.jpg
    IMG_0728.jpg
    312.9 KB · Views: 25
  • IMG_0727.jpg
    IMG_0727.jpg
    304.4 KB · Views: 24
  • IMG_0726.jpg
    IMG_0726.jpg
    258.4 KB · Views: 23
  • IMG_0725.jpg
    IMG_0725.jpg
    237.3 KB · Views: 24
  • IMG_0722.jpg
    IMG_0722.jpg
    277.7 KB · Views: 23
  • IMG_0730.jpg
    IMG_0730.jpg
    293.2 KB · Views: 25

pa17315

Member
Messages
151
Reaction score
0
Brake, Gas pedals build part 2

Now that I have the basic layout, mock-up finished and it looks promising.

I will install on the go-kart to see actual operation

Pedals installed, however I am convinced of pedal orientations. Preference, function and or esthetics will determine its placement.

For now, I am holding off until I am sure of how I am going to mount it.
Another issue on the go kart comes up which I can address.

Pedals welded and installed.

New longer "Bias Adjustment set" for master cylinder
 

Attachments

  • IMG_0741.jpg
    IMG_0741.jpg
    237.7 KB · Views: 38
  • IMG_0740.jpg
    IMG_0740.jpg
    272 KB · Views: 36
  • IMG_0739.jpg
    IMG_0739.jpg
    262.3 KB · Views: 37
  • IMG_0748.jpg
    IMG_0748.jpg
    263.2 KB · Views: 37
  • IMG_0749.jpg
    IMG_0749.jpg
    294.7 KB · Views: 30
  • IMG_0750.jpg
    IMG_0750.jpg
    241 KB · Views: 37
  • IMG_0751.jpg
    IMG_0751.jpg
    208.7 KB · Views: 31
  • IMG_0752.jpg
    IMG_0752.jpg
    227.9 KB · Views: 32
  • IMG_0746.jpg
    IMG_0746.jpg
    287.3 KB · Views: 37

pa17315

Member
Messages
151
Reaction score
0
Steering shaft changes

This is one of issue that has plagued me throughout go-kart build.

Currently, the steering shaft and steering setup is in a perfect spot, comfortable, the right arm length, angle...etc...

However, getting in and out of the go-kart is a major problem. There is always the first impression. "It is nice, but...."

Here are the pics before and after the changes....

Existing steering shaft is cut in half. I welded a 5/8" ID DOM to one end and drilled a 1/4" hole through 5/8" DOM tubing.

You can see in the pic. I can take it off when getting in the go kart. Right now just a 1/4" bolt holding both parts together. I may go to local hardware store to pick up a removable pin or just make something simple.
 

Attachments

  • IMG_0745.jpg
    IMG_0745.jpg
    281.2 KB · Views: 26
  • IMG_0744.jpg
    IMG_0744.jpg
    309.4 KB · Views: 28
  • IMG_0743.jpg
    IMG_0743.jpg
    372.8 KB · Views: 31
  • IMG_0774.jpg
    IMG_0774.jpg
    230 KB · Views: 28
  • IMG_0765.jpg
    IMG_0765.jpg
    316.9 KB · Views: 26
  • IMG_0767.jpg
    IMG_0767.jpg
    330.6 KB · Views: 23

pa17315

Member
Messages
151
Reaction score
0
Go-Kart Minor additions

New Tachometer added to existing 10mm stock air filter bolt location. Now I can tune the engine to idle RPM by adjusting the idle and air-mixture screws. This is more visual and quicker process rather than listening to the "right" sound. It is definitely a way to get a base point more quickly. From that base point, you can adjust to the sweet spot.

New fuel filter, shut off valves. It is easier to service carburetor with minimal fuel spill

New on/off switch for LED lights on main control

Header wrap and sprayed with "Hi-Temp Silicon coating". Caution, use glove otherwise your hand will be itching for a long time.

Bought a long spout for oil change at Walmart. It is easier than trying to maneuver a one quart oil bottle in that space. I can rest the funnel on the gas tank and the main frame, and then fill it full with oil. I just come back to refill it again a few more times.
 

Attachments

  • IMG_0753.jpg
    IMG_0753.jpg
    265.5 KB · Views: 24
  • IMG_0759.jpg
    IMG_0759.jpg
    294.2 KB · Views: 21
  • IMG_0755.jpg
    IMG_0755.jpg
    305.1 KB · Views: 21
  • IMG_0754.jpg
    IMG_0754.jpg
    286.6 KB · Views: 19
  • IMG_0763.jpg
    IMG_0763.jpg
    312.3 KB · Views: 18
  • IMG_0760.jpg
    IMG_0760.jpg
    258.3 KB · Views: 19
  • IMG_0761.jpg
    IMG_0761.jpg
    278 KB · Views: 19
  • IMG_0762.jpg
    IMG_0762.jpg
    321.2 KB · Views: 19
  • IMG_0764.jpg
    IMG_0764.jpg
    293 KB · Views: 18
  • IMG_0779.jpg
    IMG_0779.jpg
    334.1 KB · Views: 18

pa17315

Member
Messages
151
Reaction score
0
Test drive #2

I got home a little late today Saturday. I got 1-1/2 hours until it got dark so I have decided to take it for a test drive.

The following observation was noted during test drive in rural area with small hilly streets, grass bank, and unpaved back roads:

The first test drive was stocked with series 30 Torque converter. It was adequate on regular street but on the unpaved back roads and small incline it just burned the belt up. Maximum speed was between 20-30 mph. On the higher speed, it was pushing it. There was ample power with Predator 420cc but series 30 TC wasn't a complimentary fit to the engine.

Recommended 9-3/4" and 12" shocks weren't designed for this go-kart in this particular testing conditions. The front shocks were mushy, you can feel every bumps and the ride was rough on unpaved road. On the grass, it was an adventure. you are bouncing and leaning this and that way.

Test drive with series 40 TC, predator 420cc engine, upgrade rear shocks, larger tires, you can feel the power. It was responsive. Hill, backyard and inclines weren't a problem. However, the 9-3/4 inch front shocks were a disappointment.

If you build as per plan part recommendations such as tires, shocks and engine such as predator 212cc for an example. It would be fine in a well developed suburban environments that has flat paved black top.

If you are planning to build this particular Granddaddy go-kart plan, I would recommend the following:

Upgrade shocks for front and rear

Go for larger engine, such as Predator 420cc engine

Enlarge the plan lengthwise for teen and adults and widen the width of main frame 4" to accommodate seats.

Use series 40 Torque Converter with jack shaft combination

Alter steering wheel shaft to service and get in/out of the go-kart
Use at least 1/2" or 5/8" tie rods for steering. I am making my tie rods out from local hardware store. It is 3/8" threaded rods. I have forgotten to upload some pics

Enlarge front suspension box

Off-hand, I don't remember all the changes that I have made. If you have a question, I will happy to answer you.

These suggested changes will enable you to have a go-kart that can tackle the conditions mentioned above. You can also choose the path that I have taken, buy it twice and learn a valuable lesson. The unused parts you can sell it or build a smaller kart.

Enclosed is a URL to youtube video that show walk around of my go-kart as current conditions.

I am sure that I will make many more changes and those changes will be upload for your viewing pleasure.

(https://www.youtube.com/watch?v=3XZTGsnGfCs&t=6s)
 

pa17315

Member
Messages
151
Reaction score
0
Test drive #2 Cont.

Sunday morning Nov. 4th, 2018

Another test drive this time for speed, wet grass observation and reliability.

Again, the series 40 Torque Converter has proven itself. A nod to "Landuse" recommendation. I should have listen to you! Lesson learned.

I have started the engine this morning and it has stalled couple of time. I guess morning temperature is little cold and that effect the engine. I have increased idling speed to 1150-1200 rpm and air adjusting air-mixture screw accordingly. At 1050 rpm, it would stall when I started in the morning. We are in the fall weather right now, average morning temperature at 45-50 Fahrenheit.

I have ordered a better tachometer to get a more accurate rpm reading. It is the "DTI TECH-TACH TT-20K". It has great reviews and small engine mechanics swear by it. Another useful tool for me to tune garden powered tool in addition to the go-kart.

Going down hill and uphill, series 40 TC handle itself with ease. However, un-paved back country road is rough. You can feel every bumps, paved street is okay. It is probably the recommended front 9-3/4 inch shocks. I may search ebay for 10 inch stiffer front shock. Can anyone offer some recommendation?

Top speed is around 36 mph. I am sure it can go higher with the right tires. Large rear wheel tires with aggressive tread is great on wet grass and ground but it is not for paved street. I am contemplating whether or not adding rear mud guards and front tire mud guard to limit mud kickback. Would that take away the "off-road" buggy concept? You can't have an "off-road" buggy without some mud on you, right!

Video will be upload soon.
(https://www.youtube.com/watch?v=tSYOKY8Ua2s&feature=youtu.be)
 

Attachments

  • DTI%20TECH-TACH%20TT-20K%20Tach-2.jpg
    DTI%20TECH-TACH%20TT-20K%20Tach-2.jpg
    195.4 KB · Views: 11
  • IMG_0802.jpg
    IMG_0802.jpg
    602.6 KB · Views: 14
  • IMG_0799.jpg
    IMG_0799.jpg
    730.3 KB · Views: 13
  • IMG_0798.jpg
    IMG_0798.jpg
    679.4 KB · Views: 14
  • IMG_0796.jpg
    IMG_0796.jpg
    676.3 KB · Views: 13
  • IMG_0795.jpg
    IMG_0795.jpg
    682.7 KB · Views: 14
  • IMG_0812.jpg
    IMG_0812.jpg
    519.2 KB · Views: 10
  • IMG_0809.jpg
    IMG_0809.jpg
    466 KB · Views: 12
  • IMG_0808.jpg
    IMG_0808.jpg
    462.2 KB · Views: 8
  • IMG_0805.jpg
    IMG_0805.jpg
    557.7 KB · Views: 11

pa17315

Member
Messages
151
Reaction score
0
Emergency Hand Brake Lever Part 1

I have been looking to install an emergency hand brake lever for this go-kart. Here are the reasons that requires it:

Safety: Especially with young rider, I want her to go through the safety checks prior to stepping on the gas pedal.

Parking: To be able to keep go kart dead still on a hill and/or keeping it from rolling when your area is hilly.


These two reasons are an important decision for me to find a way to install the hand brake.

I have looked to see if there are choices for go-kart brake. Whatever the choices are offered, it is too expensive or just ridiculous. I have looked online to see if there is an alternative. There are many car hand brakes but some are more adaptable.

I have opted to purchase a used Ebay car brake. This part "01 02 03 04 05 06 HYUNDAI SANTA FE EMERGENCY PARKING BRAKE HANDLE LEVER OEM" for 15 bucks was reasonable and adaptable to go-kart.

It is nothing fancy. Simple hand brake that stop the go-kart. I just need to modify the part to make it work.

Hand lever installed, test fit with bicycle cable for function and it worked. There is a brake cable (Parking Brake Cable for 125cc Got kart Kandi KD-125FM5) that is a direct fit but it is only 25-3/8 inches long. Not long enough for my go kart.

There is also a "Rear Hand Brake Cable for Honda TRX420 Rancher" that may be adaptable to my emergency brake lever.

EMERGENCY BRAKE UPDATE WILL BE ON POST #62.
 

Attachments

  • IMG_0813.jpg
    IMG_0813.jpg
    352 KB · Views: 7
  • IMG_0817.jpg
    IMG_0817.jpg
    317.7 KB · Views: 7
  • IMG_0828.jpg
    IMG_0828.jpg
    287.1 KB · Views: 7
  • IMG_0829.jpg
    IMG_0829.jpg
    316.2 KB · Views: 6
  • IMG_0830.jpg
    IMG_0830.jpg
    287.1 KB · Views: 9
  • IMG_0831.jpg
    IMG_0831.jpg
    243.8 KB · Views: 13
Status
Not open for further replies.
Top