You are using an out of date browser. It may not display this or other websites correctly.
You should upgrade or use an alternative browser.
You should upgrade or use an alternative browser.
2019 - New GrandDaddy build (contd 2018)
- Thread starter pa17315
- Start date
- Status
- Not open for further replies.
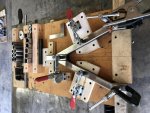
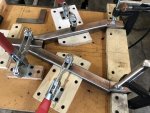
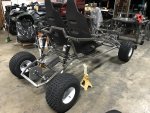
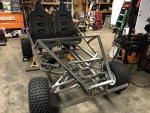
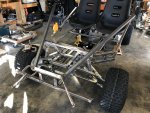
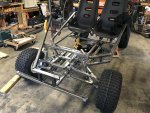
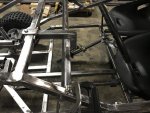
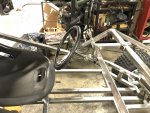
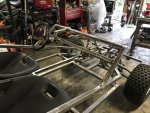
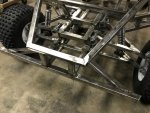
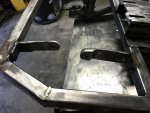
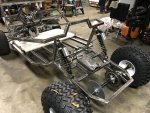
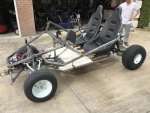
Second Go Kart A-Arms
On the second go kart, I have made some changes to the jig for the A-arms. More secure tie down before tacking.
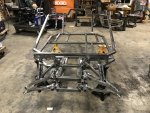
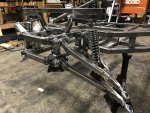
Main frame for second go kart are done.
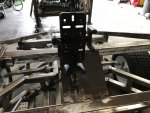
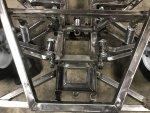
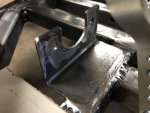
Front suspension block are done. You can see that the suspension block is a part of main frame. In addition, on either side of front suspension block, there are two metal angle connecting the block to the main frame.
Is it necessary? Maybe not, but it just make me feel better.
On the second go kart, I have made some changes to the jig for the A-arms. More secure tie down before tacking.
Main frame for second go kart are done.
Front suspension block are done. You can see that the suspension block is a part of main frame. In addition, on either side of front suspension block, there are two metal angle connecting the block to the main frame.
Is it necessary? Maybe not, but it just make me feel better.
Attachments
-
 IMG_0340.jpg380.7 KB · Views: 52
 -
 IMG_0341.jpg359.4 KB · Views: 45
 -
 IMG_0343.jpg413.9 KB · Views: 57
 -
 IMG_0344.jpg397.3 KB · Views: 67
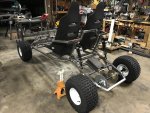
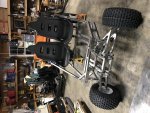
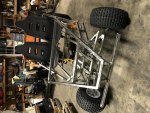
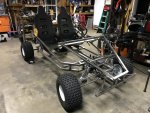
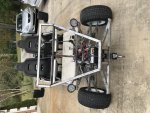
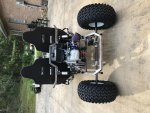
Second Go Kart
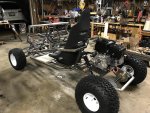
Wheel on the ground finally.
Tires are 18x9.5x8 knobby tires. Front and back.
Seats are in
Additional brace above front shock. It just make it look stronger.
New rear shocks for the rear, instead of 12 shocks as the plans required. The angle for engine mount need to adjust to accommodate new rear shocks.
The plans call out for 9-3/4 inch front shocks, that is mushy. It will probably hold up, but I may do something about it.
Attachments
-
 IMG_0349.jpg388.2 KB · Views: 57
 -
 IMG_0348.jpg410.1 KB · Views: 56
 -
 IMG_0347.jpg394.7 KB · Views: 69
 -
 IMG_0346.jpg402.6 KB · Views: 59
This is turning out to be awesome!!! Nice work.
In my opinion though, there is absolutely no need to modify the engine. Its a 420 that has a lot of power. Why go potentially mess things up when you don't need to?
I think you have made a mistake buying that TC too. The 30 series is only rated for 8HP, so 13HP is beyond pushing the limits, especially with a large heavy kart. A 40 series TC is pretty much the only sane thing to use on this kart.
Have you thought how you want to gear this kart? What diameter tires are you looking at?
A 40 series TC cost soo... much. I will be in the dog house if I even think about it.
It is for my daughter. We won't discuss the cost.
As for the tires, I followed the plan since this is my absolutely first foray into go kart. No experience, ever. I don't even know welding. Flux, stick, mig….tig… who knows, why do I even care. I am a basic office in a rectangular cubicle kind of guy. My tools of the trade are pencils, Autocad, building design, mark up construction doc, coordinate with engineer, HVAC, Clients. I don't sweat the small stuffs.
I watch a guy on you tube making this kart for his daughter, the whole thing done in 9 minutes and 12 seconds flat. The guy barely broke a sweat, no cussing, no bad words...No freaking out over anything. He actually having fun doing it and beside, the whole thing is so touching that I forgot to read the fine prints.....
I took steel tubes home before I even realized that I have no idea how to begin.
I can back track and pretended that the whole thing were planned. However, the real reason was I can't return the steel.
You don't know how many times I have looked at the steel tubes and thinking "REALLY,.....SH*T...…"
You could have fooled me that you don't know anything!! There are few people that would even attempt this type of build, let alone complete it. Your cutting, welding, jig making etc looks like you have done it as a profession

A 40 series is not too expensive. You can get a Chinese knock off for just under $60 on ebay. Go with the 30 series as you already have it, but just keep in mind that it could be an issue for you down the road
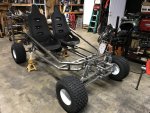
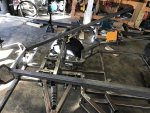
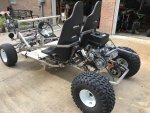
Second Go Kart Roll cage.
Since we have enlarged the front suspension box from 6x12 to 8x14 and add a bar reinforcing the front shock mount supports, the original plan has to be altered to compliment current kart.
Back to drawing board.
We have decided not to do a roll cage as per plan, instead a front guard was added. Partial front hood and control layout dashboard.
Adjustable steering wheel was also implemented.
Attachments
-
 IMG_0363.jpg439.4 KB · Views: 55
 -
 IMG_0361.jpg420.1 KB · Views: 49
 -
 IMG_0354.jpg463 KB · Views: 48
 -
 IMG_0353.jpg450.7 KB · Views: 42
 -
 IMG_0351.jpg422.3 KB · Views: 45
 -
 IMG_0365.jpg339.5 KB · Views: 43
 -
 IMG_0367.jpg361.5 KB · Views: 44
 -
 IMG_0371.jpg404.1 KB · Views: 41
 -
 IMG_0374.jpg334.5 KB · Views: 43
 -
 IMG_0377.jpg401.6 KB · Views: 51
TC
I bought this TC from Ebay:
"GO KART TORQUE CONVERTER KIT CVT CLUTCH 1" COMET TAV2 30-75 6" Driven 10T #40/41"
https://www.ebay.com/itm/GO-KART-TO...e=STRK:MEBIDX:IT&_trksid=p2060353.m2749.l2649
It has 1 inch clutch. I assume it is for the 420cc. If it is for 60 on Ebay I may replace what I have with the 40 series.
Thanks for pointing it out.
You could have fooled me that you don't know anything!! There are few people that would even attempt this type of build, let alone complete it. Your cutting, welding, jig making etc looks like you have done it as a profession
A 40 series is not too expensive. You can get a Chinese knock off for just under $60 on ebay. Go with the 30 series as you already have it, but just keep in mind that it could be an issue for you down the road
I bought this TC from Ebay:
"GO KART TORQUE CONVERTER KIT CVT CLUTCH 1" COMET TAV2 30-75 6" Driven 10T #40/41"
https://www.ebay.com/itm/GO-KART-TO...e=STRK:MEBIDX:IT&_trksid=p2060353.m2749.l2649
It has 1 inch clutch. I assume it is for the 420cc. If it is for 60 on Ebay I may replace what I have with the 40 series.
Thanks for pointing it out.
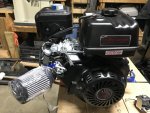
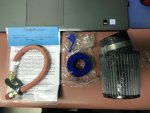
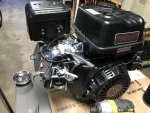
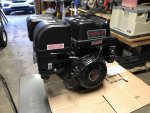
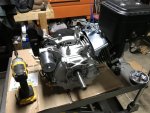
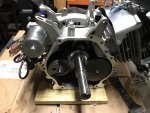
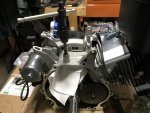
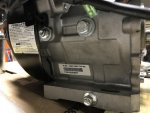
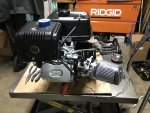
Predator 420cc Engine
Getting Predator 420cc Engine ready operating table .
I heard somewhere that you can take off the factory air filter box and replace it with aftermarket part and it will look better.
You will need this part also
https://www.ebay.com/itm/Honda-Repl...e=STRK:MEBIDX:IT&_trksid=p2060353.m2749.l2649
Getting Predator 420cc Engine ready operating table .
I heard somewhere that you can take off the factory air filter box and replace it with aftermarket part and it will look better.
You will need this part also
https://www.ebay.com/itm/Honda-Repl...e=STRK:MEBIDX:IT&_trksid=p2060353.m2749.l2649
Attachments
-
 IMG_0411.jpg323.6 KB · Views: 15
 -
 IMG_0409.jpg309.2 KB · Views: 17
 -
 IMG_0381.jpg316.4 KB · Views: 14
 -
 IMG_0380.jpg284.9 KB · Views: 13
 -
 IMG_0409 b.jpg153.1 KB · Views: 13
 -
 IMG_0407.jpg358.9 KB · Views: 13
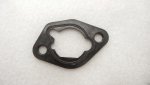
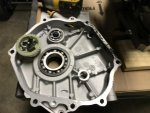
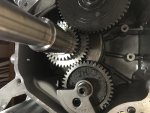
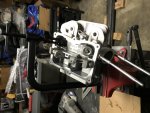
Predator 420cc Engine
Governor removed
I thought I may want to take apart the engine to see what is inside. Along the way, I misplaced the governor and oil sensor.
The governor hole was tapped with 3/8-16 and replaced with a 3/8 bolt.
The oil sensor was tapped with 7/16-14and replaced with 7/16 bolt.
You have to love Lowes or Tractor Supplies
Update: When you take off shaft cover plate, the existing gasket is pretty much torn. I used gasket maker that you can buy at Walmart for 5 bucks.
"Permatex 82180 Ultra Black Maximum Oil Resistance RTV Silicone Gasket Maker, 3.35 oz. Tube"
Suggested Applications: Valve covers, oil pans, intake manifold end seals, timing covers, and differential covers
Attachments
-
 IMG_0388.jpg246.1 KB · Views: 13
 -
 IMG_0387.jpg321.6 KB · Views: 12
 -
 IMG_0385.jpg260.6 KB · Views: 12
 -
 IMG_0384.jpg293 KB · Views: 11
 -
 IMG_0382.jpg317.9 KB · Views: 11
 -
 IMG_0399.jpg287 KB · Views: 13
 -
 IMG_0398.jpg322.5 KB · Views: 13
 -
 IMG_0396.jpg275.4 KB · Views: 12
 -
 IMG_0390.jpg269.2 KB · Views: 11
 -
 IMG_0389.jpg302.2 KB · Views: 11
Last edited:
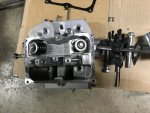
Predator 420cc Engine
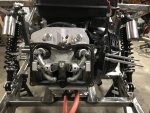
I want to see inside the cylinder head, removing them and misplaced factory valve springs.
Searched OMB warehouse for replacement spring.
https://www.ombwarehouse.com/36-valve-spring-for-bsp-clone-gx200-predator-212.html
You can buy the Valve Spring Compressor C Clamp Tool at Amazon
https://www.amazon.com/gp/product/B01M4J094J/ref=oh_aui_detailpage_o03_s02?ie=UTF8&psc=1
You will also need filler gauge set to reset your gap. I used .004 for intake and .005 for exhaust.
Hotop 32 Blades Steel Feeler Gauge Dual Marked Metric and Imperial Gap Measuring Tool
https://www.amazon.com/gp/product/B06XHXJG31/ref=oh_aui_detailpage_o03_s00?ie=UTF8&psc=1
Attachments
-
 IMG_0431.jpg271.4 KB · Views: 13
 -
 IMG_0430.jpg295.6 KB · Views: 13
 -
 IMG_0431 36lbs valve spring.jpg13.3 KB · Views: 149
 -
 IMG_0429.jpg304.4 KB · Views: 13
 -
 IMG_0410.jpg320 KB · Views: 13
 -
 IMG_0433.jpg278 KB · Views: 11
 -
 IMG_0432.jpg279 KB · Views: 11
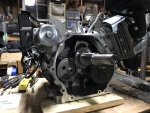
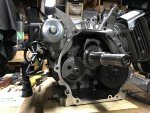
Predator 420cc Engine
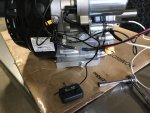
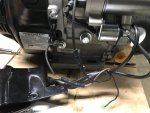
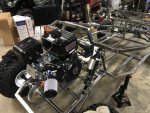
Remove and relocate factory starter box to go kart dash.
Connect battery for electric starter.
Remove and relocate factory starter box to go kart dash.
Connect battery for electric starter.
Attachments
-
 IMG_0418.jpg339.2 KB · Views: 27
 -
 IMG_0415.jpg332.7 KB · Views: 26
 -
 IMG_0413.jpg360.8 KB · Views: 30
 -
 IMG_0412.jpg355.1 KB · Views: 31
 -
 IMG_0403.jpg264 KB · Views: 29
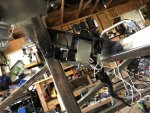
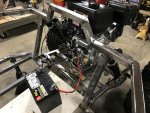
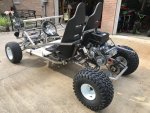
Second go kart update
I have made some progress on the second go kart. The first one is in the progress of revising and catching up to second go kart.
From the last post, I was working relocating the control box on 420cc engine to dashboard in front.
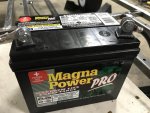
I finally have the wires extended and new battery. I have opted to buy one from Lowes_riding mower battery. It is cheaper than smaller one for motorcycle. However, there are no room to install on the engine frame. I found the place on the front for it.
Couple of small add-on for the go kart:
Replace knobby tires with Kenda 205/65-10 Bias Trailer Tire with 10" White Wheel - 4 on 4 on the front from Etrailer. With 10 inch wheel, there are room for the spindle to move freely without touching the wheel inside.
The rear tires were replaced with Ocelot Golf Cart All Trail 4-Ply UTV/ATV Sahara Type Turf Tire 22X11-8 P334 from Amazon.
Addition of iPhone holder on the dash so I can use the speed app.
Low wind shield with side mirrors.
I have made some progress on the second go kart. The first one is in the progress of revising and catching up to second go kart.
From the last post, I was working relocating the control box on 420cc engine to dashboard in front.
I finally have the wires extended and new battery. I have opted to buy one from Lowes_riding mower battery. It is cheaper than smaller one for motorcycle. However, there are no room to install on the engine frame. I found the place on the front for it.
Couple of small add-on for the go kart:
Replace knobby tires with Kenda 205/65-10 Bias Trailer Tire with 10" White Wheel - 4 on 4 on the front from Etrailer. With 10 inch wheel, there are room for the spindle to move freely without touching the wheel inside.
The rear tires were replaced with Ocelot Golf Cart All Trail 4-Ply UTV/ATV Sahara Type Turf Tire 22X11-8 P334 from Amazon.
Addition of iPhone holder on the dash so I can use the speed app.
Low wind shield with side mirrors.
Attachments
-
 IMG_0442.jpg301.2 KB · Views: 28
 -
 IMG_0441.jpg358.3 KB · Views: 30
 -
 IMG_0447.jpg383.7 KB · Views: 38
 -
 IMG_0448.jpg308.9 KB · Views: 35
 -
 IMG_0461.jpg398 KB · Views: 36
 -
 IMG_0463.jpg400.9 KB · Views: 42
 -
 IMG_0446.jpg367.7 KB · Views: 38
 -
 IMG_0462.jpg439.6 KB · Views: 37
Second go kart update
Throttle hook up to 420cc engine:
71" Throttle Cable Casing For Go Kart Manco 63" Long Inner Wire 71" inch Long from Amazon.
I made a simple bracket that utilize the bolt under fuel tank. On the end of the cable, I have used the 1/4-Inch-by-20 die that you can buy from Amazon as an add-on item for under 3 bucks.
https://www.amazon.com/gp/product/B00W5TM9KS/ref=ox_sc_saved_title_4?smid=ATVPDKIKX0DER&psc=1
Hanson 6520ZR Die 1/4"-20 NC 1" Hex, for Tap Die Extraction for $2.84 amazon
It is a quick and simple way to keep the throttle cable from flopping around
Attachments
-
 IMG_0438.jpg403.7 KB · Views: 34
Last edited:
Would Admin or moderator move this to 2018 build off contest? or explain to me how to do it.
Thanks
Here is an excert from the build off rules:
New Builders
Effective immediately, those entering the contest will start a build thread in this forum subcategory . To start your thread, you'll need to post a pic of your primary parts source(s), pile, donor machine(s) etc. In that picture, you need to have a sign that reads "DIYGK 2018 - Wrenches!"
So what you are going to have to do is make a sign and take a pic of it with your parts pile (your go kart in this case as you are far down the road) and we can then move it to the build log section.
What I will do for the moment is move it to the Build of Contest main area.
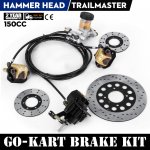
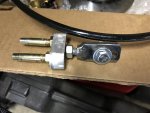
Hydraulic Brakes
I have purchased Chinese hydraulic set on Ebay for my go kart. It comes with rear and front calipers and rotors.
GO-KART Brake Master Cylinder Kit KD150BRKIT Hammerhead Hydraulic Universal
Here is the part from Ebay:
https://www.ebay.com/itm/GO-KART-Br...e=STRK:MEBIDX:IT&_trksid=p2060353.m2749.l2649
Here are the problems:
No instructions, just the parts.
On my go kart, the plan did not consider front brakes
How to mount the calipers on the Granddaddy
From online research and youtube, you would get information, however it doesn't address your plan.
I have decided to forgo the front brakes for now and mount the rear caliper.
Here are some pics that may shed some insights.
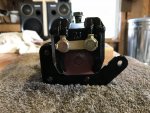
Brake continuation:
Cap front brake master cylinder hydraulic ports until further I figure out how to mount front rotors
Fabricate "Bias Adjustment Shaft Set" This was out of stock at buggydepot.com
Used 2x2 angle to support master cylinder
I have purchased Chinese hydraulic set on Ebay for my go kart. It comes with rear and front calipers and rotors.
GO-KART Brake Master Cylinder Kit KD150BRKIT Hammerhead Hydraulic Universal
Here is the part from Ebay:
https://www.ebay.com/itm/GO-KART-Br...e=STRK:MEBIDX:IT&_trksid=p2060353.m2749.l2649
Here are the problems:
No instructions, just the parts.
On my go kart, the plan did not consider front brakes
How to mount the calipers on the Granddaddy
From online research and youtube, you would get information, however it doesn't address your plan.
I have decided to forgo the front brakes for now and mount the rear caliper.
Here are some pics that may shed some insights.
Brake continuation:
Cap front brake master cylinder hydraulic ports until further I figure out how to mount front rotors
Fabricate "Bias Adjustment Shaft Set" This was out of stock at buggydepot.com
Used 2x2 angle to support master cylinder
Attachments
-
 s-l1600a.jpg281.2 KB · Views: 20
 -
 IMG_0486.jpg320.6 KB · Views: 21
 -
 IMG_0600.jpg377.4 KB · Views: 22
 -
 IMG_0601.jpg310.4 KB · Views: 24
 -
 IMG_0599.jpg418 KB · Views: 29
 -
 IMG_0609.jpg252.1 KB · Views: 21
 -
 IMG_0608.jpg252.7 KB · Views: 20
 -
 IMG_0607.jpg227.2 KB · Views: 20
Still looking sweet!!!!
supermanotorious
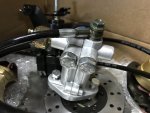
Winchmaster 5000
I bought Torque Converter from Ebay for 52 bucks for the 420cc engine. It doesn't fit.
Back to youtube again.
Here come the first mod.
Here is the part for oil cap sealer.
I think I know which Youtube video you watched ;-)
I think I know which Youtube video you watched ;-)
Yup,
The same one.
Test drive
With everything assembled, and a temporary piece of plywood for flooring. I am ready for a quick test drive.
Lost couple of bolts
The ebay 30 series torque converter for 420cc engine, 10T sprocket, 60T rear sprocket, and in addition to the 22 inch rear tires don't work real well. Burning belt problems uphill and or loss of speed.
I may have to shell out the cash and go straight for 40 series and jackshaft route.
The BMIkarts gas and brake pedals are too small. I may build new gas and brake pedals with some 3/16 inch steel plate.
Test drive 1
(https://www.youtube.com/watch?v=7vzfL40DTXY&t=2s)
Attachments
-
 IMG_0565.jpg584.3 KB · Views: 39
 -
 IMG_0566.jpg515.4 KB · Views: 42
 -
 IMG_0567.jpg511 KB · Views: 39
 -
 IMG_0568.jpg533 KB · Views: 45
 -
 IMG_0569.jpg553.8 KB · Views: 40
- Status
- Not open for further replies.