2019 - New GrandDaddy build (contd 2018)

Status
Not open for further replies.

pa17315

Member
Messages
151
Reaction score
0
Hi,

I have been researching go kart build when I come across this forum.

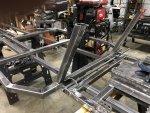
I do not have any experience in go kart, when I decide to build one from scratch. Like someone has said, it is important to take the first step. Well, it would be two steps for me because I have decide to build (2) of them.


I have bought the plans in beginning of August, however, along the way certain thing has changed. The result may not the same as the plan.


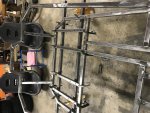
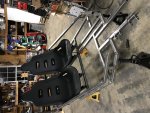
I would like to post my progress along the way, and document all the problems and or changes to my karts.

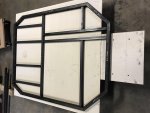
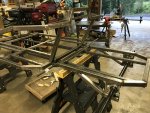
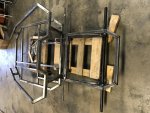
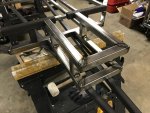
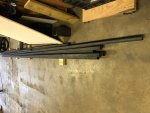
1-1/4 14 gauge steel tubings

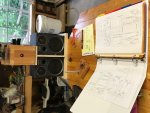
Finally get around to "DIYGK 2018 - Wrenches!" sign

Here is my inspiration, Off-Road Go Kart - how to build at (https://www.youtube.com/watch?v=mWtZgCz0CiE) by homesteadonomics. Thank you Sir,

Many thanks to other go-kart builders for insights into go-kart mysteries
 

Attachments

  • IMG_0193.jpg
    IMG_0193.jpg
    88.6 KB · Views: 35
  • IMG_0733.jpg
    IMG_0733.jpg
    167.4 KB · Views: 33

pa17315

Member
Messages
151
Reaction score
0
Office setup

Printed out the plans, organized different sections, redraw plans with dimensions,
 

Attachments

  • IMG_0194.jpg
    IMG_0194.jpg
    101.3 KB · Views: 43

pa17315

Member
Messages
151
Reaction score
0
First go kart frame

Layout for first go kart plan. the main frame was extended 8 inches
 

Attachments

  • IMG_0174.jpg
    IMG_0174.jpg
    266.8 KB · Views: 43

pa17315

Member
Messages
151
Reaction score
0
First go kart frame

Problem 1:

Seating spacing as per plan do not fit parts as ordered.

Suggestions:

Buy your seat sliders before you drill holes
 

Attachments

  • IMG_0188.jpg
    IMG_0188.jpg
    427.3 KB · Views: 28

pa17315

Member
Messages
151
Reaction score
0
First go kart frame

Main frame finished

The compound angles could be a major problem. Time and patience would definitely help here.
 

Attachments

  • IMG_0203.jpg
    IMG_0203.jpg
    355 KB · Views: 47

pa17315

Member
Messages
151
Reaction score
0
Engine frame

Engine mount framed out and weld. Engine supports will have to wait until I buy the engine.

I have build a jig to cut the 68 degree angle for engine frame.
 

Attachments

  • IMG_0213.jpg
    IMG_0213.jpg
    397.4 KB · Views: 51
  • IMG_0212.jpg
    IMG_0212.jpg
    429 KB · Views: 54
  • IMG_0208.jpg
    IMG_0208.jpg
    349.2 KB · Views: 48
  • IMG_0206.jpg
    IMG_0206.jpg
    349.3 KB · Views: 51
  • IMG_0204.jpg
    IMG_0204.jpg
    335.3 KB · Views: 54

pa17315

Member
Messages
151
Reaction score
0
Seat problems

Seats and seat sliders have arrived. One big problem, they do not fit, the spacings are wrong.

I have started to modify the seat sliders, but decided to put it off to work on front suspension block and A-Arms setup.

Wouldn't I know it, this is only the beginning. There will be more fun down the road.

Take it from me, get the seat and slider before drilling the holes on the main frame. As per plan dimensions, it will not work. you will need to widen the width of main frame at least 2 inches for the seats to fit side by side. I have learned that on the second go kart.
 

Attachments

  • IMG_0225.jpg
    IMG_0225.jpg
    263.6 KB · Views: 42

pa17315

Member
Messages
151
Reaction score
0
Front suspension block

I have read from previous builders that the front suspension block is too small so I have decided to increase the width and length to 8 inches by 14 inches.
 

Attachments

  • IMG_0232.jpg
    IMG_0232.jpg
    277.9 KB · Views: 52
  • IMG_0231.jpg
    IMG_0231.jpg
    389.4 KB · Views: 54
  • IMG_0230.jpg
    IMG_0230.jpg
    307.2 KB · Views: 49

pa17315

Member
Messages
151
Reaction score
0
A-Arms

I have dreaded this part but here it is. Temporary jig to cut exact length on the saw and jig to cut the odd 68 degree angle on the A-arms.
 

Attachments

  • IMG_0251.jpg
    IMG_0251.jpg
    316.7 KB · Views: 51
  • IMG_0250.jpg
    IMG_0250.jpg
    348.1 KB · Views: 51
  • IMG_0239.jpg
    IMG_0239.jpg
    314.3 KB · Views: 53
  • IMG_0235.jpg
    IMG_0235.jpg
    337.5 KB · Views: 50
  • IMG_0234.jpg
    IMG_0234.jpg
    270 KB · Views: 51

pa17315

Member
Messages
151
Reaction score
0
A-Arms cont.

Mock up and welded
 

Attachments

  • IMG_0253.jpg
    IMG_0253.jpg
    403.2 KB · Views: 46
  • IMG_0256.jpg
    IMG_0256.jpg
    385.2 KB · Views: 50
  • IMG_0278.jpg
    IMG_0278.jpg
    370.6 KB · Views: 57

pa17315

Member
Messages
151
Reaction score
0
A-Arms cont.

Word of caution:

On the A-arms set back, the offset of the top and bottom A-arms is 1/2 inch. Reduce that to 3/8 inch or the shock will touch or snag on the top a-arm.

The famous spindle brackets from BMI that people are freaking out are rearing their ugly head. To side step that problem, I have purchased a 5/8 inch rod and connect them together, clamp them down and then weld.


I have ordered 25 spindle bracket from BMI for two karts. One extra comes with a bend ear. BMI comes through when I contact them weeks later.


It is very hard to manage all the parts when you are working on one kart, and take notes, modify plans for second kart.


Two words I hate that come to love: G8**** it, and Sh3t
 

Attachments

  • IMG_0252.jpg
    IMG_0252.jpg
    321.7 KB · Views: 67
  • IMG_0274.jpg
    IMG_0274.jpg
    381.7 KB · Views: 68

pa17315

Member
Messages
151
Reaction score
0
Engine

I have been working on this too much, too long and too hard so it is time to focus on something else like engine.

Predator has come out with a 301cc and there aren't much info nor parts for it. The size on 301cc is smaller but not that much. There are tons of info and mod for the 420cc on youtube so I have selected the 420cc.

I keep telling myself, I won't modify the engine....I won't. I will mess up, taking it apart and then forgot one nuts when put it back together.
 

Attachments

  • IMG_0283.jpg
    IMG_0283.jpg
    312.2 KB · Views: 19
  • IMG_0282.jpg
    IMG_0282.jpg
    361.3 KB · Views: 15
  • IMG_0280.jpg
    IMG_0280.jpg
    390.7 KB · Views: 16
  • IMG_0279.jpg
    IMG_0279.jpg
    384.7 KB · Views: 21

pa17315

Member
Messages
151
Reaction score
0
Engine

New toy coming home.

Back to online for a crash course on predator 420cc


"I won't mod" I keep telling myself.

There is a dent on the cover plate but as long as it doesn't effect performance, it will be okay.
 

Attachments

  • IMG_0289.jpg
    IMG_0289.jpg
    356.5 KB · Views: 12
  • IMG_0287.jpg
    IMG_0287.jpg
    258.9 KB · Views: 13
  • IMG_0286.jpg
    IMG_0286.jpg
    374.3 KB · Views: 14
  • IMG_0285.jpg
    IMG_0285.jpg
    332.2 KB · Views: 15

pa17315

Member
Messages
151
Reaction score
0
Torque Converter

I bought Torque Converter from Ebay for 52 bucks for the 420cc engine. It doesn't fit.

Back to youtube again.

Here come the first mod.

Here is the part for oil cap sealer.
 

Attachments

  • IMG_0291.jpg
    IMG_0291.jpg
    195.8 KB · Views: 19
  • IMG_0294.jpg
    IMG_0294.jpg
    254.5 KB · Views: 19
  • IMG_0295.jpg
    IMG_0295.jpg
    306.6 KB · Views: 22
  • IMG_0301.jpg
    IMG_0301.jpg
    333.3 KB · Views: 19
  • IMG_0308.jpg
    IMG_0308.jpg
    278.9 KB · Views: 21

pa17315

Member
Messages
151
Reaction score
0
Engine frame

Added a support on engine frame to carry some live weight.
 

Attachments

  • IMG_0311.jpg
    IMG_0311.jpg
    365.6 KB · Views: 30
  • IMG_0310.jpg
    IMG_0310.jpg
    360.5 KB · Views: 30

landuse

Moderator
Staff member
Messages
18,626
Reaction score
220
Location
Pietermaritzburg, South Africa
This is turning out to be awesome!!! Nice work.

In my opinion though, there is absolutely no need to modify the engine. Its a 420 that has a lot of power. Why go potentially mess things up when you don't need to?

I think you have made a mistake buying that TC too. The 30 series is only rated for 8HP, so 13HP is beyond pushing the limits, especially with a large heavy kart. A 40 series TC is pretty much the only sane thing to use on this kart.

Have you thought how you want to gear this kart? What diameter tires are you looking at?
 

pa17315

Member
Messages
151
Reaction score
0
First go kart frame

Finally, the go kart has some wheels. It is being send to my brother' home to finish up while I am beginning to cut up steel for my own go kart.

I will post my brother go kart progress as it comes along.

As I adjust the original plan, I am going to make few addition changes and address the front end. As it looks right now, it looks like a boxer_the dog.

The tires as per spec from the plans. The 8 inch rim on the front is too tight for the spindle. It would rub.

My brother were looking to change out the tires to look more Buggy.
 

Attachments

  • IMG_0323.jpg
    IMG_0323.jpg
    405.8 KB · Views: 58

pa17315

Member
Messages
151
Reaction score
0
Second Go Kart Frame

I am starting the second go kart frame because I want to catch up the first go kart before I start to forget.

Here are some changes to the main frame:

The seats supporting steel were cut and drill out to match seat sliders spacing that we have bought.

Seat sliders was modified to match the seats

Front suspension block was integrated as part of main frame. On the first go kart frame, suspension block was created separate from the main frame and then weld onto the main frame. It is held together by the weld. It may be strong but we decided to add steel angle on either side.
 

Attachments

  • IMG_0328.jpg
    IMG_0328.jpg
    409.7 KB · Views: 38
  • IMG_0321.jpg
    IMG_0321.jpg
    341.2 KB · Views: 38
  • IMG_0322.jpg
    IMG_0322.jpg
    347.7 KB · Views: 41
  • IMG_0327.jpg
    IMG_0327.jpg
    352.2 KB · Views: 36
  • IMG_0331.jpg
    IMG_0331.jpg
    382 KB · Views: 35
  • IMG_0336.jpg
    IMG_0336.jpg
    390.4 KB · Views: 45
  • IMG_0335.jpg
    IMG_0335.jpg
    371.9 KB · Views: 34
  • IMG_0334.jpg
    IMG_0334.jpg
    384.5 KB · Views: 35
  • IMG_0337.jpg
    IMG_0337.jpg
    375.3 KB · Views: 43
Status
Not open for further replies.
Top